background image

2

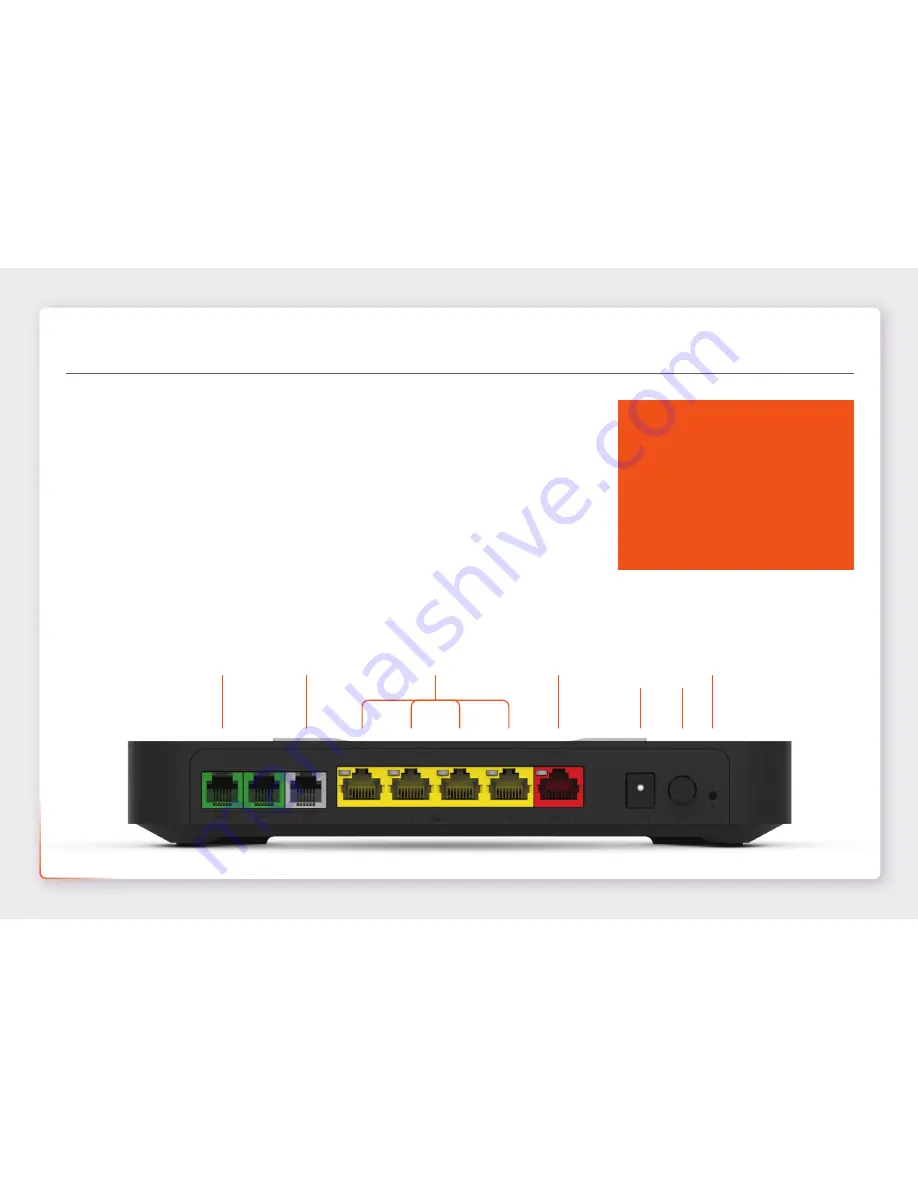
Plug in for NBN

 FTTC

1. 

Using the power cable supplied, connect the 

Power port

 on the back of your 

modem to your power outlet.

2. 

Using the Ethernet cable supplied, connect the red 

WAN

 port on the back of the 

modem to the yellow 

GATEWAY

 port on your NBN™ Connection Box.

3. 

If you wish to use your VoIP phone service, connect your phone handset to the 

Phone1 port

 on the back of your modem.

4. 

Using an additional Ethernet cable, you can connect your computer to any of the 4 

LAN ports

 on the back of your modem. Alternatively, follow the steps later in this 

guide to connect WiFi devices such as computers, tablets and smartphones.

DSL

LAN

WAN

Power

Port

Power

Button

Reset

Phone

Before you get started...

If you received a new NBN™ 

Connection Box along with your 

modem, please follow its setup 

guide to get it plugged in and 

turned on before you set up your 

modem.

Summary of Contents for TG-789

Page 1: ...TG 789 Broadband Gateway Quick Setup Guide for NBN Fibre to the Curb FTTC ...

Page 2: ...r phone handset to the Phone1 port on the back of your modem 4 Using an additional Ethernet cable you can connect your computer to any of the 4 LAN ports on the back of your modem Alternatively follow the steps later in this guide to connect WiFi devices such as computers tablets and smartphones DSL LAN WAN Power Port Power Button Reset Phone Before you get started If you received a new NBN Connec...

Page 3: ...BN FTTC Gateway Wall Socket Reset Power Power Socket Wall Socket Power Cables Phone Cable Ethernet Cable NBN Connection Box Ethernet Cable Plug into your computer s Ethernet Port Optional Phone Cable Handset Optional ...

Page 4: ...n if you have an active VoIP phone service and a handset connected to the modem See page 6 of this guide for more details Is the internet light off Ensure that you received an email from us advising that your NBN service is ACTIVE If you have please turn to page 7 to log in to your modem s interface and enter the settings manually If you haven t received the email your NBN connection is not ACTIVE...

Page 5: ...rk name on your modem s sticker 3 Enter the WiFi password wireless key exactly as printed on the sticker on the back of your modem Note You may notice there are two WiFi networks present You may connect to either of these however most devices will only be compatible with the 2 4GHz network See the sticker on your modem for more network details TG789vac v2 Wireless VoIP Smart Ultra Broadband Gatewa...

Page 6: ...ervice after setting up please use the contact details on the back cover of this guide to call our Support Team for assistance Porting your existing phone number to VoIP If you ve asked us to convert your existing phone number to a VoIP service please allow up to 2 business days after your NBN service is active for this porting process to complete We ll send you an email to confirm when your VoIP ...

Page 7: ... 5 Enter your credentials as provided in the email advising that your NBN service is active Username Your broadband username include internode on net Password Your broadband password Password Recovery internode on net getmypassword 6 Click Next After connecting successfully you may wish to customize your WiFi network and or GUI Login details by following the steps on the next page of this guide 7 ...

Page 8: ...visible to WiFi devices and you ll have to enter it manually to connect 4 The 2 4 5GHz SSID Broadcast names are the names of your WiFi networks You can change these to anything you d like 5 Security Key Type Security Mode should be set to WPA WPA2 PSK 6 Your 2 4 5GHz Security Keys Wireless passwords are the passwords for your WiFi networks Change these to something that s hard for others to guess ...

Page 9: ...u should write it down and keep it somewhere safe All done If you can t get online see the back cover of this guide to contact our friendly Support Team Tip If you ever forget your custom login details you can factory reset the modem to return it to the default settings However you will also lose all other custom settings so you ll need to set up your modem again TG789vac v2 Wireless VoIP Smart Ul...

Page 10: ... charged for the original equipment and if the original equipment has already been paid for you will not be entitled to a refund 1 4 The warranty does not apply to faults caused by any of the following Non Covered Events a any equipment not supplied by us b any interference with or modification to the equipment or a failure to use it in accordance with instructions or c damage caused by you or som...

Page 11: ...ernode Pty Ltd ABN 82 052 008 581 of 1 502 Hay Street Subiaco WA 6008 You can contact us on 1300 788 233 or via email to support internode com au if you have any questions regarding this warranty 1 11 Latest Warranty Information https www internode on net pdf legal cra internode warranty information statement pdf 2 Warranty Period Purchase 24 Months Rental For the lifetime of the Rental Contract 2...

Page 12: ...WPS Flashing orange WPS connection in progress Green Connection successful Red Connection failed Ethernet LAN Green Ethernet connection Flashing Connection Activity USB Green USB device connected Wireless button Turn WiFi broadcasting on off Phone VoIP Green NodePhone enabled Flashing Call in progress WAN Green DSL or WAN port connection Flashing Connection Activity Internet Green Internet connect...

Reviews: