


11
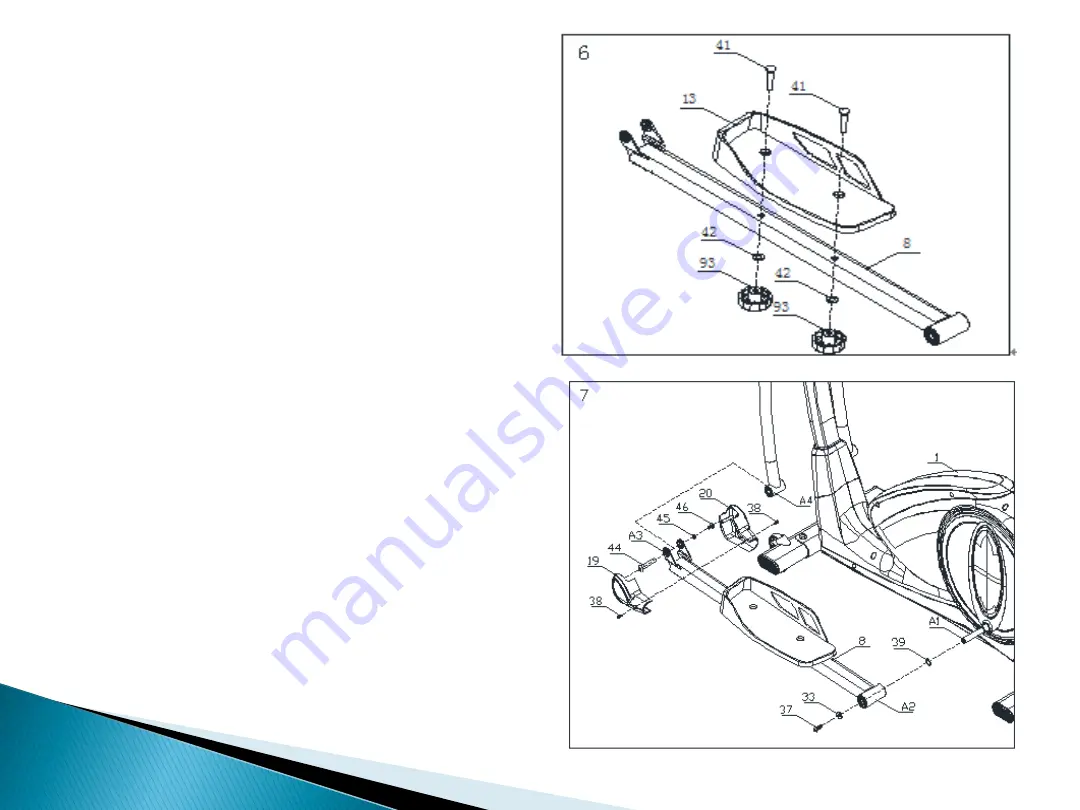
Step 6:
1. Attach the Pedal(L) 13 to the Pedal
supporter(L/R)(8),tighten with carriage screw(41),
Flat washer(42),and Hex locking nut(93).
2. Attach the Pedal(R)(14) to the Pedal
supporter(L/R)8) as the same way. Tip: Make sure
all screws are in the hexagonal hole before tighten
all the bolts.
Step 7
:
1. Attach the Wave spring washer(39) to the axle A1
of main frame(1),and attach the axle bushing A2 of
Pedal supporter(L/R)(80) to the axle A1, tighten
with the Flat washer (33) and Allen C.K.S. full
thread screw(37).
2. Attach the U shape plate A3 of Pedal
supporter(L/R)(8) to the axle bushing A4 of main
frame(1),tighten with Allen C.K.S. hollow screw(44),
Flat washer(45),and Allen C.K.S. full thread
screw(46).
3. Attach the Body Arm cover 1(19) and Body Arm
cover 2(20) to the Pedal supporter(L/R)(8),tighten
with Philips C.K.S. self-tapping screw(35).
4. Install right pedal supporter(14) with the same way.
Summary of Contents for E4.1
Page 1: ...E4 1 PROGRAMMABLE MAGNETIC ELLIPTICAL 1 ENGLISH MANUAL...
Page 14: ...14 Half drawing for assembly...
Page 17: ...17 Drawing for assembly...
Page 18: ...18...
Page 33: ...33 4 1 GREEK MANUAL...
Page 34: ...34 1 2 3 4 5 0 5 6 7 8 9 10 EN957 H C 130 11 12 13...
Page 35: ...35 ALLEN 5x80x80S 1 ALLEN 5X35X85S 1 ALLEN 6X40X120 1 15 17 1 1...
Page 37: ...37 E4 1 1300x530x1600mm 8 6kg 32 330 175MM...
Page 38: ...38 1 2 1 33 grover 32 31 2 3 1 33 grover 32 31...
Page 40: ...40 4 2 39 15 5 15 33 37 5 1 L 6 5 35 40 36 2 17 18 L 6 38...
Page 42: ...42 8 1 28 4 9 4 T 21 2 10 4 47...
Page 43: ...43 9 1 25 30 2 28 29 11 10 4 49 3 L 22 R 23 9 4 4 48 9 11 100 mm...
Page 44: ...44...
Page 47: ...47...
Page 48: ...48...
Page 54: ...54 LCD 2 1 1...
Page 55: ...55 UP DOWN Manual 2 Beginner 3 Advance 4 Sporty 5 Cardio 6 Watt 7 2 3 4 5 6 7...


