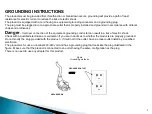
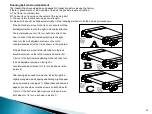
background image

9

GETTING STARTED

NOTES: 
1

. Check to make sure nothing is on or will hinder the movement of the treadmill. 

2

. Plug in the power cord and turn the treadmill ON

.

3. 

Stand on the foot rails of the treadmill.

4. 

Attach the safety key clip to part of your clothing.

5. 

Put the safety key into the safety key hole in the console, and then the treadmill will be on start/ready status.

6. 

You have two options to start your workout:

A.QUICK START

Simply press the START button to begin working out.

B.SELECT A PROGRAM

Select manual program by pressing MODE button or pressing PROGRAM buttons to enter manual program, 8 training 
goals or 3 user programs.

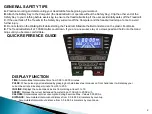
QUICK-START OPERATION
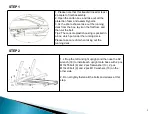
STEP 1:

Attach the Safety key to wake display up; the treadmill then will be on start/ready status.

STEP 2

: Press the START button to begin belt movement after count-down. Use the SPEED +/- or QUICK SPEED buttons 

to adjust the desired speed at any time during training; use the I/- or QUICK INCLINE buttons to adjust the 
incline at any time during training. 
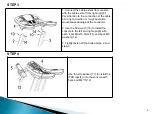
STEP 3: 

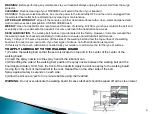
To get a pulse reading, simply grasp stainless steel pick-ups on handrails. It may take a few seconds for the 

display to reach the actual number. The pulse rate will be displayed on PULSE window.

STEP 4:

During quick-start operation, TIME, CALORIE and DISTANCE will count up.

Summary of Contents for ENERGETICS PR 11.0

Page 1: ...1 ENERGETICS PR 11 0 ENGLISH MANUAL...

Page 2: ...oduct by the supply cord or use the cord as a handle 6 Keep the cord away from hot surfaces or ground 7 Never operate the product with the air vents blocked Keep the air vents free of lint hair etc 8...

Page 3: ...d ordinances Danger Improper connection of the equipment grounding conductor can result in a risk of electric shock Check with a qualified electrician or serviceman if you are in doubt as to whether t...

Page 4: ...1 11 Screw M5 12 4 2 Left upright 1 12 Screw M4 15 4 3 Right upright 1 13 Flat washer M10 6 4 Console 1 14 Flat washer M8 4 5 IPAD rack 1 15 Safety key 1 6 Base cover Right 1 16 Silicon oil 1 7 Base c...

Page 5: ...hen cut the belt Tips The console plastic housing is packed in a box which put under the running deck Please take care of it when taking out the running deck STEP 1 STEP 2 1 Lift up the left and right...

Page 6: ...wrong connection or rough operation would cause damage of the connector 2 Use the 5 wrench 19 to install the console to the left and right upright with each 4 pcs M8x15 bolts 10 and 4pcs M8 washers 14...

Page 7: ...e cover 6 to the left upright with 2 pcs M5x12 bolts 10 Do the same for right base cover 7 STEP 5 NOTE For your safety and comfort please check if all screws are fastened Congratulation A brand new mo...

Page 8: ...The Treadmill will start at 1 0KM H after countdown If you are a new user stay at a slow speed and hold onto the Hand Grips until you become comfortable QUICK REFERENCE GUIDE DISPLAY FUNCTION TIME Acc...

Page 9: ...on or pressing PROGRAM buttons to enter manual program 8 training goals or 3 user programs QUICK START OPERATION STEP 1 Attach the Safety key to wake display up the treadmill then will be on start rea...

Page 10: ...t down the computer PRESET PROGRAMS OPERATION NOTES All the preset programs are made up with 18 time based segments the speed and incline are preset on each segment The elapse time of 18 segments on e...

Page 11: ...USING THE AUDIO FUNCTION As the figure shows plug one end of the audio cable to the audio jack on computer and then plug the other end of the audio cable to MP3 player The speaker on the computer wil...

Page 12: ...le of your training Download on your smartphone or tablet the app I Console via Google Play for Android and via APP Store for IOS or by using the QR code below 1 Log in to the iConsole application and...

Page 13: ...th other users of the Kinomap APP or you can also train by yourself and try to compete and surpass your own previous performances Search download install Kinomap over Apple Store or Google Play depend...

Page 14: ...ions provided STEP 1 Press PROGRAM button repeatedly on the 12 time pressing PROGRAM button the TIME window will display FAT Press MODE button to set the relative parameters GENDER AGE HEIGHT and WEIG...

Page 15: ...2 3 4 5 6 7 8 9 10 11 12 13 14 15 16 17 18 Level 1 SPEED KM H 1 2 2 3 3 3 4 5 6 6 7 6 5 4 4 3 2 2 Level 2 SPEED KM H 1 2 2 3 4 4 5 6 8 8 10 8 8 5 5 3 2 2 Level 3 SPEED KM H 1 2 3 4 5 5 6 8 9 10 12 10...

Page 16: ...3 5 7 8 9 10 11 12 12 13 13 12 12 10 9 7 5 3 SPEED KM H 2 4 6 7 8 9 10 11 11 12 12 11 11 9 8 6 4 2 Level 7 ELEVATION 4 6 8 9 10 11 12 13 13 14 14 13 13 11 10 8 6 4 SPEED KM H 3 5 7 8 9 10 11 12 12 13...

Page 17: ...2 3 4 5 7 8 9 10 10 10 10 9 9 7 6 4 3 2 SPEED KM H 3 5 7 8 10 11 12 13 13 13 13 12 12 10 9 7 5 3 Level 7 ELEVATION 2 3 5 6 8 9 10 11 11 11 11 10 10 8 7 5 3 2 SPEED KM H 4 6 8 9 11 12 13 14 14 14 14 1...

Page 18: ...0 1 1 2 2 3 3 4 4 5 6 7 8 7 6 4 2 0 SPEED KM H 1 1 2 2 3 3 3 4 4 4 3 3 3 2 2 2 1 1 Level 2 ELEVATION 0 1 2 2 3 3 4 4 5 6 7 8 9 8 6 4 2 0 SPEED KM H 1 1 2 2 3 3 3 4 4 4 3 3 3 2 2 2 1 1 Level 3 ELEVATIO...

Page 19: ...8 10 10 12 10 8 6 4 2 Level 4 ELEVATION 0 1 1 2 2 3 3 4 4 4 5 5 6 7 6 5 3 2 SPEED KM H 2 2 4 4 6 6 8 8 8 10 10 10 12 12 10 7 5 3 Level 5 ELEVATION 1 1 2 2 3 3 4 4 5 5 6 6 7 8 7 6 3 2 SPEED KM H 2 4 6...

Page 20: ...ing pole as the right figure shows 2 If you want to put the treadmill to the work position Firstly pull the folding knob outward as figure shows And then lay down the running deck light onto floor HOW...

Page 21: ...re optimal treadmill performance Every 10 days or 10 hours of operation lift the sides of the walking belt and feel the top surface of the walking board as far under as you can reach If you feel signs...

Page 22: ...urn each time and check how it works If the belt remains slanting to the right then turn the belt adjustment screw on the left in counterclockwise direction 1 4 as shown in the picture A If the belt t...

Page 23: ...23...

Page 24: ...LT M5 12 17 67 BASE FOOT PAD 4 26 SCREWS M4 15 2 68 BASE CUSHION 2 27 SCREWS M4 12 5 69 MOVING WHEEL 2 28 SCREWS M4 15 2 70 FRAME WHEEL 2 29 SCREWS M4 12 23 71 INCLINE MOVING WHEEL 2 30 SCREWS M4 15 5...

Page 25: ...25 ENERGETICS PR 11 0 GREEK MANUAL...

Page 26: ...26 1 1 2 3 M 50 150 4 service 5 6 7 8 9 10 aerosol spray 11 off 12 13 14 15 2 x 1 16 17 0 18 19...

Page 27: ...27 16 AMPERE AMP 220 240 volt...

Page 28: ...28 No N o 1 1 10 M8x15 4 2 1 11 5x12 4 3 1 12 4x15 5 4 1 13 10 6 5 1 14 8 4 6 1 15 1 7 2 16 1 8 M10x55 2 17 1 9 M10x20 4 18 ALLEN 6 1 19 ALLEN 5 1...

Page 29: ...29 1 2 2 3 1 2 1 2 3 1 allen 6 18 1 M10x55 8 2 10x20 9 3 M10 13 2...

Page 30: ...30 3 4 17 5 4 5 M4x15 12 1 3 4 2 allen5 19 4 2 3 4 M8x15 10 4 M8 14 3 2 3...

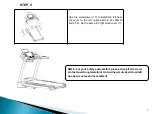
Page 31: ...31 17 6 2 M5x12 11 7 STEP 5...

Page 32: ...32 clip start 3 2 1 0 1 0 0 00 99 00 50 200 1 0 20 0 990 0 99 9 0 99 9 1 15...

Page 33: ...33 1 2 3 4 clip 5 6 7 STOP START 5 STOP 8 A QUICK START START B SELECT A PROGRAM MODE PROGRAM 8 3 user START 1 2 START 5 SPEED INCLINE 3 PULSE 4 STOP STOP START 5...

Page 34: ...30 00 SPEED 8 00 99 00 SPEED MODE 1 0 SPEED 1 0 99 0 SPEED MODE 20 SPEED 20kcal 990kcal 3 START 4 4 SPEED INCLINE 5 STOP STOP START 4 STOP 8 8 8 1 2 PROGRAM BODY FAT PROGRAM speed 30 00 8 00 99 00 3 S...

Page 35: ...35 MP3 USB USB Pulse 1 2 Pulse 3 MP3 PLAYER...

Page 36: ...ooth ok RUN MUSIC 2 i Console smart phone tablet I Console Google Play Android APP Store IOS Scan QR code iConsole Android 5 0 OS 11 0 iPhone iPad and iPod touch 1 iConsole GET STARTED 2 iConsole o 3...

Page 37: ...t phone tablet Kinomap Google Play Android APP Store IOS inomap Kinomap KINOMAP Android 5 0 OS 9 0 iPhone iPad and iPod touch Kinomap Apple Store IOS Google Play android 1 Kinomap 2 3 4 I Console 5 iC...

Page 38: ...FAT MODE 2 SPEED F1 PULSE 1 SPEED 1 2 1 2 MODE 3 MODE SPEED F 2 PULSE 25 SPEED 1 99 MODE 4 MODE SPEED F 3 PULSE 170 SPEED 100CM 199CM MODE 5 MODE SPEED F 4 PULSE 70 SPEED 20kg 150kg MODE 6 MODE SPEED...

Page 39: ...5 6 8 8 10 8 8 5 5 3 2 2 Level 3 SPEED KM H 1 2 3 4 5 5 6 8 9 10 12 10 8 7 6 4 3 2 Level 4 SPEED KM H 1 2 3 4 6 7 8 10 11 12 13 11 10 8 7 5 4 2 Level 5 SPEED KM H 2 3 4 5 7 7 8 10 12 14 14 13 12 10 9...

Page 40: ...3 5 7 8 9 10 11 12 12 13 13 12 12 10 9 7 5 3 SPEED KM H 2 4 6 7 8 9 10 11 11 12 12 11 11 9 8 6 4 2 Level 7 ELEVATION 4 6 8 9 10 11 12 13 13 14 14 13 13 11 10 8 6 4 SPEED KM H 3 5 7 8 9 10 11 12 12 13...

Page 41: ...2 3 4 5 7 8 9 10 10 10 10 9 9 7 6 4 3 2 SPEED KM H 3 5 7 8 10 11 12 13 13 13 13 12 12 10 9 7 5 3 Level 7 ELEVATION 2 3 5 6 8 9 10 11 11 11 11 10 10 8 7 5 3 2 SPEED KM H 4 6 8 9 11 12 13 14 14 14 14 1...

Page 42: ...0 1 1 2 2 3 3 4 4 5 6 7 8 7 6 4 2 0 SPEED KM H 1 1 2 2 3 3 3 4 4 4 3 3 3 2 2 2 1 1 Level 2 ELEVATION 0 1 2 2 3 3 4 4 5 6 7 8 9 8 6 4 2 0 SPEED KM H 1 1 2 2 3 3 3 4 4 4 3 3 3 2 2 2 1 1 Level 3 ELEVATIO...

Page 43: ...8 10 10 12 10 8 6 4 2 Level 4 ELEVATION 0 1 1 2 2 3 3 4 4 4 5 5 6 7 6 5 3 2 SPEED KM H 2 2 4 4 6 6 8 8 8 10 10 10 12 12 10 7 5 3 Level 5 ELEVATION 1 1 2 2 3 3 4 4 5 5 6 6 7 8 7 6 3 2 SPEED KM H 2 4 6...

Page 44: ...44 1 2 3 4 1 2 2 1 2 3 3 30 40...

Page 45: ...45 1 2 6 4 3 3km 5 1 15 3 service 18 24...

Page 46: ...46 Allen 1 2 3 4 4 km h 5 2 Allen...

Page 47: ...47...

Page 48: ...REWS M4 15 2 68 BASE CUSHION 2 27 SCREWS M4 12 5 69 MOVING WHEEL 2 28 SCREWS M4 15 2 70 FRAME WHEEL 2 29 SCREWS M4 12 23 71 INCLINE MOVING WHEEL 2 30 SCREWS M4 15 5 72 AIR CUSHION 4 31 SCREWS M4 25 2...

Page 49: ...INTERSPORT ATHLETICS SA 18 20 SOROU 15125 MAROUSI GREECE 302102806019 49 2 1 14 1 14 2 14 CE Service...

Page 50: ...50 ENERGETICS PR 11 0 ROMANIAN MANUAL...

Page 51: ...ctric i nu folosi i cablul ca m ner 8 ine i cablul la distan de suprafe e nc lzite sau de praf 9 Nu utiliza i niciodat produsul cu orificiile de ventila ie blocate P stra i deschiderile de aer libere...

Page 52: ...te cu toate codurile i dispozi iile locale PERICOL Conectarea necorespunz toare a conductorului de mp m ntare a echipamentului poate constitui un pericol de electrocutare Dac ave i ndoieli n privin a...

Page 53: ...1 Main Frame 1 11 Screw M5 12 4 2 Left upright 1 12 Screw M4 15 4 3 Right upright 1 13 Flat washer M10 6 4 Console 1 14 Flat washer M8 4 5 IPAD rack 1 15 Safety key 1 6 Base cover Right 1 16 Silicon o...

Page 54: ...l acestui pas 1 V rug m s re ine i c pentru asamblarea benzii de alergare sunt necesare cel pu in 2 persoane 2 Deschide i cutia i scoate i toate materialele spumoase i alte accesorii 3 A a cum este il...

Page 55: ...relungirea cablului de la consol 4 Aten ie la felul n care face i leg tura o manevr gre it poate provoca probleme de conexiune a cablului 2 Dup cum arat imaginea folosi i cheia allen 5 9 pentru a mont...

Page 56: ...i 6 deasupra st lpului de sprijin st ng cu dou uruburi M5x12 11 Face i acela i lucru cu capacul drept al bazei 7 PASUL 5 NOT Pentru siguran a i confortul dumneavoastr dup ce a i finalizat asamblarea v...

Page 57: ...orne te num r toarea invers 3 2 1 0 i ncepe s func ioneze la o vitez redus de 1 0 km or Dac sunte i ncep tor p n s v obi nui i r m ne i la o vitez mic i ine i v ferm de m nere INSTRUC IUNI DE UTILIZAR...

Page 58: ...e 8 de programe presetate i apoi ap sa i START FUNC IA DE PORNIRE RAPID PASUL 1 Conecta i cheia de siguran la consol i banda de alergare se va afla n modul de a teptare pentru a porni PASUL 2 Ap sa i...

Page 59: ...l STOP sau trage i cheia de siguran din pozi ie i banda de alergare se va opri imediat Ap sa i pe butonul STOP i programul se va opri imediat Dac dori i s continua i ap sa i pe butonul START i banda d...

Page 60: ...s se bazeze pe estim rile furnizate UTILIZAREA FUNC IEI DE SUNET A a cum arata i schi a conecta i un cap t al cablului la mufa audio de la consol i cel lalt cap t la boxele consolei pentru a asculta m...

Page 61: ...e pe smartphone sau tablet aplica ia I Console de pe Google Play pentru Android i APP Store pentru IOS sau folosind urm torul cod Scan QR Este compatibil cu aplica ia Kinomap este necesar abonarea Des...

Page 62: ...EED va apare num rul F2 pe afi ajul PULSE va apare num rul 25 care reprezint v rsta ap sa i pe butonul SPEED pentru a seta v rsta 1 99 Ap sa i apoi pe butonul MODE pentru a trece la pasul urm tor PASU...

Page 63: ...19 BMI 25 Subponderal BMI 19 SPEED CHANGES 1 2 3 4 5 6 7 8 9 10 11 12 13 14 15 16 17 18 Level 1 SPEED KM H 1 2 2 3 3 3 4 5 6 6 7 6 5 4 4 3 2 2 Level 2 SPEED KM H 1 2 2 3 4 4 5 6 8 8 10 8 8 5 5 3 2 2...

Page 64: ...3 5 7 8 9 10 11 12 12 13 13 12 12 10 9 7 5 3 SPEED KM H 2 4 6 7 8 9 10 11 11 12 12 11 11 9 8 6 4 2 Level 7 ELEVATION 4 6 8 9 10 11 12 13 13 14 14 13 13 11 10 8 6 4 SPEED KM H 3 5 7 8 9 10 11 12 12 13...

Page 65: ...2 3 4 5 7 8 9 10 10 10 10 9 9 7 6 4 3 2 SPEED KM H 3 5 7 8 10 11 12 13 13 13 13 12 12 10 9 7 5 3 Level 7 ELEVATION 2 3 5 6 8 9 10 11 11 11 11 10 10 8 7 5 3 2 SPEED KM H 4 6 8 9 11 12 13 14 14 14 14 1...

Page 66: ...0 1 1 2 2 3 3 4 4 5 6 7 8 7 6 4 2 0 SPEED KM H 1 1 2 2 3 3 3 4 4 4 3 3 3 2 2 2 1 1 Level 2 ELEVATION 0 1 2 2 3 3 4 4 5 6 7 8 9 8 6 4 2 0 SPEED KM H 1 1 2 2 3 3 3 4 4 4 3 3 3 2 2 2 1 1 Level 3 ELEVATIO...

Page 67: ...8 10 10 12 10 8 6 4 2 Level 4 ELEVATION 0 1 1 2 2 3 3 4 4 4 5 5 6 7 6 5 3 2 SPEED KM H 2 2 4 4 6 6 8 8 8 10 10 10 12 12 10 7 5 3 Level 5 ELEVATION 1 1 2 2 3 3 4 4 5 5 6 6 7 8 7 6 3 2 SPEED KM H 2 4 6...

Page 68: ...nzii de alergare f r obstacole pentru buna func ionare i amplasare a acesteia n spa iul dvs 2 Apoi in nd ambele m ini pe scheletul de baz al benzii de alergare atinge i cu piciorul amortizorul de spri...

Page 69: ...eriorul ambalajului Dup 15 ore de folosire zilnic a benzii de alergare sau dup dou luni n cazul n care nu este folosit zilnic mai nt i cur a i cu o bucat de p nz urmele de lubrifiant vechi apoi folosi...

Page 70: ...a excesiv a covorului rulant 4 Pune i banda de alergare n func ie Regla i covorul rulant n timp ce banda de alergare func ioneaz 4 km h f r ca cineva s se afle pe covorul rulant Dup reglare folosi i b...

Page 71: ...71...

Page 72: ...REWS M4 15 2 68 BASE CUSHION 2 27 SCREWS M4 12 5 69 MOVING WHEEL 2 28 SCREWS M4 15 2 70 FRAME WHEEL 2 29 SCREWS M4 12 23 71 INCLINE MOVING WHEEL 2 30 SCREWS M4 15 5 72 AIR CUSHION 4 31 SCREWS M4 25 2...

Page 73: ...r rii Dispozitivul va fi transportat de client la transportator Costurile de transport de la transportator la Service i viceversa vor fi suportate de societate n cazul n care se datoreaz unei defec i...

Page 74: ...74 ENERGETICS PR 11 0 BULGARIAN MANUAL...

Page 75: ...75 1 1 2 3 50 150 4 5 6 7 8 9 10 11 off 12 13 14 15 2 1 16 17 0 18 19...

Page 76: ...76 16 AMPERE AMP 220 240 W...

Page 77: ...3 Right upright 1 13 Flat washer M10 6 4 Console 1 14 Flat washer M8 4 5 IPAD rack 1 15 Safety key 1 6 Base cover Right 1 16 Silicon oil 1 7 Base cover Left 1 17 Screw Driver 1 8 Bolt M10 55 2 18 Alle...

Page 78: ...78 1 2 3 1 2 1 2 3 1 allen 6 18 1 M10x55 8 2 M10x20 9 3 M10 13 2...

Page 79: ...79 3 4 1 3 4 2 allen5 19 4 2 3 4 M8x15 10 4 M8 14 3 2 3 17 5 4 5 M4x15 12...

Page 80: ...80 17 6 2 M5x12 11 7 5...

Page 81: ...81 clip start 3 2 1 0 1 0 0 00 99 00 50 200 1 0 20 0 990 0 99 9 0 99 9 1 15...

Page 82: ...82 1 2 3 4 5 6 7 STOP START 5 STOP 8 QUICK START START SELECT A PROGRAM MODE PROGRAM 8 START QUICK START 1 2 START 5 SPEED SPEED 3 PULSE 4 STOP STOP START 5 QUICK START...

Page 83: ...00 SPEED 8 00 99 00 SPEED MODE 1 0 SPEED 1 0 99 0 SPEED MODE 20 SPEED 20 kcal 990 kcal 3 START 4 4 SPEED INCLINE 5 STOP STOP START 4 STOP 8 8 8 1 2 PROGRAM BODY FAT PROGRAM speed 30 00 8 00 99 00 3 S...

Page 84: ...84 PULSE 1 2 PULSE 5 3 MP3 PLAYER MP3 USB USB...

Page 85: ...85 SMART 1 Bluetooth ok RUN MUSIC 2 i Console smart phone I Console Google Play Android APP Store IOS Scan QR Kinomap Kinomap Google Play Android APP Store IOS Kinomap Kinomap...

Page 86: ...E FAT MODE 2 SPEED F1 PULSE 1 SPEED 1 2 1 2 MODE 3 MODE SPEED F 2 PULSE 25 SPEED 1 99 MODE 4 MODE SPEED F3 PULSE 170 SPEED 100CM 199CM MODE 5 MODE SPEED F4 PULSE 70 SPEED 20kg 150kg MODE 6 MODE SPEED...

Page 87: ...5 6 8 8 10 8 8 5 5 3 2 2 Level 3 SPEED KM H 1 2 3 4 5 5 6 8 9 10 12 10 8 7 6 4 3 2 Level 4 SPEED KM H 1 2 3 4 6 7 8 10 11 12 13 11 10 8 7 5 4 2 Level 5 SPEED KM H 2 3 4 5 7 7 8 10 12 14 14 13 12 10 9...

Page 88: ...3 5 7 8 9 10 11 12 12 13 13 12 12 10 9 7 5 3 SPEED KM H 2 4 6 7 8 9 10 11 11 12 12 11 11 9 8 6 4 2 Level 7 ELEVATION 4 6 8 9 10 11 12 13 13 14 14 13 13 11 10 8 6 4 SPEED KM H 3 5 7 8 9 10 11 12 12 13...

Page 89: ...2 3 4 5 7 8 9 10 10 10 10 9 9 7 6 4 3 2 SPEED KM H 3 5 7 8 10 11 12 13 13 13 13 12 12 10 9 7 5 3 Level 7 ELEVATION 2 3 5 6 8 9 10 11 11 11 11 10 10 8 7 5 3 2 SPEED KM H 4 6 8 9 11 12 13 14 14 14 14 1...

Page 90: ...0 1 1 2 2 3 3 4 4 5 6 7 8 7 6 4 2 0 SPEED KM H 1 1 2 2 3 3 3 4 4 4 3 3 3 2 2 2 1 1 Level 2 ELEVATION 0 1 2 2 3 3 4 4 5 6 7 8 9 8 6 4 2 0 SPEED KM H 1 1 2 2 3 3 3 4 4 4 3 3 3 2 2 2 1 1 Level 3 ELEVATIO...

Page 91: ...8 10 10 12 10 8 6 4 2 Level 4 ELEVATION 0 1 1 2 2 3 3 4 4 4 5 5 6 7 6 5 3 2 SPEED KM H 2 2 4 4 6 6 8 8 8 10 10 10 12 12 10 7 5 3 Level 5 ELEVATION 1 1 2 2 3 3 4 4 5 5 6 6 7 8 7 6 3 2 SPEED KM H 2 4 6...

Page 92: ...92 1 2 3 4 1 2 1 2 3 30 40...

Page 93: ...93 1 2 6 4 3 3 5 1 15 3 18 24...

Page 94: ...94 Allen 1 2 3 4 4 5 Allen...

Page 95: ...95...

Page 96: ...REWS M4 15 2 68 BASE CUSHION 2 27 SCREWS M4 12 5 69 MOVING WHEEL 2 28 SCREWS M4 15 2 70 FRAME WHEEL 2 29 SCREWS M4 12 23 71 INCLINE MOVING WHEEL 2 30 SCREWS M4 15 5 72 AIR CUSHION 4 31 SCREWS M4 25 2...

Page 97: ...97 2 1 2 14 1 14 2 14 CE INTERSPORT Genco Bulgaria Ltd 1797 216 359 2 439 31 81 www intersport bg http www intersport bg bg company contact...

Page 98: ...98 ENERGETICS PR 11 0 TURKISH MANUAL...

Page 99: ...lmas na ve toz sa vb ekilde t kanmamas na dikkat edin 7 Hava deliklerini i ine bir ey atmay n 8 Cihaz d alanlarda kullanmay n ve depolamay n 9 Cihaz sprey b cek sinek vb ila lar p sk rt lm yerlerde ku...

Page 100: ...n 16 AMPER AMP ak m iddetinde uygun prize ba lanmas gerekmektedir TEHL KE Ekipman topraklamas n n yanl ba lanmas elektrik arpmas riskini ortaya karabilir Cihaz n do ru ekilde toprakland ndan emin de i...

Page 101: ...5 12 4 2 Left upright 1 12 Screw M4 15 4 3 Right upright 1 13 Flat washer M10 6 4 Console 1 14 Flat washer M8 4 5 IPAD rack 1 15 Safety key 1 6 Base cover Right 1 16 Silicon oil 1 7 Base cover Left 1...

Page 102: ...z n konsolu ayr bir koliye paketlenmi halde bant taban n n alt nda bulunmaktad r L tfen bant taban n n ambalaj n a arken dikkat ediniz A AMA 1 A AMA 2 1 Sol dikmeyi 2 ve sa dikmeyi 3 kald r n ana asiy...

Page 103: ...t kablo birle me yerinde ar zaya neden olabilir 2 ekilde g sterildi i zere konsolu 4 sol 2 sa 3 dikmenin zerine yerle tirmek i in alyen 5 19 anahtar n ve 4 adet M8x15 10 c vata 4 adet M8 14 rondela ku...

Page 104: ...eye sabitlemek i in tornavida 17 ve 2 adet M5x12 11 c vata kullan n Ayn s n sa koruyucu kapak i in de uygulay n A AMA 5 NOT G venli iniz ve komforunuz i in montaj tamamlad ktan sonra vidalar do ru eki...

Page 105: ...rlerinde durunuz E Start d mesine bas ld nda ko u band 3 2 1 0 eklinde geri say m ger ekle tirir ve 1 0 km saat h zla d k h zda al maya ba lar Ko u band kullan m nda tecr beniz yoksa al ncaya kadar d...

Page 106: ...ile ayarlanm 64 haz r programdan birini se in ve ard ndan START a bas n ALI MA HIZLI BA LANGI ADIM 1 G venlik anahtar n bilgisayara ba lay n Ko u band bekleme modundad r ADIM 2 START tu una bas n 5 s...

Page 107: ...ar nda yer alan d melerden de ayarlanabilir ADIM 5 Antrenman n z sonland rmak STOP tu una bas n veya panodan g venlik anahtar n ekin Ko u band derhal duracakt r STOP tu una bas n ve program derhal dur...

Page 108: ...di i zere kablonun bir ucunu bilgisayar n ses giri ine di er ucunu ise m zik oynat c cihaz n za ba lad n zda bilgisayar n hoparl rlerinden m zik sesi gelmeye ba layacakt r Not Ses seviyesi sadece m zi...

Page 109: ...mektedir Android i in Google Play den ve IOS i in APP Store dan I Console uygulamas n ak ll telefonunuza veya tabletinize indirin Kinomap uygulamas ile uyumludur abone olman gereklidir Kinomap uygulam...

Page 110: ...ktan sonra SPEED penceresinde F2 g r n r PULSE penceresinde ise 25 g r n r ve ya temsil eder SPEED tu una basarak 1 99 aras nda ya n z ayarlay n z Ard ndan bir sonraki ad ma ge mek i im MODE tu una b...

Page 111: ...ES 1 2 3 4 5 6 7 8 9 10 11 12 13 14 15 16 17 18 Level 1 SPEED KM H 1 2 2 3 3 3 4 5 6 6 7 6 5 4 4 3 2 2 Level 2 SPEED KM H 1 2 2 3 4 4 5 6 8 8 10 8 8 5 5 3 2 2 Level 3 SPEED KM H 1 2 3 4 5 5 6 8 9 10 1...

Page 112: ...N 3 5 7 8 9 10 11 12 12 13 13 12 12 10 9 7 5 3 SPEED KM H 2 4 6 7 8 9 10 11 11 12 12 11 11 9 8 6 4 2 Level 7 ELEVATION 4 6 8 9 10 11 12 13 13 14 14 13 13 11 10 8 6 4 SPEED KM H 3 5 7 8 9 10 11 12 12 1...

Page 113: ...N 2 3 4 5 7 8 9 10 10 10 10 9 9 7 6 4 3 2 SPEED KM H 3 5 7 8 10 11 12 13 13 13 13 12 12 10 9 7 5 3 Level 7 ELEVATION 2 3 5 6 8 9 10 11 11 11 11 10 10 8 7 5 3 2 SPEED KM H 4 6 8 9 11 12 13 14 14 14 14...

Page 114: ...0 1 1 2 2 3 3 4 4 5 6 7 8 7 6 4 2 0 SPEED KM H 1 1 2 2 3 3 3 4 4 4 3 3 3 2 2 2 1 1 Level 2 ELEVATION 0 1 2 2 3 3 4 4 5 6 7 8 9 8 6 4 2 0 SPEED KM H 1 1 2 2 3 3 3 4 4 4 3 3 3 2 2 2 1 1 Level 3 ELEVATI...

Page 115: ...8 10 10 12 10 8 6 4 2 Level 4 ELEVATION 0 1 1 2 2 3 3 4 4 4 5 5 6 7 6 5 3 2 SPEED KM H 2 2 4 4 6 6 8 8 8 10 10 10 12 12 10 7 5 3 Level 5 ELEVATION 1 1 2 2 3 3 4 4 5 5 6 6 7 8 7 6 3 2 SPEED KM H 2 4 6...

Page 116: ...mesi i in cihaz n evresinde bir metre kadar bo luk b rakarak alanda engelleyecek cisimler olmamas na dikkat ediniz 2 Sonra cihaz iki elinizle bant taban ndan tutarak emniyetinin a lmas amac yla aya n...

Page 117: ...monte edildi inde kullan lmadan nce montaj seti i inde yer alan silikon bazl a r ya ile taban n ya lanmas ok nemlidir Ko u band n n 20 saat seri veya iki ay kullan m ndan sonra taban n sadece spor ale...

Page 118: ...ir taraf s karken di er taraf gev etiniz 4 Cihaz al t r n Ko u band n n zerinde kimse olmadan saatte 4 km h h z ile al t rarak ayar n yap n z Ayar n z yapt ktan sonra kontrol etmek i in ko u band n n...

Page 119: ...119...

Page 120: ...CREWS M4 15 2 68 BASE CUSHION 2 27 SCREWS M4 12 5 69 MOVING WHEEL 2 28 SCREWS M4 15 2 70 FRAME WHEEL 2 29 SCREWS M4 12 23 71 INCLINE MOVING WHEEL 2 30 SCREWS M4 15 5 72 AIR CUSHION 4 31 SCREWS M4 25 2...

Page 121: ...Gerek yedek par a eksikli i gerekse onar mda ya anan gecikmeyle ilgili olarak m teri hi bir tazminat talebinde bulunamaz GARANT GE ERL DE LD R Elektrik hatlar n n a r y klenmesinde veya dalgalanmas n...

Reviews: