


15
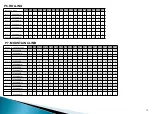
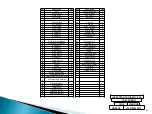
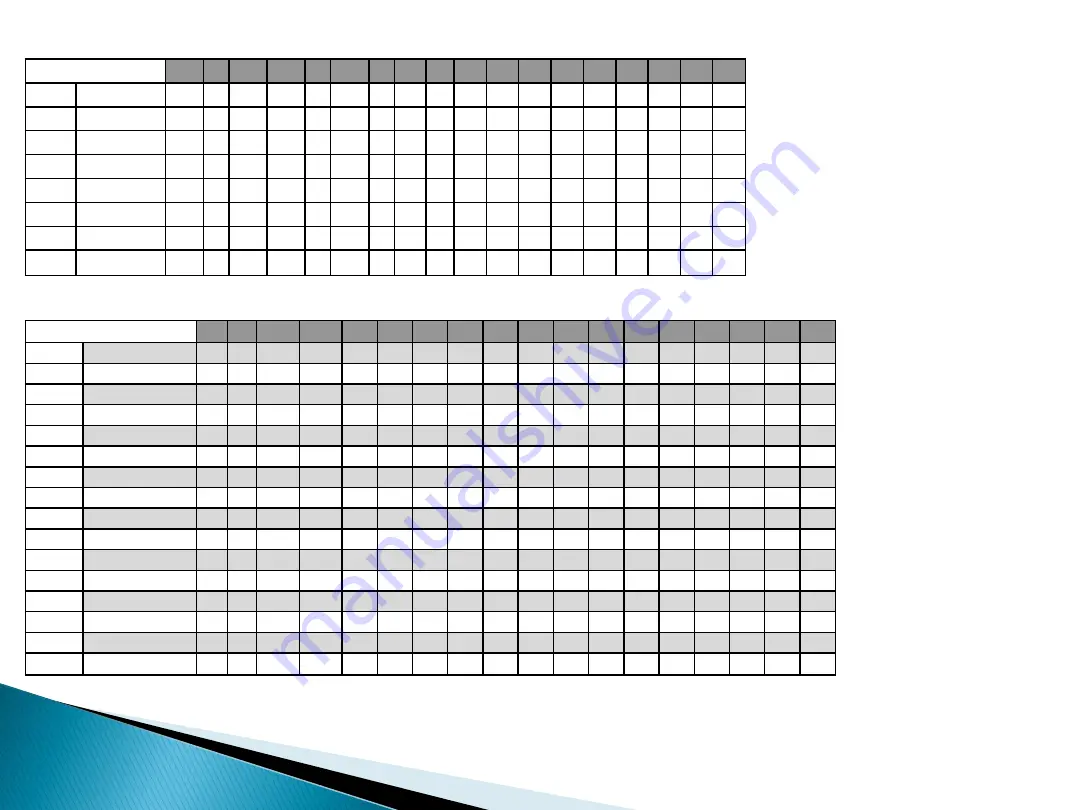
P7. MOUNTAIN CLIMB
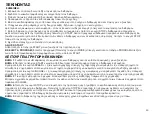
P6. ROLLING
SPEED CHANGES
1
2
3
4
5
6
7
8
9
10
11
12
13
14
15
16
17
18
Level 1
SPEED(KM/H)
1
2
3
2
1
2
3
2
1
2
3
2
1
2
3
2
1
1
Level 2
SPEED(KM/H)
2
3
4
3
2
3
4
3
2
3
4
3
2
3
4
3
2
2
Level 3
SPEED(KM/H)
2
3
4
5
4
3
4
5
4
3
4
5
4
3
4
5
4
3
Level 4
SPEED(KM/H)
2
4
5
6
5
4
5
6
5
4
5
6
5
4
5
6
5
3
Level 5
SPEED(KM/H)
2
5
6
7
6
5
6
7
6
5
6
7
5
6
7
6
5
3
Level 6
SPEED(KM/H)
3
6
7
8
7
6
7
8
7
6
7
8
7
6
7
8
7
4
Level 7
SPEED(KM/H)
3
7
8
9
8
7
8
9
8
7
8
9
8
7
8
9
8
4
Level 8
SPEED(KM/H)
3
8
9
10
9
8
9
10
9
8
9
10
9
8
9
10
8
4
SPEED & INCLINE CHANGES
1
2
3
4
5
6
7
8
9
10
11
12
13
14
15
16
17
18
Level 1
ELEVATION
0
1
1
2
2
3
3
4
4
5
6
7
8
7
6
4
2
0
SPEED(KM/H)
1
1
2
2
3
3
3
4
4
4
3
3
3
2
2
2
1
1
Level 2
ELEVATION
0
1
2
2
3
3
4
4
5
6
7
8
9
8
6
4
2
0
SPEED(KM/H)
1
1
2
2
3
3
3
4
4
4
3
3
3
2
2
2
1
1
Level 3
ELEVATION
1
1
2
3
3
4
4
5
6
7
8
9
10
9
8
6
4
2
SPEED(KM/H)
1
1
2
2
3
3
3
4
4
4
3
3
3
2
2
2
1
1
Level 4
ELEVATION
1
2
2
3
3
4
5
6
7
8
9
10
11
10
8
7
5
3
SPEED(KM/H)
2
2
3
3
4
4
4
5
5
4
4
4
3
3
3
2
2
2
Level 5
ELEVATION
1
2
3
4
5
6
7
8
9
9
10
11
12
11
10
8
6
4
SPEED(KM/H)
2
2
3
3
4
4
4
5
5
4
4
4
3
3
3
2
2
2
Level 6
ELEVATION
2
2
3
4
5
6
7
8
9
10
11
12
13
12
10
8
6
4
SPEED(KM/H)
2
2
3
3
4
4
4
5
5
4
4
4
3
3
3
2
2
2
Level 7
ELEVATION
2
3
4
5
6
7
8
9
10
11
12
13
14
13
10
8
6
4
SPEED(KM/H)
2
2
4
4
5
5
5
6
6
6
5
5
4
4
4
2
2
2
Level 8
ELEVATION
3
4
5
6
7
8
9
10
11
12
13
14
15
13
10
8
6
4
SPEED(KM/H)
2
2
4
4
5
5
5
6
6
6
5
5
4
4
4
2
2
2
Summary of Contents for ENERGETICS PR 4.9
Page 1: ...1 ENGLISH MANUAL ENERGETICS PR 4 9...
Page 20: ...20...
Page 22: ...22 GREEK MANUAL ENERGETICS PR 4 9...
Page 23: ...23 1 1 2 3 service 4 5 6 7 8 9 aerosol spray 10 off 11 12 13 2 x 1 14 15 0 16 17...
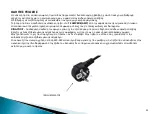
Page 24: ...24 16 AMPERE AMP 220 240 volt...
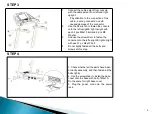
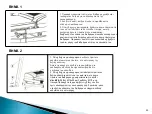
Page 26: ...26 1 2 1 2 2 3 1 2 allen6 3 M10x50 3 M10...
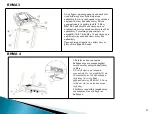
Page 27: ...27 3 4 allen 5 2 M8x15 2 8 14 1 M4 x 10 2 3 1 2 14 M4x10 3...
Page 28: ...28...
Page 29: ...29 clip start 3 2 1 0 1 0 0 00 99 00 50 200 1 0 18 0 990 0 99 9 0 5 99 9 1 15...
Page 38: ...38 1 2 3 4 1 2 2 1 2 3 3 30 40...
Page 39: ...39 1 2 6 4 3 3km 5 1 20 2 18 24...
Page 40: ...40 Allen 1 2 3 4 4 km h 5 2 Allen...
Page 41: ...41...
Page 44: ...44 ENERGETICS PR 4 9 ROMANIAN MANUAL...
Page 63: ...63...
Page 66: ...66 ENERGETICS PR 4 9 BULGARIAN MANUAL...
Page 67: ...67 1 1 2 3 4 5 6 7 8 9 10 11 off 12 13 14 15 2 1 16 17 0 18 19...
Page 68: ...68 16 AMPERE AMP 220 240 W...
Page 70: ...70 1 2 1 2 3 1 2 allen6 3 M10x50 3 M10...
Page 71: ...71 3 4 allen 5 2 M8x15 2 M8 14 1 M4 x 10 2 3 1 2 14 M4x10 3...
Page 72: ...72...
Page 73: ...73 clip start 3 2 1 0 1 0 0 00 99 00 50 200 1 0 18 0 990 0 99 9 0 99 9 1 15...
Page 82: ...82 1 2 3 4 1 2 1 2 3 30 40...
Page 83: ...83 1 2 6 4 3 3 5 1 15 3 18 24...
Page 84: ...84 Allen 1 2 3 4 4 5 Allen...
Page 85: ...85...
Page 88: ...88 ENERGETICS PR 4 9 TURKISH MANUAL...
Page 107: ...107...


