background image

77

ENERGETICS

PR 40.1

BULGARIAN MANUAL

Summary of Contents for ENERGETICS PR 40.1

Page 1: ...1 ENERGETICS PR 40 1 ENGLISH MANUAL...

Page 2: ...duct by the supply cord or use the cord as a handle 6 Keep the cord away from hot surfaces or ground 7 Never operate the product with the air vents blocked Keep the air vents free of lint hair etc 8 N...

Page 3: ...ith all local codes and ordinances Danger Improper connection of the equipment grounding conductor can result in a risk of electric shock Check with a qualified electrician or serviceman if you are in...

Page 4: ...T UPRIGHT 1PCE 12 ARC WASHER 2PCS 3 RIGHT UPRIGHT 1PCE 13 SAFETY KEY 1PCE 4 CONSOLE SET 1SET 14 LUBRICATION OIL 1PCE 5 BASE COVER L 1PCE 15 SCREWDRIVER 1PCE 6 BASE COVER R 1PCE 16 WRENCH 6MM 1PCE 7 BO...

Page 5: ...As the photo shows take out the running deck from the box lay it on the flat floor and then cut the belt STEP 1 STEP 2 1 Lift up the left upright 2 and right upright 3 and then use the 6 wrench 16 to...

Page 6: ...tion to the connection of the cable a wrong connection or rough operation would cause damage of the connector 3 Tightly fasten all the bolts at step 2 and step 3 1 Use the screwdriver 15 to fasten the...

Page 7: ...7 NOTE For your safety and comfort please check if all screws are fastened Congratulation A brand new motorized treadmill has been successful assembled...

Page 8: ...will stop if the user accidentally walks off the Treadmill C If the user falls off the Treadmill the Safety Key will come off the Computer and the treadmill will stop at once to avoid further injury D...

Page 9: ...grasping both stainless steel pick ups on front handrails it will display yourcurrent heart rate in beats per minute from 50 to 200 INCLINE Displays the current deck incline from starting at level 1 t...

Page 10: ...Press the START button to begin belt movement after count down Use the SPEED or QUICK SPEED buttons to adjust the desired speed at any time during training use the INCLINE or QUICK INCLINE buttons to...

Page 11: ...be automatically arranged according to the time you set for your workout time There are 64 preset programs for 8 different training goals and 8 different intensity levels on each training goals STEP...

Page 12: ...wake display up the treadmill then will be on start ready status keep pressing PROG button until the distance window display U 1 then the TIME window display 30 00 press SPEED to set the program time...

Page 13: ...H 3 STEP 2 After selecting the program Press MODE button the TIME window will bling press SPEED or INCLINE to set time Press MODE button again the DIS window will bling press SPEED or INCLINE to set y...

Page 14: ...EIGHT press SPEED button to set weight from 20KG 120KG Then press MODE button to go to next step STEP 6 After finished setting all the necessary information of your body condition press MODE button ag...

Page 15: ...TION 1 1 2 3 4 5 6 7 7 8 8 7 7 5 4 2 1 1 SPEED KM H 1 1 2 2 3 4 5 6 6 7 7 6 6 4 3 2 1 1 Level 2 ELEVATION 1 2 3 4 5 6 7 8 8 9 9 8 8 6 5 3 2 1 SPEED KM H 1 2 2 3 4 5 6 7 7 8 8 7 7 5 4 2 2 1 Level 3 ELE...

Page 16: ...4 3 2 2 1 1 SPEED KM H 1 2 3 3 5 6 7 8 8 8 8 7 7 5 4 3 2 1 Level 2 ELEVATION 1 1 2 2 3 4 5 6 6 6 6 5 5 4 3 2 1 1 SPEED KM H 1 2 3 4 6 7 8 9 9 9 9 8 8 6 5 3 2 1 Level 3 ELEVATION 1 1 2 3 4 5 6 7 7 7 7...

Page 17: ...EED KM H 2 4 8 4 8 4 8 4 8 4 8 4 8 4 8 4 8 4 Level 8 SPEED KM H 2 5 8 5 8 5 8 5 8 5 8 5 8 5 8 5 8 5 P6 ROLLING SPEED CHANGES 1 2 3 4 5 6 7 8 9 10 11 12 13 14 15 16 17 18 Level 1 SPEED KM H 1 2 3 2 1 2...

Page 18: ...3 3 3 4 4 4 3 3 3 2 2 2 1 1 Level 4 ELEVATION 1 2 2 3 3 4 5 6 7 8 9 10 11 10 8 7 5 3 SPEED KM H 2 2 3 3 4 4 4 5 5 4 4 4 3 3 3 2 2 2 Level 5 ELEVATION 1 2 3 4 5 6 7 8 9 9 10 11 12 11 10 8 6 4 SPEED KM...

Page 19: ...8 10 10 12 10 8 6 4 2 Level 4 ELEVATION 0 1 1 2 2 3 3 4 4 4 5 5 6 7 6 5 3 2 SPEED KM H 2 2 4 4 6 6 8 8 8 10 10 10 12 12 10 7 5 3 Level 5 ELEVATION 1 1 2 2 3 3 4 4 5 5 6 6 7 8 7 6 3 2 SPEED KM H 2 4 6...

Page 20: ...lding pole as the right figure shows 2 If you want to put the treadmill to the work position Firstly pull the folding knob outward as figure shows And then lay down the running deck light onto floor H...

Page 21: ...re optimal treadmill performance Every 10 days or 10 hours of operation lift the sides of the walking belt and feel the top surface of the walking board as far under as you can reach If you feel signs...

Page 22: ...each time and check how it works If the belt remains slanting to the right then turn the belt adjustment screw on the left in counterclockwise direction 1 4 as shown in the picture A If the belt tend...

Page 23: ...23...

Page 24: ...15 4 70 CABLE GROMMET 1 23 SCREW M4 12 6 71 STOP COLLAR 2 24 SCREW M4 10 9 72 AUDIO CABLE 1 25 SCREW M4 30 4 73 AC CABLE L 400 BLACK 1 26 NUT M10 6 74 AC CABLE L 400 RED 1 27 NUT M8 6 75 AC CABLE L 10...

Page 25: ...25 ENERGETICS PR 40 1 GREEK MANUAL...

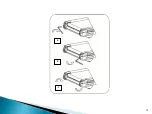
Page 26: ...26 1 2 3 50 120 4 service 5 6 7 8 9 10 aerosol spray 11 off 12 13 14 15 2 x 1 16 17 0 18 19...

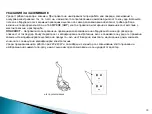
Page 27: ...27 GROUNDED PIN GROUNDED OUTLET Figure Grounding methods 16 AMPERE AMP 220 240 volt...

Page 28: ...PCE 13 SAFETY KEY 1PCE 4 CONSOLE SET 1SET 14 LUBRICATION OIL 1PCE 5 BASE COVER L 1PCE 15 SCREWDRIVER 1PCE 6 BASE COVER R 1PCE 16 WRENCH 6MM 1PCE 7 BOLT M10 50MM 2PCS 17 WRENCH 5MM 1PCE 8 BOLT M8 15MM...

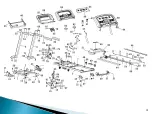
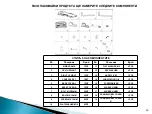
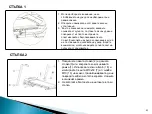
Page 29: ...29 1 2 2 3 1 2 1 2 3 1 allen 6 16 3 M10x50 7 M10 10 2...

Page 30: ...30 3 4 1 2 allen 5 17 4 4 M8x15 8 4 M8 11 3 2 3 1 15 5 6 4 M5x12 9 2 15 18 19 1 4 M6x10...

Page 31: ...31...

Page 32: ...32 clip start 3 2 1 0 1 0...

Page 33: ...NCLINE BUTTON I INCLINE BUTTON B DISTANCE WINDOW F QUICK SPEED BUTTON J SPEED BUTTON C INCLINE WINDOW G MODE BUTTON K START BUTTON D SPEED WINDOW H PROGRAM BUTTON L STOP BUTTON 0 00 99 00 50 200 1 15...

Page 34: ...34 1 2 3 4 clip 5 6 7 STOP START 5 STOP 8 A QUICK START START B SELECT A PROGRAM MODE PROGRAM 8 3 user START 1 2 START 5 SPEED INCLINE 3 PULSE 4 STOP STOP START 5...

Page 35: ...35 START 5 1 2 MODE 30 00 SPEED 8 00 99 00 SPEED MODE 1 0 SPEED 1 0 99 0 SPEED MODE 20 SPEED 20kcal 990kcal 3 START 4 4 SPEED INCLINE 5 STOP STOP START 4 STOP 8 8 8 1...

Page 36: ...36 2 PROGRAM BODY FAT PROGRAM speed 30 00 8 00 99 00 3 START 4 SPEED INCLINE 5 STOP Pulse 1 2 Pulse 3 18 START STOP 3 BHMA 1 PROG distance U 1 TIME 30 00 SPEED...

Page 37: ...37 BHMA 2 MODE 01 INCLINE SPEED 01 MODE 2 18 BHMA 3 18 START HRC 125 BPM 110 BPM 125 BPM BPM 3 HRC H 1 H 2 H 3...

Page 38: ...ME SPEED INCLINE MODE DIS SPEED INCLINE MODE CAL SPEED INCLINE 3 START STOP 4 MODE INCLINE F 3 DIST 170 SPEED 100CM 200CM MODE 5 MODE INCLINE F 4 DIST 70 SPEED 20kg 120kg MODE 6 MODE INCLINE F 5 DIST...

Page 39: ...3 4 5 6 7 7 8 8 7 7 5 4 2 1 1 SPEED KM H 1 1 2 2 3 4 5 6 6 7 7 6 6 4 3 2 1 1 Level 2 ELEVATION 1 2 3 4 5 6 7 8 8 9 9 8 8 6 5 3 2 1 SPEED KM H 1 2 2 3 4 5 6 7 7 8 8 7 7 5 4 2 2 1 Level 3 ELEVATION 1 2...

Page 40: ...4 3 2 2 1 1 SPEED KM H 1 2 3 3 5 6 7 8 8 8 8 7 7 5 4 3 2 1 Level 2 ELEVATION 1 1 2 2 3 4 5 6 6 6 6 5 5 4 3 2 1 1 SPEED KM H 1 2 3 4 6 7 8 9 9 9 9 8 8 6 5 3 2 1 Level 3 ELEVATION 1 1 2 3 4 5 6 7 7 7 7...

Page 41: ...EED KM H 2 4 8 4 8 4 8 4 8 4 8 4 8 4 8 4 8 4 Level 8 SPEED KM H 2 5 8 5 8 5 8 5 8 5 8 5 8 5 8 5 8 5 P6 ROLLING SPEED CHANGES 1 2 3 4 5 6 7 8 9 10 11 12 13 14 15 16 17 18 Level 1 SPEED KM H 1 2 3 2 1 2...

Page 42: ...3 3 3 4 4 4 3 3 3 2 2 2 1 1 Level 4 ELEVATION 1 2 2 3 3 4 5 6 7 8 9 10 11 10 8 7 5 3 SPEED KM H 2 2 3 3 4 4 4 5 5 4 4 4 3 3 3 2 2 2 Level 5 ELEVATION 1 2 3 4 5 6 7 8 9 9 10 11 12 11 10 8 6 4 SPEED KM...

Page 43: ...8 10 10 12 10 8 6 4 2 Level 4 ELEVATION 0 1 1 2 2 3 3 4 4 4 5 5 6 7 6 5 3 2 SPEED KM H 2 2 4 4 6 6 8 8 8 10 10 10 12 12 10 7 5 3 Level 5 ELEVATION 1 1 2 2 3 3 4 4 5 5 6 6 7 8 7 6 3 2 SPEED KM H 2 4 6...

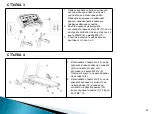
Page 44: ...44 1 2 3 4 1 2 2 1 2 3 3 30 40...

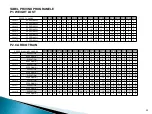
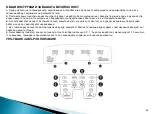
Page 45: ...45 1 2 6 4 3 3km 5 1 20 18 24 3...

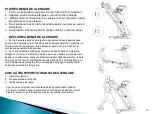
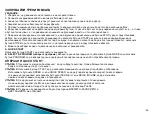
Page 46: ...46 Allen 1 2 3 4 4 km h 5 2 Allen...

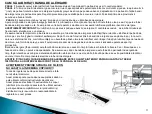
Page 47: ...47 A B C...

Page 48: ...48 O 12 60 30...

Page 49: ...49...

Page 50: ...12 6 71 STOP COLLAR 2 24 SCREW M4 10 9 72 AUDIO CABLE 1 25 SCREW M4 30 4 73 AC CABLE L 400 BLACK 1 26 NUT M10 6 74 AC CABLE L 400 RED 1 27 NUT M8 6 75 AC CABLE L 100 RED 1 28 NUT M5 8 76 POWER CORD 1...

Page 51: ...INTERSPORT ATHLETICS SA 18 20 SOROU 15125 MAROUSI GREECE 302102806019 51 2 1 14 1 14 2 14 CE Service...

Page 52: ...52 ENERGETICS PR 40 1 ROMANIAN MANUAL...

Page 53: ...ctric i nu folosi i cablul ca m ner 8 ine i cablul la distan de suprafe e nc lzite sau de praf 9 Nu utiliza i niciodat produsul cu orificiile de ventila ie blocate P stra i deschiderile de aer libere...

Page 54: ...ntat n conformitate cu toate codurile i dispozi iile locale PERICOL Conectarea necorespunz toare a conductorului de mp m ntare a echipamentului poate constitui un pericol de electrocutare Dac ave i nd...

Page 55: ...8 4PCS 2 LEFT UPRIGHT 1PCE 12 ARC WASHER 2PCS 3 RIGHT UPRIGHT 1PCE 13 SAFETY KEY 1PCE 4 CONSOLE SET 1SET 14 LUBRICATION OIL 1PCE 5 BASE COVER L 1PCE 15 SCREWDRIVER 1PCE 6 BASE COVER R 1PCE 16 WRENCH 6...

Page 56: ...benzii de alergare este ambalat ntr o cutie care este plasat sub cadrul principal al benzii de alergare V rug m s fi i aten i la scoaterea p r ii de jos a benzii de alergare din ambalaj PASUL 1 PASUL...

Page 57: ...ntre st lpul de sprijin din st nga st lpul de sprijin din dreapta folosind 4 uruburi M8x15 8 i aibe M8 11 3 Ulterior str nge i bine uruburile folosite la pa ii 2 3 1 Folosi i urubelni a 15 pentru a f...

Page 58: ...58 NOT Pentru siguran a i confortul dumneavoastr dup ce a i finalizat asamblarea verifica i dac a i str ns toate uruburile n mod corespunz tor...

Page 59: ...banda de alergare se va opri dac nu va fi folosit n mod corect C n cazul n care utilizatorul cade de pe band cheia de siguran va ie i din pozi ie i banda de alergare se va opri mediat pentru evitarea...

Page 60: ...a pentru a v detecta pulsul Pe ecran va apare valoarea curent a pulsului dvs pe minut cu valori de la 50 p n la 200 VITEZA Pe ecran se afi eaz viteza actual a benzii de alergat ncep nd de la 1 0 km or...

Page 61: ...i pentru a ncepe antrenamentul A QUICK START Ap sa i doar pe butonul START pentru a ncepe antrenamentul B SELECT A PROGRAM Selecta i un program Ap s nd pe butonul MODE selectare i apoi pe butonul PROG...

Page 62: ...ul STOP sau trage i cheia de siguran din pozi ie i banda de alergare se va opri imediat Ap sa i pe butonul STOP i programul se va opri imediat Dac dori i s continua i ap sa i pe butonul START i banda...

Page 63: ...a regla n sus i apoi ap sa i SPEED pentru a regla viteza acestei sec iuni Dup ce a i terminat setarea sec iunii 01 ap sa i butonul MODE pentru a seta toate celelalte sec iuni de la 2 la 18 Pasul 3 Dup...

Page 64: ...pe afi ajul INCLINE va apare num rul F5 pe afi ajul DIST num rul care desemneaz nceputul proces rii datelor ine i apoi ferm senzorii de ritm cardiac cu ambele m ini pe m nere i dup 8 secunde va apare...

Page 65: ...VATION 1 1 2 3 4 5 6 7 7 8 8 7 7 5 4 2 1 1 SPEED KM H 1 1 2 2 3 4 5 6 6 7 7 6 6 4 3 2 1 1 Level 2 ELEVATION 1 2 3 4 5 6 7 8 8 9 9 8 8 6 5 3 2 1 SPEED KM H 1 2 2 3 4 5 6 7 7 8 8 7 7 5 4 2 2 1 Level 3 E...

Page 66: ...4 3 2 2 1 1 SPEED KM H 1 2 3 3 5 6 7 8 8 8 8 7 7 5 4 3 2 1 Level 2 ELEVATION 1 1 2 2 3 4 5 6 6 6 6 5 5 4 3 2 1 1 SPEED KM H 1 2 3 4 6 7 8 9 9 9 9 8 8 6 5 3 2 1 Level 3 ELEVATION 1 1 2 3 4 5 6 7 7 7 7...

Page 67: ...EED KM H 2 4 8 4 8 4 8 4 8 4 8 4 8 4 8 4 8 4 Level 8 SPEED KM H 2 5 8 5 8 5 8 5 8 5 8 5 8 5 8 5 8 5 P6 ROLLING SPEED CHANGES 1 2 3 4 5 6 7 8 9 10 11 12 13 14 15 16 17 18 Level 1 SPEED KM H 1 2 3 2 1 2...

Page 68: ...3 3 3 4 4 4 3 3 3 2 2 2 1 1 Level 4 ELEVATION 1 2 2 3 3 4 5 6 7 8 9 10 11 10 8 7 5 3 SPEED KM H 2 2 3 3 4 4 4 5 5 4 4 4 3 3 3 2 2 2 Level 5 ELEVATION 1 2 3 4 5 6 7 8 9 9 10 11 12 11 10 8 6 4 SPEED KM...

Page 69: ...8 10 10 12 10 8 6 4 2 Level 4 ELEVATION 0 1 1 2 2 3 3 4 4 4 5 5 6 7 6 5 3 2 SPEED KM H 2 2 4 4 6 6 8 8 8 10 10 10 12 12 10 7 5 3 Level 5 ELEVATION 1 1 2 2 3 3 4 4 5 5 6 6 7 8 7 6 3 2 SPEED KM H 2 4 6...

Page 70: ...enzii de alergare f r obstacole pentru buna func ionare i amplasare a acesteia n spa iul dvs 2 Apoi in nd ambele m ini pe scheletul de baz al benzii de alergare atinge i cu piciorul amortizorul de spr...

Page 71: ...eriorul ambalajului Dup 15 ore de folosire zilnic a benzii de alergare sau dup dou luni n cazul n care nu este folosit zilnic mai nt i cur a i cu o bucat de p nz urmele de lubrifiant vechi apoi folosi...

Page 72: ...a excesiv a covorului rulant 4 Pune i banda de alergare n func ie Regla i covorul rulant n timp ce banda de alergare func ioneaz 4 km h f r ca cineva s se afle pe covorul rulant Dup reglare folosi i b...

Page 73: ...73 A B C...

Page 74: ...74...

Page 75: ...12 6 71 STOP COLLAR 2 24 SCREW M4 10 9 72 AUDIO CABLE 1 25 SCREW M4 30 4 73 AC CABLE L 400 BLACK 1 26 NUT M10 6 74 AC CABLE L 400 RED 1 27 NUT M8 6 75 AC CABLE L 100 RED 1 28 NUT M5 8 76 POWER CORD 1...

Page 76: ...r rii Dispozitivul va fi transportat de client la transportator Costurile de transport de la transportator la Service i viceversa vor fi suportate de societate n cazul n care se datoreaz unei defec i...

Page 77: ...77 ENERGETICS PR 40 1 BULGARIAN MANUAL...

Page 78: ...78 1 2 3 50 120 4 5 6 7 8 9 10 11 off 12 13 14 15 2 1 16 17 0 18 19...

Page 79: ...79 16 AMPERE AMP 220 240 W...

Page 80: ...13 SAFETY KEY 1PCE 4 CONSOLE SET 1SET 14 LUBRICATION OIL 1PCE 5 BASE COVER L 1PCE 15 SCREWDRIVER 1PCE 6 BASE COVER R 1PCE 16 WRENCH 6MM 1PCE 7 BOLT M10 50MM 2PCS 17 WRENCH 5MM 1PCE 8 BOLT M8 15MM 4PC...

Page 81: ...81 1 2 3 1 2 1 2 3 1 allen 6 16 3 M10x50 7 3 M10 10 2...

Page 82: ...82 3 4 1 2 5 17 4 M8x15 8 M8 11 3 2 3 1 15 5 4 M5x12 9 6 2 15 18 19 1 4 M6 10...

Page 83: ...83...

Page 84: ...84 clip start 3 2 1 0 1 0...

Page 85: ...LINE BUTTON I INCLINE BUTTON B DISTANCE WINDOW F QUICK SPEED BUTTON J SPEED BUTTON C INCLINE WINDOW G MODE BUTTON K START BUTTON D SPEED WINDOW H PROGRAM BUTTON L STOP BUTTON 0 00 99 00 50 200 1 0 18...

Page 86: ...86 1 2 3 4 5 6 7 STOP START 5 STOP 8 QUICK START START SELECT A PROGRAM MODE PROGRAM 8 3 QUICK START 1 2 SPEED QUICK SPEED INCLINE QUICK INCLINE 3 PULSE 4...

Page 87: ...87 START 1 2 MODE 30 00 SPEED 5 00 99 00 SPEED MODE 1 0 SPEED 1 0 99 0 SPEED MODE 50 SPEED 20 kcal 990 kcal 3 START 4 4 SPEED INCLINE QUICK SPEED QUICK INCLINE 5 STOP...

Page 88: ...88 8 8 8 1 2 PROGRAM BODY FAT PROGRAM speed 30 00 8 00 99 00 3 START 4 SPEED 5 STOP PULSE 1 2 PULSE 5 3 18 START STOP 3...

Page 89: ...MODE 2 18 3 18 1 PROGRAM TIME FAT MODE 2 INCLINE F1 DIST 1 SPEED 1 2 1 2 MODE 3 MODE INCLINE F 2 DIST 25 SPEED 10 99 MODE 4 MODE INCLINE F3 DIST 170 SPEED 100CM 200CM MODE 5 MODE INCLINE F4 DIST 70 SP...

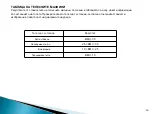
Page 90: ...90 BMI 30 26 BMI 30 19 BMI 25 BMI 19...

Page 91: ...3 4 5 6 7 7 8 8 7 7 5 4 2 1 1 SPEED KM H 1 1 2 2 3 4 5 6 6 7 7 6 6 4 3 2 1 1 Level 2 ELEVATION 1 2 3 4 5 6 7 8 8 9 9 8 8 6 5 3 2 1 SPEED KM H 1 2 2 3 4 5 6 7 7 8 8 7 7 5 4 2 2 1 Level 3 ELEVATION 1 2...

Page 92: ...4 3 2 2 1 1 SPEED KM H 1 2 3 3 5 6 7 8 8 8 8 7 7 5 4 3 2 1 Level 2 ELEVATION 1 1 2 2 3 4 5 6 6 6 6 5 5 4 3 2 1 1 SPEED KM H 1 2 3 4 6 7 8 9 9 9 9 8 8 6 5 3 2 1 Level 3 ELEVATION 1 1 2 3 4 5 6 7 7 7 7...

Page 93: ...EED KM H 2 4 8 4 8 4 8 4 8 4 8 4 8 4 8 4 8 4 Level 8 SPEED KM H 2 5 8 5 8 5 8 5 8 5 8 5 8 5 8 5 8 5 P6 ROLLING SPEED CHANGES 1 2 3 4 5 6 7 8 9 10 11 12 13 14 15 16 17 18 Level 1 SPEED KM H 1 2 3 2 1 2...

Page 94: ...3 3 3 4 4 4 3 3 3 2 2 2 1 1 Level 4 ELEVATION 1 2 2 3 3 4 5 6 7 8 9 10 11 10 8 7 5 3 SPEED KM H 2 2 3 3 4 4 4 5 5 4 4 4 3 3 3 2 2 2 Level 5 ELEVATION 1 2 3 4 5 6 7 8 9 9 10 11 12 11 10 8 6 4 SPEED KM...

Page 95: ...8 10 10 12 10 8 6 4 2 Level 4 ELEVATION 0 1 1 2 2 3 3 4 4 4 5 5 6 7 6 5 3 2 SPEED KM H 2 2 4 4 6 6 8 8 8 10 10 10 12 12 10 7 5 3 Level 5 ELEVATION 1 1 2 2 3 3 4 4 5 5 6 6 7 8 7 6 3 2 SPEED KM H 2 4 6...

Page 96: ...96 1 2 3 4 1 2 1 2 3 30 40...

Page 97: ...97 1 2 6 4 3 3 5 1 15 3 18 24...

Page 98: ...98 Allen 1 2 3 4 4 5 Allen...

Page 99: ...99 A B C...

Page 100: ...10 0...

Page 101: ...COLLAR 2 24 SCREW M4 10 9 72 AUDIO CABLE 1 25 SCREW M4 30 4 73 AC CABLE L 400 BLACK 1 26 NUT M10 6 74 AC CABLE L 400 RED 1 27 NUT M8 6 75 AC CABLE L 100 RED 1 28 NUT M5 8 76 POWER CORD 1 29 FLAT WASH...

Page 102: ...10 2 2 1 2 14 1 14 2 14 CE INTERSPORT Genco Bulgaria Ltd 1797 216 359 2 439 31 81 www intersport bg http www intersport bg bg company contact...

Page 103: ...10 3 ENERGETICS PR 40 1 TURKISH MANUAL...

Page 104: ...mas na ve toz sa vb ekilde t kanmamas na dikkat edin 7 Hava deliklerini i ine bir ey atmay n 8 Cihaz d alanlarda kullanmay n ve depolamay n 9 Cihaz sprey b cek sinek vb ila lar p sk rt lm yerlerde kul...

Page 105: ...anosu sigortas ndan 16 AMPER AMP ak m iddetinde uygun prize ba lanmas gerekmektedir TEHL KE Ekipman topraklamas n n yanl ba lanmas elektrik arpmas riskini ortaya karabilir Cihaz n do ru ekilde toprakl...

Page 106: ...E 12 ARC WASHER 2PCS 3 RIGHT UPRIGHT 1PCE 13 SAFETY KEY 1PCE 4 CONSOLE SET 1SET 14 LUBRICATION OIL 1PCE 5 BASE COVER L 1PCE 15 SCREWDRIVER 1PCE 6 BASE COVER R 1PCE 16 WRENCH 6MM 1PCE 7 BOLT M10 50MM 2...

Page 107: ...in Uyar Cihaz n konsolu ayr bir koliye paketlenmi halde bant taban n n alt nda bulunmaktad r L tfen bant taban n n ambalaj n a arken dikkat ediniz A AMA 1 A AMA 2 1 Sol dikmeyi 2 ve sa dikmeyi 3 kald...

Page 108: ...Kablonun ba lant s na dikkat edin yanl bir ba lant veya kaba bir i lem konekt r n zarar g rmesine neden olabilir 3 Ad m 2 ve Ad m 3 teki t m c vatalar s k ca s k n 1 Sol alt kapa 5 ve sa alt kapa 6 so...

Page 109: ...10 9 NOT G venli iniz ve komforunuz i in montaj tamamlad ktan sonra vidalar do ru ekilde s k p s kmad n z kontol edin...

Page 110: ...nd n n duraca n garanti etmek i in k yafetinize ba lay n C Kullan c n n ko u band ndan d mesi durumunda g venlik anahtar yerinden kacak ve ko u band herhangi bir yaralanman n ka n lmas i in hemen dura...

Page 111: ...z l mek i in hem sa hem sol tutacakta bulunan her iki metal nab z sens rlerini tutmal s n z Nabz n z n dakikada 50 200 aras olan ge erli de erini ekranda g rebilirsiniz HIZ Ko u band n n 1km h ile 18...

Page 112: ...onra PROGRAM d mesi ile ayarlanm 64 haz r programdan birini se in ve ard ndan START a bas n ALI MA HIZLI BA LANGI ADIM 1 G venlik anahtar n bilgisayara ba lay n Ko u band bekleme modundad r ADIM 2 STA...

Page 113: ...kollar nda yer alan d melerden de ayarlanabilir ADIM 5 Antrenman n z sonland rmak STOP tu una bas n veya panodan g venlik anahtar n ekin Ko u band derhal duracakt r STOP tu una bas n ve program derha...

Page 114: ...gerek duyan sa l k sorunu olan ki iler sunulan de erleri dikkate almamalar gerekir KULLANICI PROGRAMI Bu program kullan c n n ki isel bir program d zenlemesi i indir her b l m n h z ve e imi ki inin...

Page 115: ...y n z Ard ndan bir sonraki ad ma ge mek i im MODE tu una bas n z 4 Ad m MODE tu una bast ktan sonra INCLINE penceresinde F3 g r n r DIST penceresinde 170 g r n r ve boyu temsil eder SPEED tu una basar...

Page 116: ...ATION 1 1 2 3 4 5 6 7 7 8 8 7 7 5 4 2 1 1 SPEED KM H 1 1 2 2 3 4 5 6 6 7 7 6 6 4 3 2 1 1 Level 2 ELEVATION 1 2 3 4 5 6 7 8 8 9 9 8 8 6 5 3 2 1 SPEED KM H 1 2 2 3 4 5 6 7 7 8 8 7 7 5 4 2 2 1 Level 3 EL...

Page 117: ...4 3 2 2 1 1 SPEED KM H 1 2 3 3 5 6 7 8 8 8 8 7 7 5 4 3 2 1 Level 2 ELEVATION 1 1 2 2 3 4 5 6 6 6 6 5 5 4 3 2 1 1 SPEED KM H 1 2 3 4 6 7 8 9 9 9 9 8 8 6 5 3 2 1 Level 3 ELEVATION 1 1 2 3 4 5 6 7 7 7 7...

Page 118: ...PEED KM H 2 4 8 4 8 4 8 4 8 4 8 4 8 4 8 4 8 4 Level 8 SPEED KM H 2 5 8 5 8 5 8 5 8 5 8 5 8 5 8 5 8 5 P6 ROLLING SPEED CHANGES 1 2 3 4 5 6 7 8 9 10 11 12 13 14 15 16 17 18 Level 1 SPEED KM H 1 2 3 2 1...

Page 119: ...2 3 3 3 4 4 4 3 3 3 2 2 2 1 1 Level 4 ELEVATION 1 2 2 3 3 4 5 6 7 8 9 10 11 10 8 7 5 3 SPEED KM H 2 2 3 3 4 4 4 5 5 4 4 4 3 3 3 2 2 2 Level 5 ELEVATION 1 2 3 4 5 6 7 8 9 9 10 11 12 11 10 8 6 4 SPEED K...

Page 120: ...8 10 10 12 10 8 6 4 2 Level 4 ELEVATION 0 1 1 2 2 3 3 4 4 4 5 5 6 7 6 5 3 2 SPEED KM H 2 2 4 4 6 6 8 8 8 10 10 10 12 12 10 7 5 3 Level 5 ELEVATION 1 1 2 2 3 3 4 4 5 5 6 6 7 8 7 6 3 2 SPEED KM H 2 4 6...

Page 121: ...mesi i in cihaz n evresinde bir metre kadar bo luk b rakarak alanda engelleyecek cisimler olmamas na dikkat ediniz 2 Sonra cihaz iki elinizle bant taban ndan tutarak emniyetinin a lmas amac yla aya n...

Page 122: ...ce montaj seti i inde yer alan silikon bazl a r ya ile taban n ya lanmas ok nemlidir Ko u band n n 20 saat seri veya iki ay kullan m ndan sonra taban n sadece spor aletlerinin sat ld d kkanlardan temi...

Page 123: ...n bir taraf s karken di er taraf gev etiniz 4 Cihaz al t r n Ko u band n n zerinde kimse olmadan saatte 4 km h h z ile al t rarak ayar n yap n z Ayar n z yapt ktan sonra kontrol etmek i in ko u band n...

Page 124: ...12 4 A B C...

Page 125: ...12 5...

Page 126: ...71 STOP COLLAR 2 24 SCREW M4 10 9 72 AUDIO CABLE 1 25 SCREW M4 30 4 73 AC CABLE L 400 BLACK 1 26 NUT M10 6 74 AC CABLE L 400 RED 1 27 NUT M8 6 75 AC CABLE L 100 RED 1 28 NUT M5 8 76 POWER CORD 1 29 FL...

Page 127: ...Gerek yedek par a eksikli i gerekse onar mda ya anan gecikmeyle ilgili olarak m teri hi bir tazminat talebinde bulunamaz GARANT GE ERL DE LD R Elektrik hatlar n n a r y klenmesinde veya dalgalanmas n...

Reviews: