background image

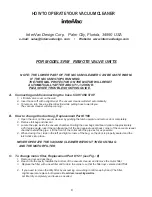
HOW TO OPERATE YOUR VACUUM CLEANER

InterVac Design Corp. Palm City, Florida, 34990 USA

e-mail: sales@intervacdesign. com

Website: www.intervacdesign.com

FOR MODELS RM REMOTE VALVE UNITS

NOTE: THE LOWER PART OF THE VACUUM CLEANER CAN BE QUITE WARM.

IF THE VACUUM STOPS RUNNING:

THE THERMAL PROTECTOR ON THE MOTOR WILL RESET

AUTOMATICALLY AFTER ABOUT 1-1/2 HOUR.

A.

Connecting and disconnecting the hose

B.

How to change the dust bag, Replacement Part # Y08

NEVER OPERATE THE VACUUM CLEANER WITHOUT THE DUST BAG

AND THE MOTOR FILTER

C:

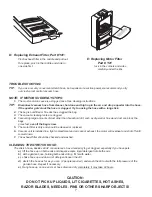
To change motor filter, Replacement Part # Y21 (see Fig.: E)

.

.

PLEASE SEE TROUBLE SHOOTING GUIDE.

START AND STOP.

1. Lift inlet valve cover on the wall.
2. Insert hose cuff with a slight twist. The vacuum cleaner will start automatically.

3. To remove, turn hose in either direction while pulling hose towards you.

The vacuum cleaner will stop running.

1. Open the door on the vacuum cleaner by pushing the latch upward and remove door completely.

2. Remove full bag and discard.
3. Locate the pipe inside the vacuum chamber. Holding the new bags cardboard collar at approximately

a 45 degree angle, insert the cardboard part of the bag against upper back corner of the vacuum cleaner
chamber behind the pipe. Lift the front of the collar over the pipe as far as possible.

4. When closing door, tuck-in the left and right corners of the bag, so the door is properly sealed and the

latch clicks into place.

1. Remove door and dust bag.

2. Reach into the cavity towards the bottom of the vacuum cleaner and remove the motor filter.

3. Replace the filter with a new filter and tuck-in the corners so that the filter lays centered

4. If you need to; clean the dirty filter by vacuuming or washing in mild soap by hand. The filter

might separate, replace both pieces.

.

Let filter dry completely and reuse as needed.

and flat

Do not clean in washing machine

6

Summary of Contents for RMF-220

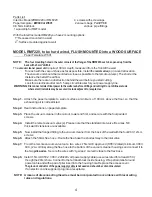
Page 1: ...r maintenance is performed This unit must be installed by a qualified technician Modification of this product can be extremely hazardous and could result in personal injury or property damage MODEL NUMBER _______________________ DATE OF PURCHASE ___________________ PLACE OF PURCHASE__________________ 1 Manual RM CE e Rev 9 09 11 Part W511 AS NZS CS8830N RoHS THE BUILT IN VACUUM SYSTEM InterVac Des...

Page 2: ...o not use cord as a handle do not close a door on cord or pull cord around sharp edges or corners Do not run appliance over cord Keep cord away from heated surfaces 11 12 13 14 15 16 17 18 19 20 21 22 Do not unplug by pulling on cord To unplug grasp the plug not the cord Keep hair loose clothing fingers and all parts of body away from any openings and all moving parts Do not pick up anything that ...

Page 3: ...enter If the problem is not handled to you satisfaction than write to the Customer Service Center at the company address Disposable dust bag filters vacuum cleaner tools and vacuum hoses You must return your warranty card in order to be covered under these provisions InterVac Model RM 220 240 volt INSTALLATION CAUTION To avoid possible electrical shock be sure that electricity is turned off at the...

Page 4: ... though the 20mm hole Connect to the terminal block inside housing Wrap strain relief around power cable and with a pair of plier insert into the housing hole If an electric cord is supplied plug into a receptacle W600 or W601 Y08 NOTE The WARNING Step 1 Step 2 Step 3 Step 4 Step 7 Step 8 NOTE Ameans of disconnecting the wires must be incorporated in accordance with local wiring rules and regulati...

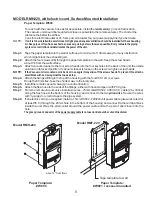
Page 5: ...uum valve s in a central location Attach the flex hose to the ends of the fittings either with hose clamps or with PVC glue From the remote vacuum valve install two wires 75mm rated H05V2 300V 60 C cable 24 volt line along the flex hose to the bottom of the housing and connect to the two Secure the wires with ty wraps or electric tape to the pipe system If an electric cord is not supplied install ...

Page 6: ...u The vacuum cleaner will stop running 1 Open the door on the vacuum cleaner by pushing the latch upward and remove door completely 2 Remove full bag and discard 3 Locate the pipe inside the vacuum chamber Holding the new bags cardboard collar at approximately a 45 degree angle insert the cardboard part of the bag against upper back corner of the vacuum cleaner chamber behind the pipe Lift the fro...

Page 7: ...nt and air cannot exhaust the motor will overheat and shut off until cooled down The exhaust filter should be checked and washed The stretch hose besides all its conveniences has a tendency to get clogged especially if you have pets lift the hose up on both ends and dispense some liquid detergent into both ends with a garden hose holding both ends still up fill with water shake hose up and down le...

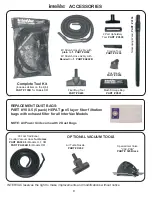
Page 8: ... Wand PART X154 ACCESSORIES INTERVAC reserves the right to make improvements and modifications without notice OPTIONAL VACUUM TOOLS 30 Foot Traditional Central Vacuum Hose for Models H F CM for Models RM for Homes PART A006 PART A006B Special Inlet Valve VAC PAN PART 505 Black Crevice Tool PART X200 REPACEMENT DUST BAGS PART Y08 5 5 pack HEPA Type 5 layer fiber filtration bags with exhaust filter ...

Page 9: ...9 ...

Page 10: ...10 ...

Reviews: