background image

(198PO)  AUTO CLEANER  ENGLISH  SIZE: 4.875” X 7.25”  PANTONE 295U  06/23/2019

   S  AVE THESE INSTRUCTIONS

English

198

PO

Page 8

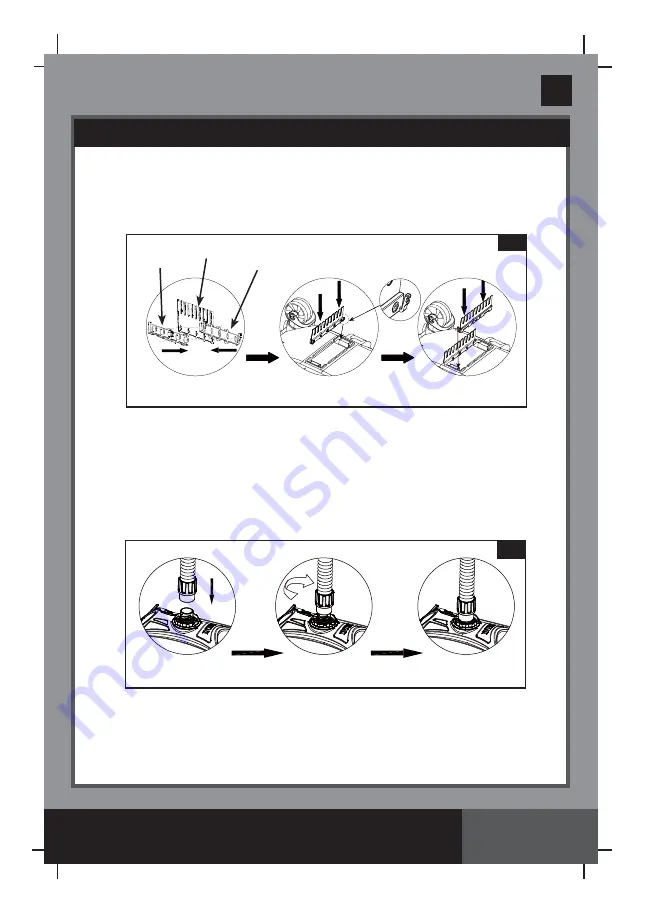
SETUP INSTRUCTIONS (continued)
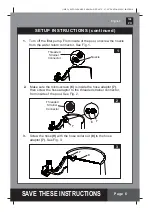
5.

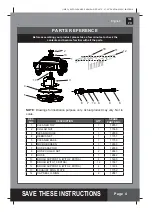
  Brush assembly. See Fig. 5.

 NOTE:

 Remove the brushes from underneath the device when  


vacuuming large debris or leaves on the pool floor.
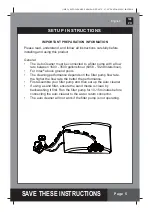
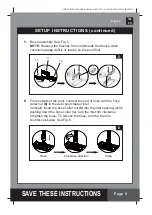
6. 

From


outside of the pool, connect the end of hose


with the hose    

 collar 

nut

 (8) 

to the auto pool cleaner inlet. 


Vertically insert the hose collar nut 

(8)

 into the inlet opening, while   


pushing down the hose collar nut, turn the inlet rim clockwise  


to tighten the hose. To remove the hose, turn the inlet rim 


counter-clockwise. See Fig. 6.

6

Press

Clockwise direction 

Screw

5

10

12

11

Summary of Contents for 198 PO

Page 1: ...lers or visit our website Due to a policy of continuous product improvement Intex reserves the right to change specifications and appearance which may result in updates to the instruction manual witho...

Page 2: ...295U 06 23 2019 SAVE THESE INSTRUCTIONS English 198 PO Page 2 Warnings 3 Parts Reference 4 Set Up Instructions 5 9 Debris Net Cleaning 10 Micro screen Cleaning 11 Troubleshooting Guide 12 Long Term S...

Page 3: ...MP BEFORE ADJUSTING CLEANING OR SERVICING REMOVE THE PRODUCT FROM THE POOL BEFORE PLACING A POOL COVER OVER THE POOL STORE THE PRODUCT AND ACCESSORIES IN A DRY AND SAFE PLACE INDOORS FOR POOL AND FILT...

Page 4: ...se only Actual product may vary Not to scale 13 3 4 5 10 12 11 1 2 6 7 8 9 8 14 14 REF NO DESCRIPTION QTY SPARE PARTS NO 1 CLEANER TOP 1 12857 2 COLLAR NUT 1 11569 3 GEAR MODULE 1 12858 4 DEBRIS NET 1...

Page 5: ...6 13248 liters hour For Intex above ground pools The cleaning performance depends on the filter pump flow rate the higher the flow rate the better the performance First assemble your filter pump and t...

Page 6: ...f the pool unscrew the nozzle from the water return connector See Fig 1 2 Make sure the micro screen 6 is inside the hose adaptor 7 then screw the hose adaptor to the threaded strainer connector from...

Page 7: ...ion the hose collar nut 8 from the other end of the hose 9 before cutting the excess hose Screw counter clockwise direction the hose collar nut 8 back onto the main hose 9 after cutting Pool size Reco...

Page 8: ...en vacuuming large debris or leaves on the pool floor 6 From outside of the pool connect the end of hose with the hose collar nut 8 to the auto pool cleaner inlet Vertically insert the hose collar nut...

Page 9: ...p will clean the pool water It s essential to clean or replace the filter cartridge or backwash sand media frequently to keep the water clean If the auto cleaner starts to stir the debris sediments on...

Page 10: ...damage the auto cleaner hose connection fitting 3 Grasp the cleaner base with two hands lift the auto cleaner up slowly with an angle either head or tail up See Fig 10 After the water has been fully r...

Page 11: ...To remove the hose unscrew counter clockwise direction the hose collar nut 8 from the hose adaptor 7 See Fig 13 3 Unscrew counter clockwise direction the hose adaptor 7 from the threaded strainer conn...

Page 12: ...ter Check and clean the debris net and micro screen Clean or replace the filter pump cartridge If using a sand filter ensure the sand media is clean by backwashing it See sand filter owner s manual If...

Page 13: ...recreation but do not cover all risks and or dangers For additional safeguards also familiarize yourself with the following general guidelines as well as guidelines provided by nationally recognized...

Reviews: