background image

Uninterruptible power supply

sine wave line-interactive 

12 V | 230 V | 400 W

KOM0229

Instrukcja obsługi

Manual de utilizare

Owner’s manual

Bedienungsanleitung

EN

DE

PL

RO

Summary of Contents for KOM0229

Page 1: ...Uninterruptible power supply sine wave line interactive 12 V 230 V 400 W KOM0229 Instrukcja obs ugi Manual de utilizare Owner s manual Bedienungsanleitung EN DE PL RO...

Page 2: ......

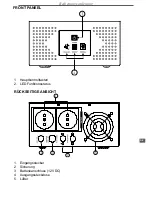
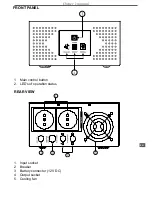
Page 3: ...Bedienungsanleitung DE FRONT PANEEL 1 Hauptkontrolltasten 2 LED Funktionsstatus R CKSEITIGE ANSICHT 1 Eingangsstecker 2 Sicherung 3 Batterieanschluss 12 VDC 4 Ausgangssteckdose 5 L fter...

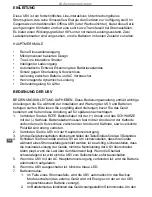
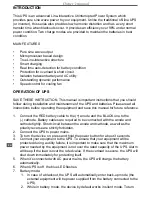
Page 4: ...r Sie das Ger t bedienen und heben diese Anleitung auf f r sp teres nachschlagen 1 Verbinden Sie das ROTE Batteriekabel mit der Anode und das SCHWARZE mit der Kathode Batteriekabel m ssen fest mit der...

Page 5: ...n und halten der Taste Ein Aus f r etwa 3 Sekunden um das Ger t auszuschalten Trennen Sie danach das Ger t von der Hauptstromversorgung Trennen Sie die USV von der Batterie wenn das Ger t f r eine l n...

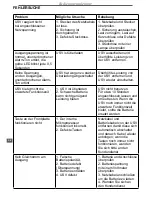
Page 6: ...n USV bietet nicht die erwartete Funktionszeit 1 USV ist berladen 2 Schwache Batterie kann nicht gen gend Leistung bieten USV nicht benutzen F r etwa 10 Stunden angeschlossen lassen und erneut testen...

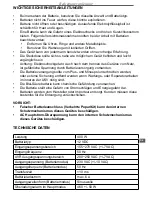
Page 7: ...rgung vorhanden Die Batterieversorgung sollte vom Plus und Minuspol unterbrochen werden oder externe Sicherung entfernt werden wenn Wartungs oder Reparaturarbeiten im inneren der USV n tig sind Die Bl...

Page 8: ...on stofflichen Ressourcen zu f rdern Private Nutzer sollten den H ndler bei dem das Produkt gekauft wurde oder die zust ndigen Beh rden kontaktieren um in Erfahrung zu bringen wie sie das Ger t auf um...

Page 9: ...Owner s manual EN FRONT PANEL 1 Main control button 2 LED s of operation status REAR VIEW 1 Input socket 2 Breaker 3 Battery connector 12 V DC 4 Output socket 5 Cooling fan...

Page 10: ...he equipment and save this manual tor future reference 1 Connect the RED battery cable to the anode and the BLACK one to the cathode Battery cables are required to be connected with the anode and cath...

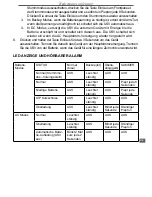
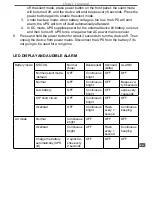
Page 11: ...seconds to turn the device off Then unplug the device from power mains Disconnect the UPS from the battery if it s not going to be used for a long time LED DISPLAY AND AUDIBLE ALARM Battery mode STATU...

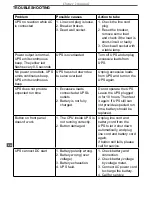
Page 12: ...from UPS and turn on the UPS again UPS does not provide expected run time 1 Excessive loads connected at UPS s outlets 2 Battery is not fully charged Do not operate the UPS Leave the UPS plugged in fo...

Page 13: ...hould be therefore disconnected in the plus and minus pole through or from the outer enclosure accessible battery fuses when maintenance or service work inside the UPS is considered The lead acid batt...

Page 14: ...erial resources Household users should contact either the retailer where they purchased this product or their local government office for details of where and how they can take this item for environme...

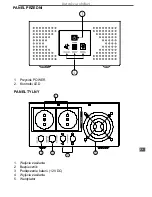
Page 15: ...Instrukcja obs ugi PL PANEL PRZEDNI 1 Przycisk POWER 2 Kontrolki LED PANEL TYLNY 1 Wej cie zasilania 2 Bezpiecznik 3 Pod czenie baterii 12 VDC 4 Wyj cia zasilania 5 Wentylator...

Page 16: ...Przed pierwszym u yciem nale y dok adnie przeczyta instrukcje i zachowa j do p niejszego wykorzystania 1 Czerwony kabel nale y pod czy do a czarny do akumulatora Nale y si upewni e kable s mocno przyt...

Page 17: ...tycznie UPS w czy si automatycznie po przywr ceniu zasilania z sieci elektrycznej 8 Aby wy czy to urz dzenie nale y nacisn i przytrzyma przycisk Power przez 3 sekundy a nast pnie od czy od zasilania J...

Page 18: ...rz dzenie zosta o wy czone z powodu przeci enia Nale y od czy nadmierne obci enie i w czy awaryjne r d o zasilania Kr tki czas pracy na baterii 1 Zbyt du e obci enie 2 Bateria nie jest w pe ni na adow...

Page 19: ...e doprowadzi do po aru lub pora enia pr dem elektrycznym Nale y od czy urz dzenie od zasilania baterii przed czyszczeniem pracami konserwacyjnymi napraw Zu ytych baterii nie nale y wyrzuca wraz z inny...

Page 20: ...uuzyskaniainformacjinatematmiejscaisposobubezpiecznegodla rodowiska recyklingu tego produktu u ytkownicy w gospodarstwach domowych powinni skontaktowa si z punktem sprzeda y detalicznej w kt rym dokon...

Page 21: ...de utilizare RO PANOUL PANEL 1 Buton mod principal de control 2 LED urile care indica starea de functionare PANOUL DIN SPATE 1 Mufa intrare 2 Intrerupator 3 Conector baterie 12 VDC 4 Mufa iesire 5 Ven...

Page 22: ...ructiuni inainte de punerea in functiune a echipamentului si sa pastrati acest manual pentru referinte ulterioare 1 Conectati cablul ROSU la baterie iar cablul ALBASTRU la baterie Cablurile bateriei t...

Page 23: ...energia de la retea este normala In acest caz va rugam sa scoateti cablul de alimentare daca doriti sa opriti invertorul AFISAJ LED SI ALARMA SONORA Modul baterie Status LED albastru LED rosu Suprasa...

Page 24: ...de functionare dorita 1 Sarcini excesive conec tate la prizele invertorului 2 Bateria nu este complet incarcata Nu actionati invertorul Lasati invertorul conectat timp de 10 ore Testati l apoi din no...

Page 25: ...ea de la baterie Alimentarea bateriei ar trebui asadar deconectata de la si baterie sau de la sigurantele bateriei atunci cand se efectueaza intretinerea sau service ul invertorului Bateriile cu plumb...

Page 26: ...lor materiale Utilizatorii casnici sunt rugati s ia legatura fie cu distribuitorul de la care au achizitionat acest produs fie cu autoritatile locale pentru a primi informatii cu privire la locul si m...

Page 27: ......

Page 28: ......

Reviews: