background image

292

IO

S  AVE THESE INSTRUCTIONS

(292IO)  BUBBLE SPA WITH POOL  ENGLISH  7.5” X 10.3”  PANTONE 295U  07/15/2016

English

Page 13

OPERATION

On/Off Button: 

Once the unit is plugged in, use this button to active the control unit panel 

buttons. The light next to the button is green when activated. Press this button to turn off all 

currently activated functions.

NOTE:

 The On/Off button may appear as a black button in the center of the control panel.

Heat Button:


Use this button to turn on and off the heating system for the spa (A) side only. 

The pump will heat the spa water until the water temperature reaches the set temperature, and 

then the heater will go into rest while the 

fi

 ltration pump will continue to run for an additional 8 

hours with the indicator light “A” showing green. During these 8 hours, every time the spa water 

temperature drops 1-2°C (1.8-3.6°F) below the set temperature the heating system will restart. 

After the additional 8 hours, the heater will rest for about 2 hours, and the 

fi

 ltration system 

will switch to the “B” side, and 

fi

 lter the water for 2 hours with the indicator light “B” showing 

green. After 2 hours, the 

fi

 ltration system will switch back to the “A” side, and run for 8 hours. 

The heater will restart to compensate for any spa water temperature drop from the initial set 

temperature. This cycle is repeated again until the unit is manually turned off. When the 

fl

 ame 

icon on the display is red, the heating system is activated. When the 

fl

 ame icon turns green, 

the water is at the set temperature. The heating system is at rest and the 

fi

 ltration system will 

continue working nonstop.

When the indicator light “A” is illuminated, the following options are available:

•  During the heating process, press the 

fi

 lter button for 3 seconds to switch the 

fi

 ltration function 

to the “B” side, the heater will stop and the 

fl

 ame icon will turn off. The 

fi

 ltration will run for 

2 hours; then the 

fi

 ltration will automatically switch back to the spa (A) side, and the heating 

system resumes its operating cycle.

•  Stop the 

fi

 ltration while the heater is at rest mode: press the 

fl

 ame button 

fi

 rst to turn off the 

heater, and then the 

fi

 lter button. 

•  

Press the 

fl

 ame button while the heater is at rest mode will turn off the heating system only, 

the 

fi

 ltration system will operate for two cycles or 24 hours before it turns off automatically.

When the indicator light “B” is illuminated and the heater is in standby mode (indicated 
by a fl ashing green fl ame icon), the following option is available:


•  Press the 

fl

 ame button will stop the 

fi

 ltration on the “B” side of the tub, and turn on the heater 

and 

fi

 lter functions on the “A” side of the tub.

IMPORTANT: 

The following conditions will lead to slow water heating.

•  The ambient temperature is lower than 10ºC (50ºF).

•  Outdoor wind speed is above 3.5-5.4 m/s (8-12 mph).

•  The air bubble function is activated when heating the spa water.

•  The spa is not properly covered with the spa cover when the water is heating.

Celsius/Fahrenheit Toggle Button: 

The temperature can be displayed in either Fahrenheit 

or Celsius. The system’s default is Celsius.

CAUTION: 

NEVER use the spa if indicated water temperature is more than 40°C (104ºF).

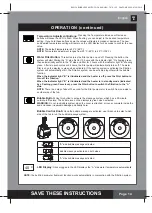
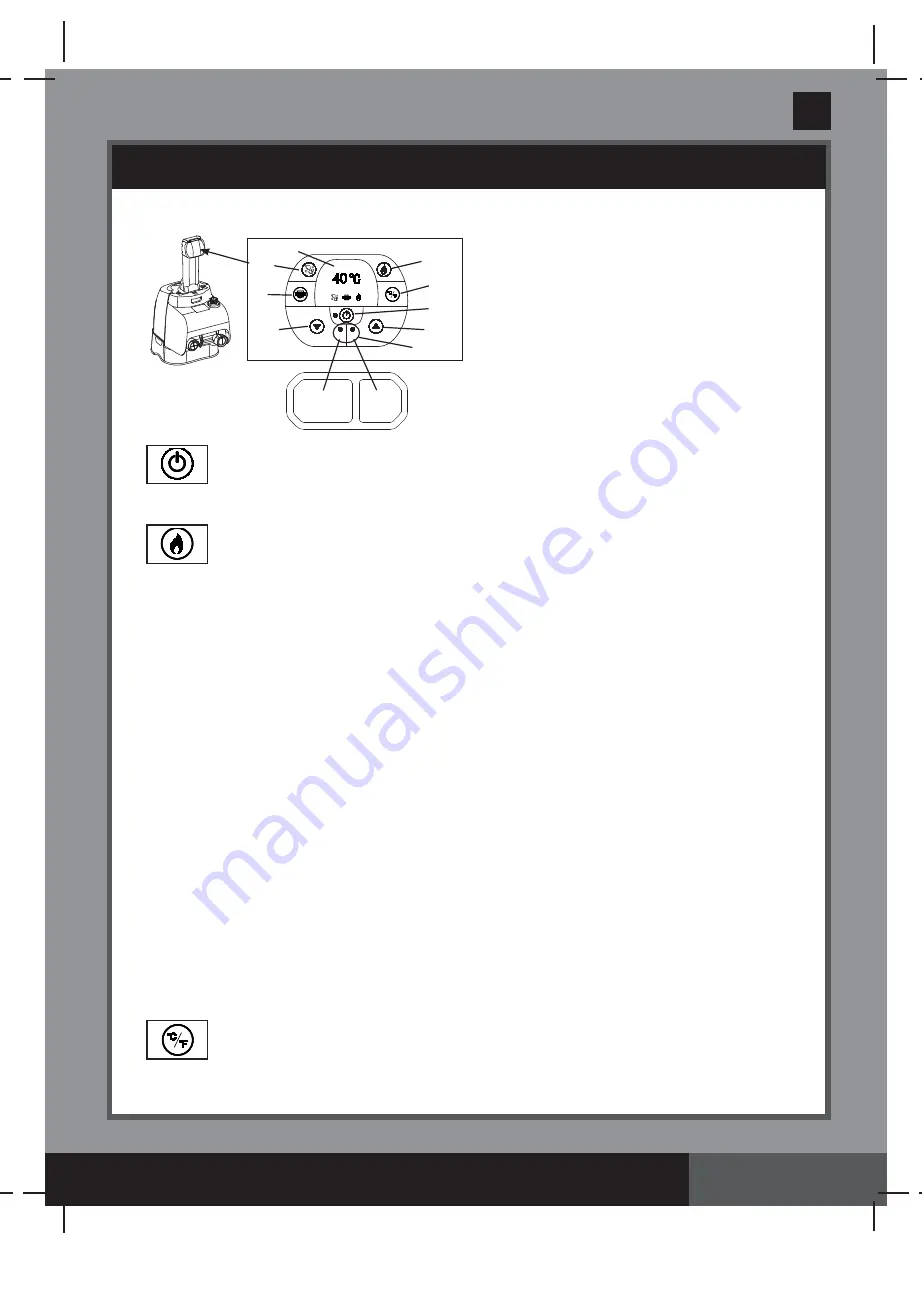
1: On/Off Button
2: Heat Button 
3:  Celsius/Fahrenheit Toggle Button
4:  Temperature Increase Button 
5:  Temperature Decrease Button
6:  Water Filter Button
7: Bubble Button
8: LED Display
9:  Filtration section indicator light ("A" side 

fi

 ltration;  

 "B" 

side 

fi

 ltration)

B

A

7

6

5

4

3

2

8

1

9

B

A

SPA CONTROL UNIT PANEL

Summary of Contents for PureSpa PS-BH-20

Page 1: ...echte vorbehalten Printed in China Imprim en Chine Impreso en China Gedruckt in China Trademarks used in some countries of the world under license from Marques utilis es dans certains pays sous licenc...

Page 2: ...TH POOL ENGLISH 7 5 X 10 3 PANTONE 295U 07 15 2016 English Page 2 Warning 3 5 Parts 6 7 Product specifications 8 Set up 8 12 Operation 13 14 LED Code Chart 15 Maintenance and Chemicals 16 22 Storage 2...

Page 3: ...ust contact the local service center for assistance and or repair of the product Parts containing live parts except parts supplied with safety extra low voltage not exceeding 12 V must be inaccessible...

Page 4: ...37 C 98 6 F The symptoms of hyperthermia include an increase in the internal temperature of the body dizziness lethargy drowsiness and fainting The effects of hyperthermia include failure to perceive...

Page 5: ...of SPA must be directly connected only to a earthed socket outlet from a fixed electrical installation To reduce the risk of electric shock do not use extension cords timers plug adaptors or converte...

Page 6: ...age 6 PARTS Before assembling your product please take a few minutes to check the contents and become familiar with all the parts NOTE Drawings for illustration purpose only Actual product may vary No...

Page 7: ...11696B 11 SPA DRAIN VALVE ADAPTOR 1 11718 11718 12 FILTER CARTRIDGE HOUSING 2 11798 11798 13 FILTER CARTRIDGE 4 11692 11692 14 FILTER CARTRIDGE HOUSING LID 2 11797 11797 15 INLET OUTLET PLUG 6 11739 1...

Page 8: ...moisture condensation Spa owners may need to comply with local or states laws relating to childproof fencing safety barriers lighting and other safety requirements Contact your local building code enf...

Page 9: ...ly 1 Connect the control panel 3 cable plug into the receptacle on top of the spa control base and screw in the plug cover firmly by hand see drawing 1 2 Screw the control panel bolts 4 with the provi...

Page 10: ...t to lock it see drawing 7 3 Unscrew the air valve cap to reveal the stem in the up position for inflation Insert the other end of the inflation hose 7 into the valve and turn to the right to lock it...

Page 11: ...rm to the touch but not hard see drawing 13 2 Disconnect the inflation hose 7 from the air blower inflation outlet and the valve 3 Replace the control base inflation cap 5 back close and recess the in...

Page 12: ...des of the tub 5 Fill the spa tub with freshwater to a level between MIN and MAX marked on the inside of the spa wall Do not over fill the spa Never move the spa tub with water inside and or with the...

Page 13: ...A is illuminated the following options are available During the heating process press the filter button for 3 seconds to switch the filtration function to the B side the heater will stop and the flame...

Page 14: ...he filtration system will automatically start The filtration system can be activated together with the bubble function When the indicator light B is illuminated and the heater is off press the filter...

Page 15: ...he button to heat up the water to the desired temperature If problem persists contact Intex Service center E95 Water temperature too high Turn off and unplug the control unit When the water has cooled...

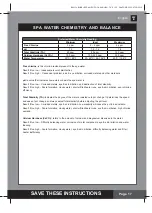
Page 16: ...housing and replace the cartridge housing assembly back onto the spa tub wall 2 Change the spa water every 3 days See Spa Tub Drainage and Spa Tub Cleaning sections for details 3 Use spa chemicals to...

Page 17: ...ye skin irritation and destruction of total alkalinity Result if too high Scale formation cloudy water shorter filter heater runs eye skin irritation poor chlorine efficiency Total Alkalinity TA indic...

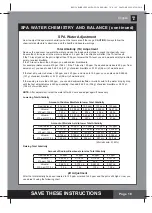
Page 18: ...ppm you can add sodium bisulfate or muriatic acid to the water drop by drop until the test strip indicates a 240 ppm reading then add 0 528 Lb 238 g of sodium bisulfate or 0 202 qt 192 ml of muriatic...

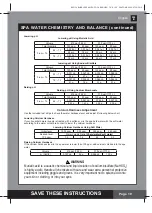
Page 19: ...ppm 350 ppm 250 ppm Desired level 100 ppm Water Volume Ratio Vhard water Vsoft water 1 9 1 4 2 5 2 3 Lowering Calcium Hardness Using Soft Water Raising pH Raising pH Using Sodium Bicarbonate Lowering...

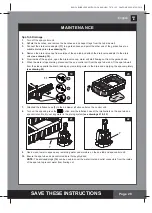
Page 20: ...6 When the water stops draining disconnect the spa control unit from the spa tub wall Lift the spa tub wall from the side opposite the drain leading any remaining water to the drain and emptying the s...

Page 21: ...air valve base from the inside of the spa tub wall and turn the wrench 22 clockwise IMPORTANT Never adjust the air valve base when the spa is in use or filled with water Only use the air valve wrench...

Page 22: ...n is activated to avoid damage to the blower motor 4 Make sure all the spa components and accessories are thoroughly clean and dry before storage Air dry the spa tub in the sun for an hour before fold...

Page 23: ...cated circuit breaker feeding the spa electrical outlet only Contact a qualify electrician to correct the electrical fault Increase the temperature and attach the spa cover Clean or replace the filter...

Page 24: ...red by the provisions of the warranty the item will be repaired or replaced with the same or comparable item at Intex s choice at no charge to you Other than this warranty and other legal rights in yo...

Reviews: