background image

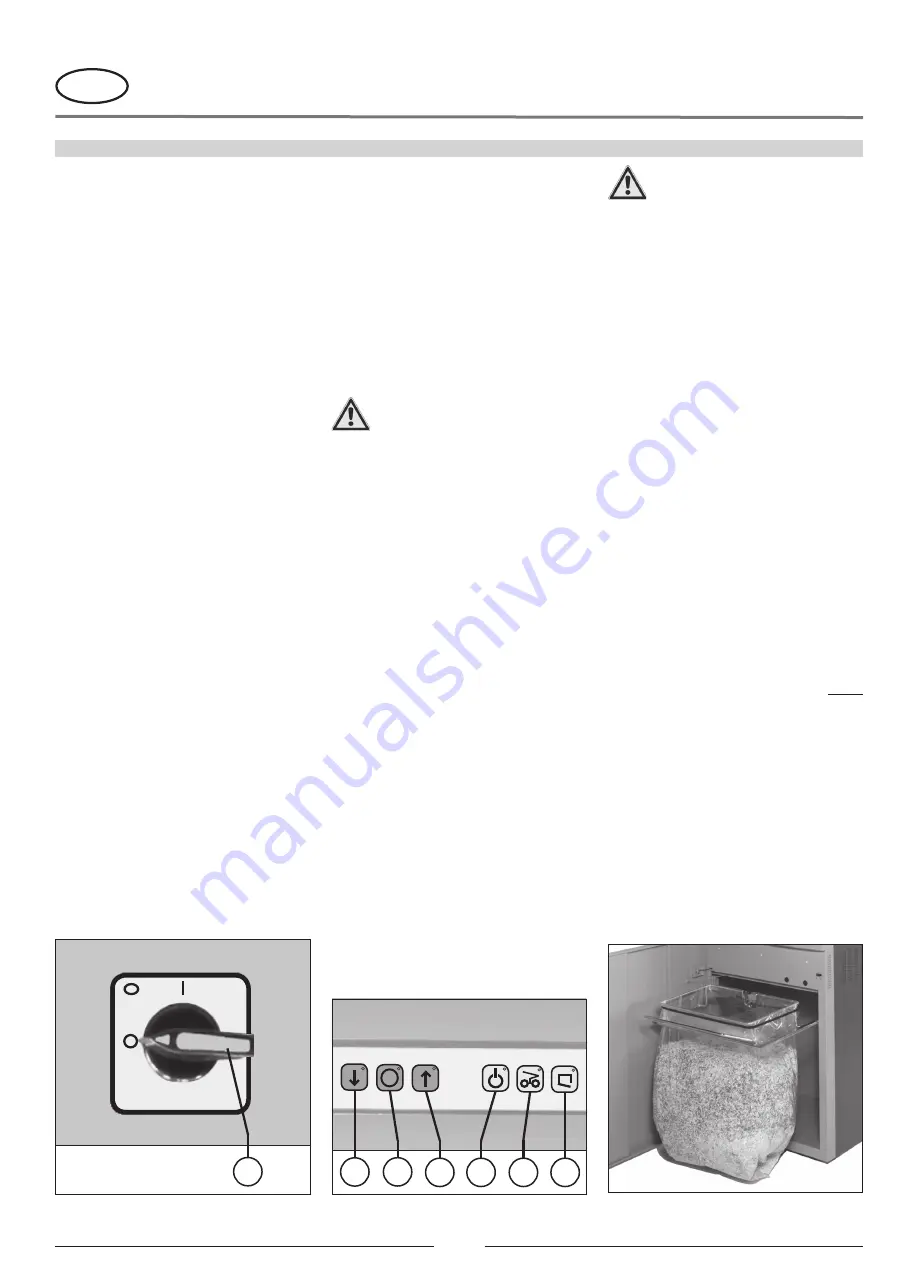
OPERATING FUNCTIONS (Figs. 1, 2 and 4):

1 =  Mains switch (Emergency-stop) (fig. 1)

    This switch turns the machine either on (po-

sition „1“) or off (position „0“).

2 =  „Cutting system forward“

    pushbutton (fig. 2)

    Pressing this button starts the cutting system. 

Material can now be fed to the shredder.


Note: Press and hold button for approx. 1 

sec.

3 =  „Cutting system stop“

    pushbutton (fig. 2)

    Pressing this button switches the shredder 

off, thereby halting the cutting system.

4 =  „Cutting system reverse“

    pushbutton (fig. 2)

    Pressing this button starts the cutting system 

in reverse.


Note: Press and hold button for approx. 1 

sec.

5 =  Pilot lamp (fig. 2)

    a) „ready“

     Continously lights when the mains switch 

(1) is operated.

    b) „motor protection“

     Flashes when the motor is overloaded. 

The machine cannot be started during the 

cooling down phase of the motor. Additional 

the pilot lamp of the control display (7) (fig. 

2) lights up.

6 =  Pilot lamp „paper jam“ (fig. 2)

    Lights when too much paper is fed to the 

cutters (see description „AUTOMATIC RE-

SPONSE IN CASE OF OVER-LOADING“).

7 =  Pilot lamp (fig. 2)

    a) „door open“/„hopper open“

      Lights when the door is not closed or when 

the hopper is open. The machine then 

switches off automatically and it cannot 

be started as long as the door is open or 

the hopper is open.

     Note: To turn the machine into the „Rea-

dy“- mode again after an interruption, there 

must be operated both end switches at 

the corresponding turn-off device. For this 

the door must be openend before not less 

than 10 cm or the hopper must be folded 

upwards with a minimum of 10 cm.

    b) „collecting bag full“ (fig. 2)

      Lights as soon as the collecting bag is full 

and needs to be emptied. At the same time 

the machine switches off automatically.

8 =  Light barrier (forward operation) (fig. 5)

    The shredding operation is started as soon 

as a sheet of paper passes through the feed 

slot.

OPERATING THE MACHINE:

To start, switch on the unit by operating the mains 

switch (1) (fig. 1). The pilot lamp marked „ready 

for operation“ (5), as well as the red stop-button 

„S“ (3) (fig. 2) will light to indicate that the machine 

is ready for operation.

The paper tray may not be used as 

a step ladder or as a seat. Danger of 

tipping over!

FEEDING CRUMPLED PAPER:

1. Fill the hopper with crumpled paper.

  Note: The crumpled paper can be dropped 

directly from the wastepaper basket into the 

hopper of the machine. The apportioning wings 

preceding the cutting mechanism ensure more 

or less uniform distribution of the paper.

 Attention: 

The wastepaper basket is no refuse 

tin and should not be emptied into the machine 

thoughtlessly - in no way can the machine 

destroy bottles, pens, pencil sharpeners etc.

2. Press the pushbutton switch „forward“ (2) (fig. 

2). The cutting system runs and begins to shred 

the paper.

  Note: Do not feed any smooth paper until the 

crumpled paper is completely shredded.

3. To switch the machine off press the red stop-

button (3) (fig. 2).

FEEDING SMOOTH PAPER:

- Feed smooth paper through the opening at the 

lower part of the hopper to the cutting system.

- Machine switches automatically to forward and 

draws paper in.

- The machine switches off automatically after 

shredding.

Never feed the shredder with a quantity 

of paper exceeding the maximum indi-

cated in the technical details.

Should the machine be overfed, follow 

the instructions under „AUTOMATIC RE-

SPONSE IN CASE OF OVERLOADING“.

AUTOMATIC RESPONSE

IN CASE oF „ovERLoADING“:

In case you accidentally overload the shredder, 

it will automatically alleviate the problem as 

follows:

1. The cutting system becomes jammed. The pilot 

lamp (6) (fig. 2) lights up.

2. The  cutting  system  runs  briefly  in  reverse, 

thereby freeing the material to be shredded.

3. The cutting system automatically switches back 

to forward mode. 

The machine repeats this process until all the 

material has been shredded satisfactorily.

EMPTYING THE COLLECTING BAG (Fig. 4):

When the collecting bag is full, the machine turns 

off automatically. The pilot lamp (7) (fig. 2) lights 

up. Empty the collecting bag as follows:

- Open the door and take out the sliding frame 

with the collecting bag.

- Remove the rubber band, take out the full bag 

and dispose of contents.

-  Put the empty bag from below through the sliding 

frame and put the edges of the bag approx. 10 

cm over the frame outwardly.

- Fix the collecting bag with the rubber band at 

the sliding frame.

- Move back the sliding frame with the collecting 

bag and close door.

Note: The machine will only run with closed 

door!

Fig. 1

Fig. 2

Fig. 4

93165 3 10/16

3

2 5

6 7

4

S

I

1

OPERATION

GB

MAINS SWITCH

6

Translation of the Original Operation Manual

Übersetzung der Originalbetriebsanleitung

Summary of Contents for 648-2C

Page 1: ...efore operating please read the Operating Instructions Veuillez lire le mode d emploi avant la mise en service 93165 3 10 16 Betriebsanleitung Seite 2 4 D Operating Instructions page 5 7 GB Instructions d opération page 8 10 F Schaltplan Wiring Diagram Plan de montage Seite page 11 14 ...

Page 2: ...uss befindet Angaben über die erforderliche Vorsicherung der Netzsteckdose siehe TECHNISCHE DATEN AusGründenderZugriffsicherheitdarf die Maschine nur betrieben werden wenn der Trichteraufsatz 9 auf dem Einfülltrichter 10 montiert ist Hinweise zum Netzanschluss a Der Schleifenwiderstand der Netzversorgung am Anschlussort darf höchstens 0 5 Ohm betragen b Der Leitungsquerschnitt der Stromzuführung a...

Page 3: ...er Motor überlastet worden ist Die Maschine kann während derAbkühlphasedesMotorsnichtgestartet werden ZusätzlichleuchtetdasLämpchen der Kontroll Anzeige 7 Abb 2 auf 6 Kontroll Anzeige Papierstau Abb 2 Leuchtet auf wenn dem Schneidwerk zuviel Papier zugeführt wurde siehe Beschreibung unter AUTOMATIK SCHALTUNG BEI ÜBERFÜTTERUNG 7 Kontroll Anzeige Abb 2 a Tür offen Trichter zurückgeklappt Leuchtet au...

Page 4: ...en so schaltet er ab Zum Zeichen dafür blinkt das Lämpchen der Anzeige Betriebsbereit 5 Abb 2 auf Zusätzlich leuchtet das Lämpchen der Kontroll Anzeige 7 Abb 2 auf Nach einerAbkühlzeit von ca 10 Minuten je nach Raumtemperatur können Sie das Gerät erneut starten und mit der Zerkleinerung fortfahren STÖRUNG CHECKLISTE BEI STÖRUNGEN Sollte die Anlage nicht funktionieren prüfen Sie folgende Punkte ist...

Page 5: ...c The machine is not a toy and is not suitable for use by children The overall technical safety concept of this machine dimensions feed openings emergency shutdown devices etc does not provide for any guarantee regarding hazard free operation by children IMPORTANT SAFETY PRECAUTIONS APPLICATION TheINTIMUS802CCshredderisusedinallareas where large quantities of printed material need to be shredded T...

Page 6: ...he hopper with crumpled paper Note The crumpled paper can be dropped directly from the wastepaper basket into the hopper of the machine The apportioning wings preceding the cutting mechanism ensure more or less uniform distribution of the paper Attention The wastepaper basket is no refuse tin and should not be emptied into the machine thoughtlessly in no way can the machine destroy bottles pens pe...

Page 7: ... ready 5 fig 2 flashes Additionalthepilotlamp of the control display 7 fig 2 lights up After a cooling down period of approx 10 minutes depending on the room temperature you can restart the machine and continue shredding FAULT CHECKLIST If the machine is not functioning properly you should check the following is the plug conneted to the mains is the mains switch 1 turned on is the door closed is t...

Page 8: ...onter la hausse de trémie 9 voir la description ci après Accrocher le sac collecteur sur le cadre coulissant voir description sous VIDER LE SAC COLLECTEUR Raccorder l appareil au réseau électrique à l aide de la fiche secteur Les grilles permettent une aération de l appareil parconséquentnepascouvrir Le branchement électrique de l appareil doit être accessible L installation doit être mise en plac...

Page 9: ...ir de remplissage de la machine Les ailettes de dosage qui précèdent le mécanisme de coupe répartissent le papier de façon à peu près égale Attention La corbeille à papier ne doit pas servir de poubelle et ne doit être vidé dans la machine qu avec précautions car elle n est pas faite pour détruire les bouteilles les stylos à bille les taille crayons etc 2 Appuyer sur la touche marche avant 2 fig 2...

Page 10: ...rez le papier excessif de l entonnoir comme suit 1 Mettre la machine pour un court instant en marche arrière touche 4 fig 2 Le matériel se dégage 2 Soulevez la goulotte un peu Le voyant de con trôle porte ouverte à savoir goulotte relevée 7 fig 2 s allume 3 Retirez à la main le papier en trop de l entonnoir Remarque Vous pouvez le faire sans aucun danger car tous les circuits électriques sont inte...

Page 11: ... 220V 60Hz PE 3 x 400V 50Hz PE 3 x 415V 50Hz PE A2 1 S2 1 S2 2 Trichter aufgeklappt hopper is opened goulotte ouverte 8 4 1 7 2 14 9 15 5 S2 2 S1 1 X1 5 16 12 11 10 S1 2 X1 7 X1 8 X1 10 3 6 A3 Sicherheitsrelais ELOBAU 470115 F1 T0 5A K12M 6 T3 4 T2 2 T1 K11M 5 L3 3 L2 5 L3 3 L2 K1S 2 T1 4 T2 6 T3 2 T1 1 L1 1 L1 1 L1 380 5 X1 21 230 220 200 0P 0 F2 T0 5A 6 T3 5 L3 3 L2 4 T2 K1S 21 K11M K12M 22 21 2...

Page 12: ...1 X1 T2 X1 T3 L2 X1 22 M1 M 3 M 1 S0 1 A1 A1 X1 6 X1 9 A1 991 0347 4 b K11M vorwärts forward avant Blatt sheet feuille Blattanzahl No of sheets No de feuilles Änderungs index revision 3 x 200V 50 60Hz PE 3 x 230V 50Hz PE 3 x 220V 60Hz PE 3 x 400V 50Hz PE 3 x 415V 50Hz PE SB Nr DWG NO b A2 A2 K1S SICHERHEIT safety securité 2 4 S2 1 M2 Pumpe Öler oil pump pomp de lubrificateur A2 9 A3 1 10 11 12 6 1...

Page 13: ...auptschalter main switch commutateur principal S0 1 L3 T1 L1 M 3 T3 X1 L2 X1 L1 M1 L2 X1 L3 X1 PE T2 X1 7 X1 10 S2 1 S2 2 Trichter aufgeklappt hopper is opened goulotte ouverte X1 12 X1 11 S0 2 7 6 S2 2 X1 8 X1 9 X1 6 S2 1 X1 5 13 5 X1 6 X1 9 8 10 11 9 S1 2 3 L2 5 L3 3 L2 5 L3 1 L1 1 L1 4 T2 K1S 6 T3 2 T1 X1 T3 X1 W X1 U X1 V X1 PE X1 T2 X1 T1 K11M 2 T1 4 T2 6 T3 5 L3 3 L2 1 L1 X1 22 A3 Sicherheit...

Page 14: ...z PE 3 x 220V 60Hz PE 3 x 400V 50Hz PE 3 x 415V 50Hz PE Schaltbild für Type 648 649 INTIMUS 802CC 852CC TAROS 80 20CC 85 20CC wiring diagram diagramme de connexions S0 1 S0 2 S1 1 S1 2 S3 S2 1 S2 2 a Blatt 2 hinzu 15 05 2008 Er 4 4 Änderung revision 05 3 2008 geprüft proved W Madena NAME J Erlecke erstellt prepared NAME 05 3 2008 Änderungs index revision Blattanzahl No of sheets No de feuilles Bla...

Page 15: ... Stoffe in Elektro und Elektronikgeräten Das vorgenannte Produkt entspricht folgenden harmonisierten bzw nationalen Normen We do hereby certify that the above mentioned product meets the requirements set forth in EEC Guidelines 2006 42 and EMC 2004 108 EEC including all changes and addendums to date thereto The object of the declaration described above is in conformity with Directive 2011 65 EU of...

Page 16: ...elgium intimus International Belgium NV Wayenborgstraat 22 2800 Mechelen 32 v w 0 15 29 46 26 suppliesbenelux intimus com Netherlands intimus International Netherlands B V Rivium Quadrant 2 6e verdieping 2909 LC Capelle aan den Ijssel 31 0 10 89 20 242 suppliesbenelux intimus com Luxemburg intimus International Luxemburg S à r l Route des Trois Cantons 9 ground floor 8399 Luxembourg 352 0 15 29 46...

Reviews: