background image

93902 1 01/16

Translation of the Original Operation Manual

Übersetzung der Originalbetriebsanleitung

GB

12

NOTE!

While  shredding,  repeated  reversing  (swit-

ching  between  forward  and  backward  ope-

ration) is normal. This is part of the shredding 

process and does not indicate a failure.

Smart shredding function

The 

intimus FlashEx

 has a smart shredding function.

When a device is fed into the machine, it is possible 

the cutting rollers do not immediately grip the device.
In  this  case  the  machine  reverses  automatically. This 

brings the material to shred into a new position. 
This sequence can happen up to 

fi

ve times in successi-

on. As soon as the cutting rollers grip the device, they 

start shredding it.
If after 

fi

ve sequences the cutting rollers cannot grip 

the device, the cutting mechanism stops (see 

„Failure“, 

p.


13

).

"Cutting mechanism ready" / "Cutting mechanism 

not ready" indicator

The curved pilot lamps (Fig. 1/9) show whether materi-

al can be fed into the machine or not:


ƒ

Green light: machine is ready!

The cutting mechanism can be fed.


ƒ

Red light: machine is busy!

The  cutting  mechanism  is  already  working  and 

cannot be fed.

Stopping the shredding process manually

The shredding process can be manually stopped at any 

time by brie

fl

y pressing the function button (Fig. 1/1) 

or the reverse button (Fig. 1/5).

NOTE!

After  10


min  without  use  the  machine  shuts 

o

ff

 automatically.

3.6  Switching the machine o

ff

Press and hold the function button (Fig. 1/1) for about 

3 seconds.


¾

The machine turns o

ff

.

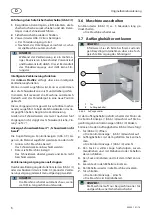
3.7  Emptying the catch basket

NOTE!

Please consult the appropriate recycling servi-

ces in your area to learn how to properly dis-

pose of the shredded material!

1

2

000085

1

Door

2

Catch basket

Fig. 4  Catch basket

If the catch basket is full, the motor switches o

ff

. The   

pilot lamp (Fig. 1/4) lights up. The curved pilot lamps 

(Fig. 1/9) 

fl

ash.

Proceed as follows to empty the catch basket (Fig. 4/2):

1. 

Open the door (Fig. 4/1).


¾

The   pilot lamp (Fig. 1/6) lights up.

2. 

Remove the catch basket with the full bag.


¾

The   pilot lamp (Fig. 1/4) goes out.

3. 

Pull the bag out to its full length, tie it up and seal 

it with adhesive tape or cable ties.

4. 

Remove  the  bag  and  dispose  of  it  with  the  con-

tents.

5. 

Insert an empty bag in the basket.

6. 

Insert the basket back into the machine.

7. 

Close the door.


¾

The   pilot lamp goes out.


¾

The machine is ready for operation.

NOTE!

The machine only runs if the door and the sa-

fety glass are closed!

Summary of Contents for FlashEx

Page 1: ...FlashEx Betriebsanleitung D Operating instructions GB Instructions d op ration F Instrucciones de uso E 000086 93902 1 01 16...

Page 2: ...operating please read the Operating Instructions Veuillez lire le mode d emploi avant la mise en service Leer las instrucciones de uso antes de la puesta en servicio D Betriebsanleitung Seite 3 8 GB O...

Page 3: ...chine nur in geschlossenen und temperierten 10 25 C R umen einsetzen Offene Geh uset r stets langsam schlie en um die Elektronik nicht zu gef hrden Das Ger t darf nicht von mehreren Per sonen gleichze...

Page 4: ...S Vor dem ersten Shreddervorgang bitte einen Initialisierungslauf starten siehe Initialisie rungslauf auf S 5 3 Bedienung 3 1 Bedienungselemente i control 000083 2 3 4 5 1 6 7 8 9 1 Funktionstaster 2...

Page 5: ...tialisierungslauf HINWEIS Beim Initialisierungslauf bitte kein Shredder gut zuf hren Initialisierungslauf starten bei ausgeschalteter Maschine 1 Funktionstaster Abb 1 1 kurz bet tigen Maschine schalte...

Page 6: ...nes Licht Maschine bereit Das Schneidwerk kann beschickt werden Rotes Licht Maschine belegt Das Schneidwerk abeitet gerade und kann nicht beschickt werden Zerkleinerungsvorgang manuell stoppen Durchk...

Page 7: ...auf dem Schneidwerk verbleibt Dies kann dreierlei Gr nde haben Die Maschine konnte das Objekt nicht greifen Siehe in diesem Fall Material wird nicht eingezogen auf S 7 Die zugef hrte Menge war zu vie...

Page 8: ...auf den Schneidwalzen zu verteilen Das Schneidwerk bewegt sich w hrend des Schmiervorgangs einige Male vor w rts und r ckw rts Dabei blinken die LED Anzeigen oder je nach Drehrichtung Anschlie end sc...

Page 9: ...ot be covered or blocked The machine s power supply must be near the machine and easily accessible Only use the machine in closed temperated 10 25 C spaces Always close the open housing door slowly to...

Page 10: ...run an initialization process see Initia lization process p 11 before shredding for the first time 3 Operation 3 1 i control operator unit 000083 2 3 4 5 1 6 7 8 9 1 Function button 2 Forward button...

Page 11: ...ion button Fig 1 1 The machine turns on 2 Briefly press the forward button Fig 1 2 The initialization process starts The cutting me chanism switches five times between forward and backward operation T...

Page 12: ...working and cannot be fed Stopping the shredding process manually The shredding process can be manually stopped at any time by briefly pressing the function button Fig 1 1 or the reverse button Fig 1...

Page 13: ...are three possi ble reasons for this The machine could not grip the object In this case see Material is not drawn in p 13 Too much material was fed In this case please proceed as follows 1 Open the sa...

Page 14: ...d and backward a few times during the lubrication process The or LED indicators flash depending on the direction of rotation The motor then switches off The pilot lamp Fig 1 7 goes out The machine is...

Page 15: ...achine et librement accessible Utiliser la machine uniquement dans des pi ces ferm es et temp r es 10 25 C Toujours fermer lentement la porte du bo tier ouverte afin de ne pas mettre en p ril le cir c...

Page 16: ...tech niques p 20 REMARQUE Avant la premi re op ration de destruction veuillez d marrer une course d initialisation voir Course d initialisation p 17 3 Commande 3 1 l ments de commande i con trol 00008...

Page 17: ...aliment e 3 4 Course d initialisation REMARQUE Lors de la course d initialisation ne pas ali menter de mat riau d truire D marrer la course d initialisation lorsque la ma chine est teinte 1 Actionner...

Page 18: ...ppareil ap r s les cinq op rations le bloc de coupe s arr te voir Panne p 19 Voyant Bloc de coupe pr t Bloc de coupe non pr t Les voyants courb s fig 1 9 indiquent si le mat riau peut tre aliment ou n...

Page 19: ...enti re ment d truit Une commande intelligente permet la machine de d terminer si l objet a t d truit et teint le bloc de coupe Dans de rares cas il peut arriver que le mat riau reste sur le bloc de c...

Page 20: ...e voyant de contr le s teint Le voyant de contr le continue de clignoter Le moteur d marre automatiquement afin de r partir l huile sur les rouleaux de coupe Le bloc de coupe se d place plusieurs repr...

Page 21: ...erca de ella y tener f cil acceso La m quina solo puede usarse en estancias cerradas y acondicionadas 10 25 C Cierre siempre lentamente la puerta de la carcasa para no da ar el mecanismo electr nico E...

Page 22: ...una primera puesta en marcha antes del primer proceso de triturado consulte Pri mera puesta en marcha p 23 3 Manejo 3 1 Elementos de mando i control 000083 2 3 4 5 1 6 7 8 9 1 Pulsador funcional 2 Pul...

Page 23: ...ncional se ilu mina para indicar que la m quina est lista para usar Puede introducirse material en la m quina 3 4 Primera puesta en marcha INDICACI N No introduzca materiales para triturar durante la...

Page 24: ...rte se detiene consulte Aver a p 25 Indicador mecanismo de corte preparado me canismo de corte no preparado Los indicadores de control arqueados Fig 1 9 se a lan si se puede introducir material o no L...

Page 25: ...3 El material no se destruye por completo La m quina determina a trav s de un control inte ligente si el objeto se ha destruido y apaga el meca nismo de corte En algunos casos puede suceder que quede...

Page 26: ...El indicador de control se apaga 4 Vuelva a cerrar la placa de seguridad El indicador de control se apaga El indicador de control sigue parpadeando El motor arranca autom ticamente para distribuir el...

Page 27: ...93902 1 01 16 27 FlashEx...

Page 28: ...o intimus com cn Austria intimus International Austria Ges m b H Ernst Melchior Gasse 20 4 OG Top 6 1020 Wien 43 1 2583621 0 contact intimus com Belgium intimus International Belgium NV Wayenborgstraa...

Reviews: