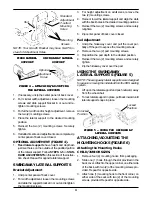
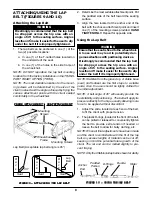
background image

13

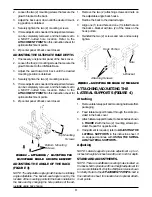
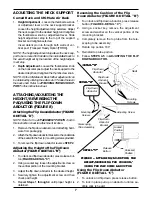
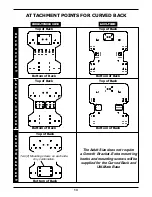
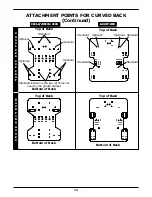
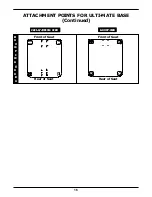
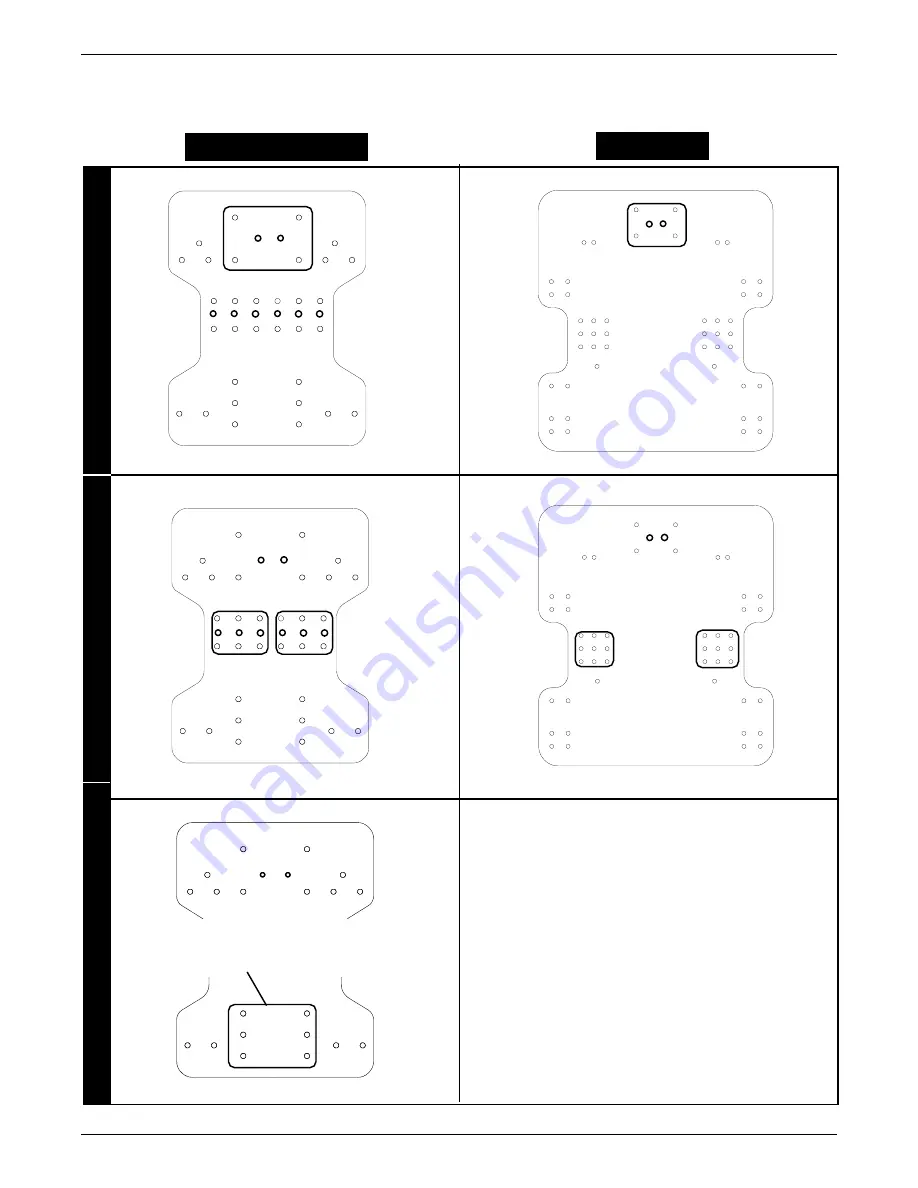
ATTACHMENT POINTS FOR CURVED BACK
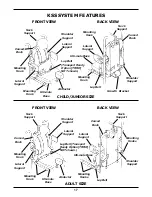
CHILD/JUNIOR SIZE

CHILD/JUNIOR SIZE

CHILD/JUNIOR SIZE

CHILD/JUNIOR SIZE

CHILD/JUNIOR SIZE

ADUL

ADUL

ADUL

ADUL

ADULT SIZE

T SIZE

T SIZE

T SIZE

T SIZE

L

L

L

L

L

A

A

A

A

A

T

T

T

T

T

E

E

E

E

E

R

R

R

R

R

A

A

A

A

A

L

L

L

L

L

S

S

S

S

S

U

U

U

U

U

P

P

P

P

P

P

P

P

P

P

O

O

O

O

O

R

R

R

R

R

T

T

T

T

T

N

N

N

N

N

E

E

E

E

E

C

C

C

C

C

K

K

K

K

K

S

S

S

S

S

U

U

U

U

U

P

P

P

P

P

P

P

P

P

P

O

O

O

O

O

R

R

R

R

R

T

T

T

T

T

G

G

G

G

G

R

R

R

R

R

O

O

O

O

O

W

W

W

W

W

T

T

T

T

T

H

H

H

H

H

B

B

B

B

B

R

R

R

R

R

A

A

A

A

A

C

C

C

C

C

K

K

K

K

K

E

E

E

E

E

T

T

T

T

T

The Adult Size does not require

a Growth  Bracket. Extra mounting

hooks and mounting screws will be

supplied for the Curved Back and

Ulti-Mate Base

Two (2) Mounting screws on each side.

Any combination.

Top of Back

Bottom of Back

Top of Back

Bottom of Back

Top of Back

Bottom of Back

Top of Back

Bottom of Back

Top of Back

Bottom of Back

Summary of Contents for 10R

Page 1: ...the growth bracket provides height adjustment for the Curved Back See FIGURE 1 3 Install four 4 of the mounting screws through the holes in the growth bracket and into the back shell Securely tighten...

Page 2: ...cket and into theundersideoftheUlti matebase Securelytighten NOTE On the Ulti mate base the standard attachment points are the front and rear four 4 holes Refer to the ATTACHMENT POINTS in this instru...

Page 3: ...elateralsupportandmountinghardwarefrom packaging 2 Feed lateral support bracket through the slots pro vided in the back cover 3 Attachlateralsupportbrackettobackshellasshown in FIGURE 2 with the two 2...

Page 4: ...STEPS 3 5 in STAN DARDADJUSTMENTSinthissectionoftheinstruc tion sheet Repeat for opposite lateral support SWINGAWAY LATERAL SUPPORTS Bracket Adjustment 1 Unzip center panel of back cover 2 For width a...

Page 5: ...2 of the mounting screws provided Repeat for opposite side Adjusting the Mounting Hooks NOTE Refer to the ATTACHMENT POINTS chart in this instruction sheet for adjustment locations 1 If necessary unz...

Page 6: ...ure the vertical neck post to the back shell using the two 2 mounting screws provided 5 Close center panel with the vertical neck post ex posed through the slot provided in upholstery 6 Zip the back c...

Page 7: ...Down Abductor Bracket DET DET DET DET DETAIL B AIL B AIL B AIL B AIL B Flip Down Abductor Mounting Screws Telescoping Tube Assembly Flip Down Abductor Bracket Adjusting Screw Using the Flip Down Abduc...

Page 8: ...anchor end of the belt with the chosen attachment point and insert one 1 of the mounting screws provided HAND TIGHTEN ONLY Repeat for opposite side Using the Lap Belt WARNING Ensure that the seat is f...

Page 9: ...hardware is tight at ALL times INSTALLATION WARNING DO NOT install twist quick and fixed release clamps in any other locations than specified in this instruction sheet otherwise the seating sys tem w...

Page 10: ...seat rail tubing install insert provided as shown in DE TAIL A 4 Install the quick release clamp onto the seat rail so that the fixed portion is flush against and rests on top of the mounting hook an...

Page 11: ...E CLAMPS FOR B FIGURE 13 FIXED RELEASE CLAMPS FOR B FIGURE 13 FIXED RELEASE CLAMPS FOR BA A A A ACK CK CK CK CK DET DET DET DET DETA I L A I L A I L A I L A I L B B B B B Lock Washer Sleeve Mounting H...

Page 12: ...release clamp DETAIL C 2 Place the fixed release clamp on the seat rail 3 Iffixedreleaseclampisnottightlyfittedaroundseatrail tubing installinsertprovidedasshowninDETAIL C 4 Install the fixed release...

Page 13: ...E E C C C C C K K K K K S S S S S U U U U U P P P P P P P P P P O O O O O R R R R R T T T T T G G G G G R R R R R O O O O O W W W W W T T T T T H H H H H B B B B B R R R R R A A A A A C C C C C K K K...

Page 14: ...L L D D D D D E E E E E R R R R R S S S S S U U U U U P P P P P P P P P P R R R R R O O O O O T T T T T M M M M M O O O O O U U U U U N N N N N T T T T T I I I I I N N N N N G G G G G H H H H H O O O...

Page 15: ...combination Front of Seat Rear of Seat G G G G G R R R R R O O O O O W W W W W T T T T T H H H H H B B B B B R R R R R A A A A A C C C C C K K K K K E E E E E T T T T T Lap Belt Optional Rear of Seat...

Page 16: ...SIZE CHILD JUNIOR SIZE CHILD JUNIOR SIZE ADUL ADUL ADUL ADUL ADULT S I Z E T S I Z E T S I Z E T S I Z E T S I Z E Front of Seat M M M M M O O O O O U U U U U N N N N N T T T T T I I I I I N N N N N G...

Page 17: ...upport Lap Belt Mounting Hook Neck Support CHILD JUNIOR SIZE Ulti mate Base Curved Back Mounting Hook Curved Back Mounting Hook Ulti mate Base Shoulder Support Lateral Support Neck Support Lap Belt Tr...

Page 18: ...colored NEOPRENE child cushion covers NOTE We recommend cleaning the cover on a regular basis Inner Cover If applicable 1 Hand wash with a damp cloth 2 We DO NOT recommend machine washing or dry ing...

Page 19: ...12 12 12 12 11 11 11 11 11 6 6 6 6 6 12 12 12 12 12 1 0 1 0 1 0 1 0 1 0 5 5 5 5 5 8 8 8 8 8 1 2 1 2 1 2 1 2 1 2 1 1 1 1 1 1 1 1 1 1 12 12 12 12 12 12 12 12 12 12 1 1 1 1 1 2 2 2 2 2 4 4 4 4 4 9 9 9 9...

Page 20: ...sfactory warranty service please write directly to Invacare at the address on the next page Provide dealer s name address model number date of pur chase indicate nature of the defect and if the produc...

Reviews: