Part No. 1104849
27
3G Storm Series
®
Wheelchairs
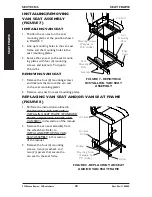
REPLACING BACK UPHOLSTERY (FIGURE 2)
1. Remove one (1) armrest from the wheelchair. Refer to INSTALLING/REMOVING
FLIP BACK ARMRESTS
in SECTION 4
of the Owner’s Manual, part number 1104782
or 1123757.
2. If applicable, remove the two (2) mounting screws and locknuts that secure the
spreader bar to the back canes.
3. Remove the two (2) mounting screws and washers that secure the existing back
upholstery to the back canes.
4. Cut the tie-wraps that secure the bottom of the existing back upholstery to the back
canes.
NOTE: Note the back angle before disassembly for proper reinstallation.
5. On the side of the wheelchair that the armrest was removed, remove one (1) of the
mounting screws, washer, spacer, and locknut that secures the back cane to the seat
frame.
NOTE: To avoid losing the insert in each back cane, thread the mounting screw just removed
through the cane from the inside of the wheelchair to hold the insert in place.
6. Remove the other mounting screw, washer, spacer, and locknut that secures the
back cane to the seat frame.
7. Slide the back cane out of the spreader bar (if applicable) and the existing back
upholstery.
8. Remove other armrest from the chair. Refer to INSTALLING/REMOVING FLIP
BACK ARMRESTS
in SECTION 4
of the Owner’s Manual, part number 1104782 or
1123757.
9. Repeat STEPS 5-7 for the opposite side of the wheelchair.
10. Slide the other back cane out of the spreader bar (if applicable) and the existing back
upholstery.
11. Slide one (1) back cane into NEW back upholstery and through spreader bar (if
applicable).
12. Secure back cane to the seat frame from the outside of the wheelchair with the
existing two (2) mounting screws, washers, spacers, and locknuts. Use Loctite 242
and torque to 75 in-lbs.
13. Repeat
STEPS 11-12 for opposite back cane.
14. Secure the top of the new back upholstery to the back canes with the two (2) existing
mounting screws.
UPHOLSTERY/POSITIONING STRAP
SECTION 5
UPHOLESTERY/
POSITIONING STRAP


