17
This Procedure Includes the Following:
Removing or Replacing Standard Armrest
Adjusting Armrest Height - Adjustable
Height Arms Only
Using or Replacing Flip-Back Armrest
ARMS
PROCEDURE 2
A
R
M
S
WARNING
After ANY adjustments, repair or service and BE-
FORE use, make sure all attaching hardware is
tightened securely - otherwise injury or damage
may result.
Make sure the armrest is securely locked into the
arm socket BEFORE using the wheelchair.
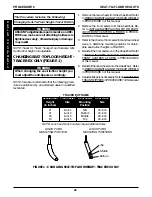
FIGURE 3 - USING OR REPLACING FLIP-BACK
ARMREST
USING OR REPLACING FLIP-BACK
ARMREST (FIGURE 3)
WARNING
DO NOT operate or replace flip-back armrest
when wheelchair is folded.
Using
1. Press in armrest release button located on armrest
front tube.
2. Rotate front of armrest UP and BACK and out of
arm socket.
3. Reverse STEP 2 to replace armrest to DOWN position.
4. Position the front of the armrest into the arm socket.
5. Ensure armrest is securely locked into arm socket
and snap button locks into place BEFORE using.
Replacing
1. Perform STEPS 1-2 above to flip the armrest back.
2. Remove bolt, washer, spacer and locknut securing
armrest to wheelchair frame.
3. Remove armrest from frame.
4. Position new insert into new rear armrest tube, align-
ing the mounting holes.
Arm Socket
Armrest Release Button
Armrest Front
Tube
Washer
Spacer
Armrest
Rear Tube
Nut
FIGURE 1 - REMOVING OR REPLACING
STANDARD ARMREST
REMOVING OR REPLACING
STANDARD ARMREST (FIGURE 1)
1. Press in armrest release button located on armrest.
2. Pull straight up to remove armrest from arm sockets.
3. Replace armrest by reversing STEPS 1-2.
Arm Socket
Arm Socket
Armrest Release
Button
ADJUSTING ARMREST HEIGHT -
ADJUSTABLE HEIGHT ARMS ONLY
(FIGURE 2)
1. Unlock the armrest by flipping the height adjustment
lever on the top front of the armrest to the UP (HORI-
ZONTAL) position.
2. Adjust armrest to desired height.
NOTE: Height adjustment lever MUST be in the unlocked
position when placing armrest into the arm assembly.
3. Lock the armrest by pressing the height adjustment
lever into the DOWN (VERTICAL) position when the
desired armrest height is achieved.
FIGURE 2 - ADJUSTING ARMREST HEIGHT -
ADJUSTABLE HEIGHT ARMS ONLY
Unlocked (Horizontal)
Height Adjustment Lever
Locked (Vertical)
5. Insert the new bolt through the armrest mounting
bracket, new washer, new spacer and new armrest
rear tube, as shown in FIGURE 3.
NOTE: Ensure the spacer sits flush against the armrest.
6. Install nut onto bolt. Torque to 55-60in./lbs.
Armrest
Mounting
Bracket
Bolt
Armrest Rear
Tube
Insert
Mounting
Holes

