background image

Patient Transfer

6 Patient Transfer

6.1 General safety information

WARNING!
Risk of Injury or Damage

Improper use of this product may cause injury
or damage.

– Before transferring to a stationary object

(wheelchair, bed, commode or other surface)
check that the weight capacity can withstand
the patient’s weight.

– If applicable the wheel or castor locks of the

stationary object (wheelchair, bed etc.) must be
in a locked position before lowering the patient
onto or lifting the patient off.

WARNING!
Risk of Injury or Damage

Improper use of this product may cause injury
or damage.

– Use the push bars on the mast at all times to

push or pull the lift.

– Avoid using the lift on an incline. Invacare

recommends that the product only be used on
a flat surface.

– During transfer, with the patient suspended in

a sling attached to the lift, DO NOT roll lift over
uneven surfaces that could cause the lift to tip
over.

WARNING!
Risk of Injury or Damage

Damage to parts of the lift (hand control, castors,
etc.) caused by impact with the floor, walls or
other stationary objects may cause damage to
the product and lead to injury.

– DO NOT allow parts of the lift to impact the

floor, walls or other stationary objects.

– ALWAYS store the hand control properly when

not in use.

WARNING!
Risk of Injury

The spreader bar can move suddenly and cause
injury.

– When positioning lift, be aware of the position

of the spreader bar and the patient.

WARNING!
Risk of Entrapment or Strangulation

The hand control cord can cause injury if
improperly positioned and secured.

– ALWAYS be aware of the location of the hand

control cord in relation to the patient and
caregivers.

– DO NOT allow the hand control cord to become

entangled around the patient and caregivers.

– The hand control must be secured properly.

ALWAYS store the hand control properly when
not in use.

WARNING!
Risk of Entrapment or Strangulation

Items in the patient’s surroundings can cause
entrapment strangulation during lifting. To avoid
entrapment or strangulation:

– Before lifting, check that the patient is

completely free of his/her surroundings.

WARNING!
Risk of Entrapment

There is a risk of entrapment between the
spreader bar hooks and the sling.

– Use caution when lifting.
– NEVER put hands or fingers on or near the

hooks when lifting.

– Ensure the patient’s hands and fingers are away

from the hooks before lifting.

IMPORTANT!

All transfer procedures described in the following
can be performed by one (1) assistant. However,
Invacare recommends that the procedures are
performed by two (2) assistants whenever
possible.

6.2 Preparing to lift

WARNING!
Risk of Injury

During transfers and lift operation, the boom can
impact the patient or caregivers and cause injury.

– ALWAYS be aware of the position of the boom

during transfers.

– Ensure the boom is positioned in a way that it

cannot impact the patient or bystanders.

– ALWAYS be aware of your body position in

relation to the boom during transfers.

1.

Before proceeding, review the information and observe
all warnings indicated in

2 Safety, page 5

and

Lifting

the Patient

.

2.

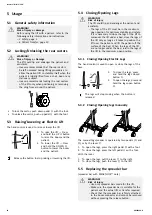
Position the patient onto the sling. Refer to your sling
user manual.

3.

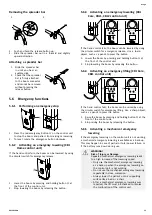
Unlock the rear castors. See

5 Usage, page 14

.

4.

Open the legs of the lift. See

5 Usage, page 14

.

5.

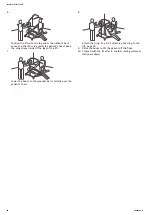
Use the push bars to move the patient lift into position.

WARNING!

– When using the lift in conjunction with

beds or wheelchairs, be aware of the
position of the lift in relationship to those
other devices so that the lift does not
become entangled.

– Before positioning the legs of the patient

lift under a bed, make sure that the area
is clear of any obstructions.

6.

Lower the patient lift for easy attachment of the sling.

7.

Lock the rear castors. See

5 Usage, page 14

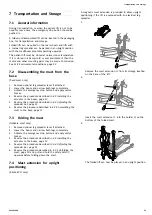
8.

Attach the sling. See

6.2.1 Attaching the sling to the

lift, page 20

60128520-A

19

Summary of Contents for Birdie EVO

Page 1: ...EVO Birdie EVO COMPACT Birdie EVO PLUS Birdie EVO XPLUS en Mobile Patient Lift User Manual This manual MUST be given to the user of the product BEFORE using this product this manual MUST be read and...

Page 2: ...ation duplication or modification in whole or in part is prohibited without prior written permission from Invacare Trademarks are identified by and All trademarks are owned by or licensed to Invacare...

Page 3: ...t 15 5 6 4 Activating an emergency lifting CBJ Care CBJ1 control unit 15 5 6 5 Activating a mechanical emergency lowering 15 5 7 Charging the battery 16 5 7 1 CBJ Home control unit 16 5 7 2 CBJ Care C...

Page 4: ...ous situation that could result in damage to property if it is not avoided Tips and Recommendations Gives useful tips recommendations and information for efficient trouble free use 1 2 Service Life Th...

Page 5: ...NING Risk of injury or damage Inappropriate handling of cables can cause electrical shock and product failure Do not kink shear or otherwise damage the cables of the product Make sure that no cables a...

Page 6: ...ment must consider The patient s weight size physical ability and medical condition The type of transfer and the environment The compatibility to the other lifting equipment used 2 3 Safety informatio...

Page 7: ...king load Class II equipment Type B applied part WEEE conform European Conformity Medical device Abbreviations for technical data Iin Incoming Current Uin Incoming Voltage Int Intermittence AC Alterna...

Page 8: ...ty limitation Atmospheric pressure limitation Transport and storage conditions Operation conditions Always ensure that the sling is properly attached to the hooks See 6 2 1 Attaching the sling to the...

Page 9: ...roduct 3 2 Main parts of the lift A Boom B Spreader bar with or without SMARTLOCK C Hook for sling D Push bar E Lifting actuator F Mast foldable or fixed G Base with foot pedal for manual leg spreader...

Page 10: ...ar control unit and actuators with foldable mast 1 piece with fixed mast 2 pieces base as a separate part B Hand control 1 piece Mains cable 1 piece User Manual 1 piece Battery 1 piece CBJ Care CBJ1 a...

Page 11: ...mast only WARNING Risk of injury or Damage The maximum safe working load stated on the boom and on the base must be the same Always compare the maximum safe working load values stated on the base and...

Page 12: ...ast and fit it to the boom mounting bracket C 3 Align the holes and reinstall the pin A Make sure that the pin is completely inserted and secure it with the D clip IMPORTANT Due to higher loads Birdie...

Page 13: ...llow during daily usage or after a reassembly the lift requires service Contact your Invacare provider for service After the initial assembly of the lift the service indicator needs to be reset before...

Page 14: ...and assistants The legs of the lift must be in the maximum open position for optimum stability and safety If it is necessary to close the legs of the lift to maneuver the lift under a bed close the l...

Page 15: ...s the button 1 Lower the boom by pressing and holding button A at the front of the control unit 2 Stop lowering the boom by releasing the button 5 6 4 Activating an emergency lifting CBJ Care CBJ1 con...

Page 16: ...BJ Home control unit The control unit is equipped with a sound signal A beep indicates that the battery has low capacity but lowering the patient is still possible It is recommended to charge the batt...

Page 17: ...he boom 5 7 3 Optional hand control For CBJ Care a optional hand control with battery indicator is available Battery Indicator Type Battery State Description Full Charge The battery is OK no need for...

Page 18: ...ger as shown and make sure there is an audible click B When the battery is placed on the charger the charge LED will illuminate When charging is complete charge LED will switch off A battery needing t...

Page 19: ...the hand control properly when not in use WARNING Risk of Entrapment or Strangulation Items in the patient s surroundings can cause entrapment strangulation during lifting To avoid entrapment or stran...

Page 20: ...of the sling during transfer Make sure that there is sufficient head support when lifting a patient Position the patient in the sling as directed by the instructions provided with the sling Adjustmen...

Page 21: ...is her feet rest on the base of the lift straddling the mast The lower center of gravity provides stability making the patient feel more secure and the lift easier to move 10 Move the patient lift wit...

Page 22: ...an withstand the patient s weight The wheelchair wheel locks MUST be in a locked position before lowering the patient into the wheelchair for transport 1 Perform the following steps in addition to tho...

Page 23: ...achment 6 Raise the patient off of the commode 7 When the patient is clear of the commode surface use the push bars to move the lift away from the commode 8 Proceed with the transfer to another restin...

Page 24: ...the sling straps inside of the legs of the lift 7 Lower the boom so the spreader bar is directly over the patient s chest 8 Attach the sling See 6 2 1 Attaching the sling to the lift page 20 9 Raise t...

Page 25: ...d in 4 5 Installing the actuator to the boom page 12 5 Reverse the procedure described in 4 4 Unfolding the spreader bar page 11 6 Reverse the procedure described in 4 3 2 Assembling the mast to the b...

Page 26: ...Take precautions for yourself and use appropriate protective equipment CAUTION Risk of electric shock and product damage Switch off the device and disconnect from mains if applicable When cleaning el...

Page 27: ...specified therein 8 4 Service interval WARNING Risk of injury or damage Service must be performed only by a qualified technician Contact your Invacare provider for service Service must be performed a...

Page 28: ...1 Technical Data page 30 Be environmentally responsible and recycle this product through your recycling facility at its end of life Disassemble the product and its components so the different material...

Page 29: ...ency stop button is pressed in Rotate the emergency stop button clockwise until it pops out Battery not connected properly to control unit Reconnect the battery to the control unit See 5 7 4 Optional...

Page 30: ...rom base b 630 630 530 530 630 Base length c 1200 1220 1060 1080 1280 Total length without lever n 1250 1250 1100 1100 1280 Total length with lever l 1290 1290 1140 1140 1350 Reach from base with legs...

Page 31: ...dable version only 1300 1320 1190 1210 1360 CSP Central Suspension Point All measures are taken with a 450 mm 2 point spreader bar Weights Main Parts kg Birdie EVO Birdie EVO COMPACT Birdie EVO PLUS X...

Page 32: ...ronmental conditions Storage and transportation Operation Temperature 10 C to 50 C 5 C to 40 C Relative humidity 20 to 90 at 30 C not condensing Atmospheric pressure 800 hPa to 1060 hPa Allow the prod...

Page 33: ...duct uses RF energy only for its internal function Therefore its RF emissions are very low and are not likely to cause any interference in nearby electronic equipment RF emissions CISPR 11 Class B Thi...

Page 34: ...ions for radio cellular cordless telephones and land mobile radios amateur radio AM and FM radio broadcast and TV broadcast cannot be predicted theoretically with accuracy To assess the electromagneti...

Page 35: ...Notes...

Page 36: ...445 38 00 34 italia invacare com www invacare it Nederland Invacare BV Galvanistraat 14 3 NL 6716 AE Ede Tel 31 0 318 695 757 Fax 31 0 318 695 758 nederland invacare com www invacare nl Belgium Luxemb...

Reviews: