Assembly
2.9
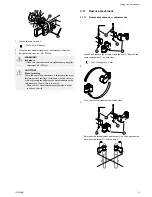
Mounting the foot operated tilt
1.
B
A
Mount the foot operated tilt
A
on the back frame of the
wheelchair. Tighten the screw
B
.
The foot operated tilt is always mounted on the right
side.
2.
D
C
E
F
Loosen the screw
C
in order to remove the lever for the hand
operated tilt
D
. Loosen the nut to the brake wire for the tilt
handle
E
and remove the wire
F
.
3.
H
G
Attach the wire of the foot operated tilt
G
and tighten the nut
H
.
2.10
Reducing tilt and / or backrest recline
Depending on the rear wheel size when the wheelchair is ordered
with a low seat to floor height, reduction bushings are added to the
tilt and/or recline function in some combinations. This is because
there may be a conflict between the seat frame and the rear wheel
attachment when tilting or reclining the chair. This means that the
operating range of the gas piston is reduced in order to avoid damage
to certain parts when tilting or reclining the wheelchair. One or more
reduction bushings can be used, each reduction bushing reduces the
tilting/reclining range with 10º. This means that if the tilt/recline have
a range of 1–30º, the range will be reduced to 1–20º by adding one
reduction bushing to the gas piston. For the Dahlia 30º version, the
reduction bushings can be used to reduce both the tilt and the recline
range. For the Dahlia 45º version, the reduction bushings will reduce
the recline range with 10º or 20º and the reduction blocks will reduce
the seat tilt range from 45º to 30º.
CAUTION!
Risk of damage
Removing the reduction bushings could cause damage to
the wheelchair in some positions.
–
Be careful when tilting/reclining the chair if the
reduction bushings are removed. Read the instructions
concerning limitation areas and how to avoid them.
See section: “Troubleshooting” for more information.
2.10.1
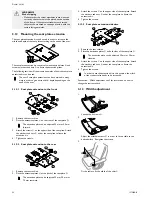
Mounting of the tilt/recline reduction bushing
The reduction bushings can be used both for the seat tilt
and the backrest recline on Dahlia 30º and for the backrest
recline reduction on Dahlia 45º.
A
A
1.
Mount the reduction bushing
A
on the gas piston rod by manually
pressing it on to the tube.
2.
Remove the reduction bushing
A
by manually twisting it from
the gas piston rod.
When using one bushing, the tilt/recline reduction is 10�,
with two bushings, the tilt/recline reduction is 20�.
2.10.2
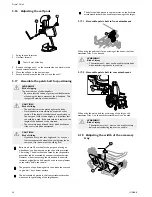
Mounting the tilt reduction block
A
B
C
1.
Place the reduction block
A
in the slider attachment
B
on the
seat frame.
2.
Fasten the screw
C
and tighten.
3.
Repeat the procedure with the second block.
With these reduction blocks mounted, the tilt limit is 30�.
1572308-B
9


