Etude Plus
3 Setup
3.1 Receiving the bed
When you receive the bed, check the packaging. If the bed shows any
signs of damage upon delivery, please follow terms of delivery
0
00000000000000
00000000000000
00000000000000
00000000000000
00000000000000
00000000000000
00000000000000
00000000000000
00000000000000
00000000000000
00000000000000
00000000000000
00000000000000
00000000000000
00000000000000
00000000000000
00000000000000
00000000000000
00000000000000
00000000000000
00000000000000
00000000000000
00000000000000
00000000000000
00000000000000
00000000000000
00000000000000
00000000000000
00000000000000
00000000000000
00000000000000
00000000000000
00000000000000
0000000000000000
0000000000000000
0000000000000000
0000000000000000
0000000000000000
0000000000000000
0000000000000000
0000000000000000
0000000000000000
0000000000000000
0000000000000000
0000000000000000
0000000000000000
0000000000000000
0000000000000000
0000000000000000
0000000000000000
000000
000000
000000
000000
000000
000000
000000
0000000000000
0000000000000
0000000000000
0000000000000
0000000000000
0000000000000
0000000000000
0000000000000
0000000000000
0000000000000
0000000000000
0000000000000
0000000000000
0000000000000
0000000000000
0000000000000
0000000000000
0000000000000
0000000000000
00000000
00000000
00000000
00000000
00000000
00000000
00000000
00000000
00000000
00000000
00000000
00000000
000000000000
000000000000
00000000
00000000 00000000
00000000 00000000
00000000 00000000
00000000 00000000
00000000 00000000
00000000 00000000
00000000 00000000
A
B
C
D
E
F
G
H
I
J
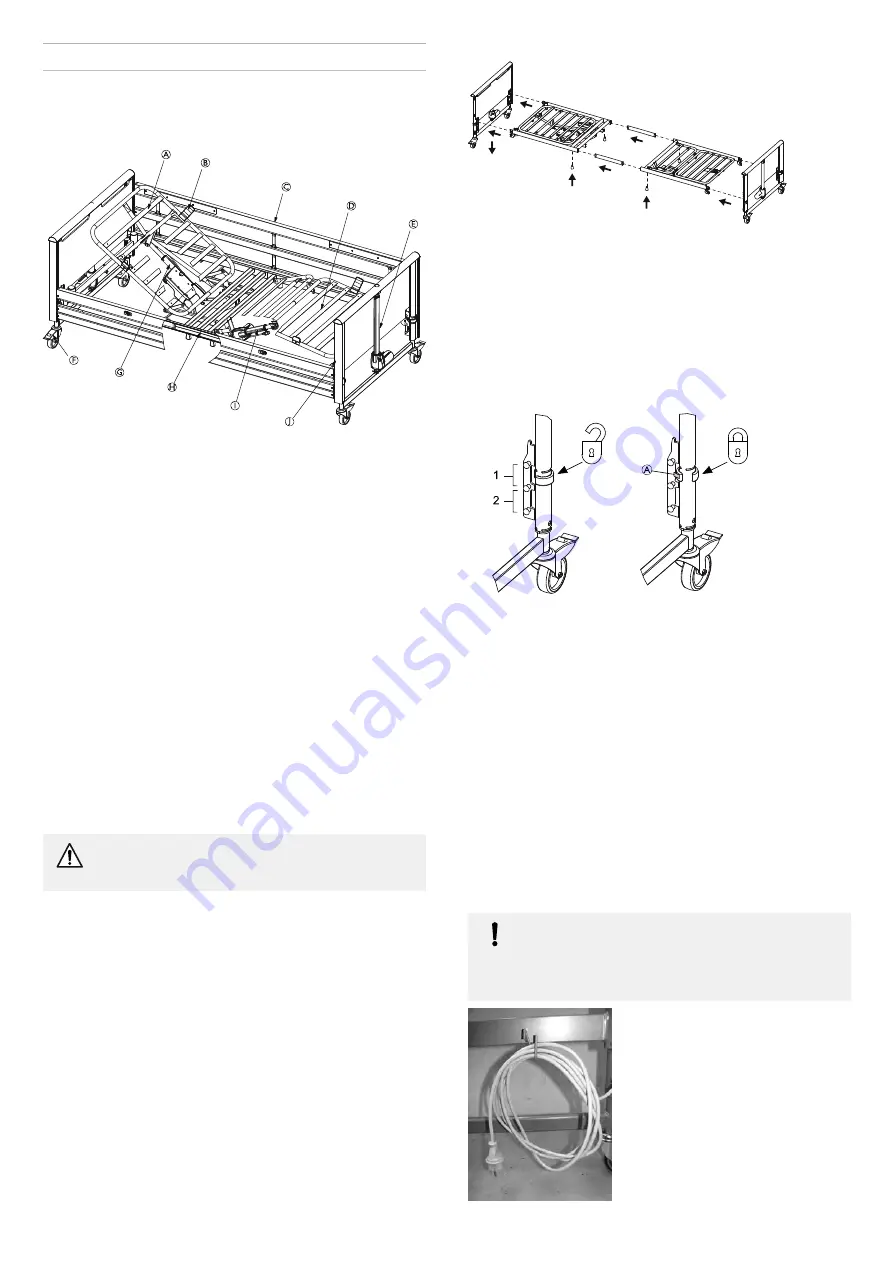
Scope of delivery:
A
Mattress support, head end
B
4 pcs. of mattress support bracket
C
Pair of side rails (wood or steel)
D
Mattress support, foot end
E
Motor for bed end
F
Castors
G
Motor for head end
I
Motor for leg end
J
Pair of bed ends
Hand control
Optional
H
Mattress support extension (10 or 20 cm)
Lifting pole
Transport fitting
3.2 Assembly of the bed
WARNING!
–
After each assembly, check that all fittings are tightened
correctly and that the function of all parts is given.
Mattress support
1.
Place the two inserts in the head end of the mattress support.
The inserts must be mounted in such a way that one extends
further out of the side tube than the other.
2.
Loosely screw in the two thumb screws.
3.
Push the foot end of the mattress support onto the two inserts.
4.
Tighten with two thumb screws.
5.
Retighten the two thumb screws at the head end of the top frame.
6.
Turn up the four mattress support brackets.
7.
Turn the handle of the leg section up.
8.
Press the bracket
A
on the locking ring* and turn the locking ring
on the bed ends to the position "open".
1
2
A
9.
Latch the mattress support to the bed ends and press firmly
into position.
10. Make sure that the bed ends are in the same level. It is possible
to level the bed in high position (1) and low position (2).
11. Turn the locking ring to the position "lock".
* The locking rings ensure that the mattress support is not accidentally
lift clear off the bed ends.
Control Box
The control box is latched to the backrest motor. The control box
is provided with a label with symbols showing where to connect the
motor plugs:
•
Backrest motor
•
Thigh section’s motor
•
Bed end motor
•
Hand control
3.3 Wiring
IMPORTANT!
–
The cables must be mounted in such a way that they
are kept clear of the floor and do not block the castors.
Mount the mains cable on the hook for this purpose,
see picture.
6
1567454-A
Summary of Contents for Etude Plus
Page 18: ...Notes...
Page 19: ...Notes...


