SECTION 2—INSTALLATION
8
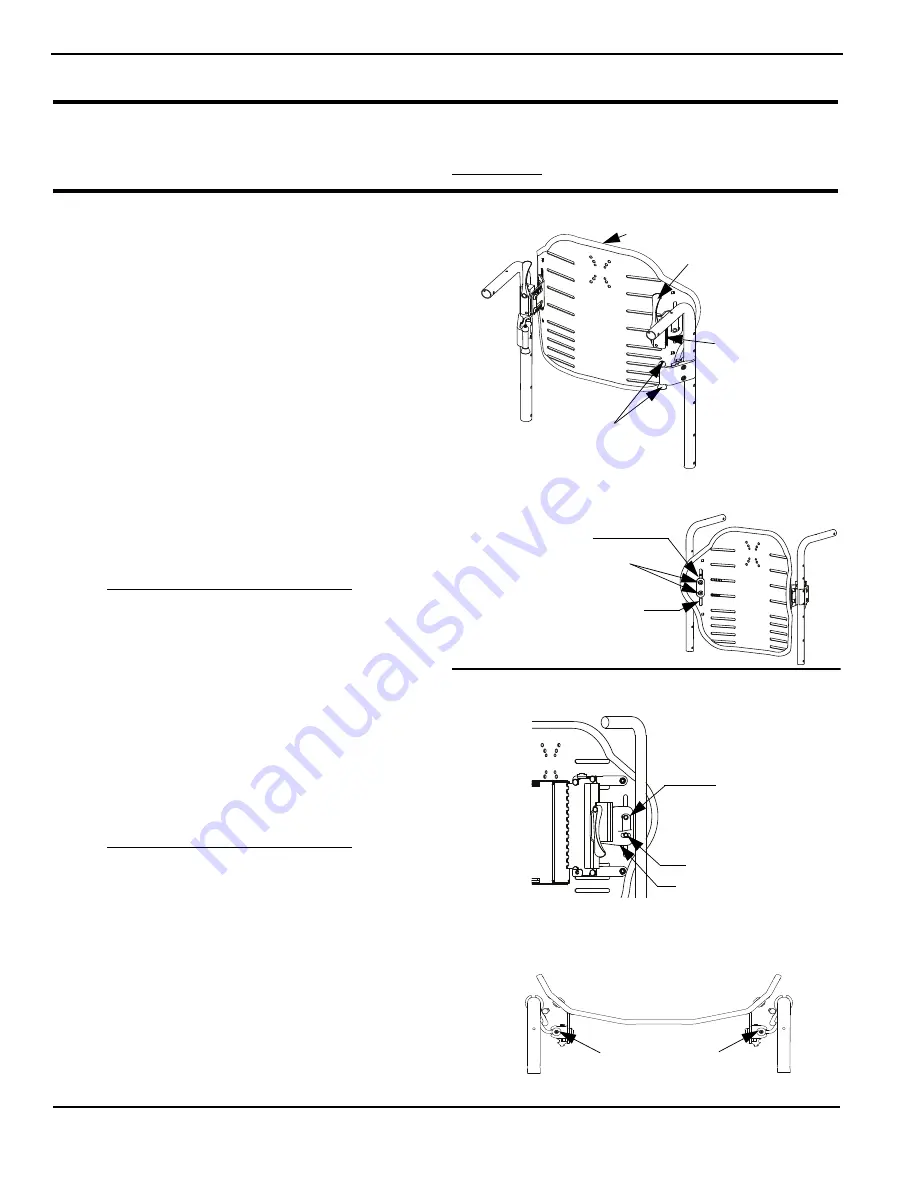
Install/Adjust the Back on the Back Cane Mounting Assemblies
WARNING
The installed location of the back is directly related to the wheelchairs stability. Check the stability of the
wheelchair after installation and before use. Refer to STABILITY in the wheelchair Owner’s Manual.
NOTE:
For
this
procedure,
refer
to
FIGURES
2.4
through
2.6.
NOTE:
Both
latches
MUST
be
in
the
up
(unlocked)
position
to
install
the
back.
1.
On
each
back
mounting
bracket,
slightly
pull
out
as
you
rotate
the
bottom
of
the
latch
outward
180°
to
the
up
(unlocked)
position.
2.
Align
and
put
the
receivers
on
the
back
mounting
brackets
onto
the
back
cane
mounting
assemblies
as
shown
in
FIGURE
2.4.
3.
Adjust
the
back
cane
mounting
assemblies
until
the
receivers
are
fully
seated
on
each
side
and
the
back
is
centered
between
the
back
canes.
NOTE:
If
no
other
adjustment
is
needed,
proceed
to
STEP
5.
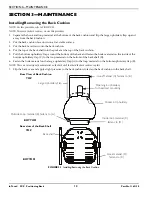
NOTE:
The
position
of
the
socket
head
screws,
washer
and
nut
plates
can
be
adjusted
in
the
slots
in
the
back
shell
and
back
mounting
brackets.
Refer
to
FIGURE
2.5.
Use
STEP
4
to
make
these
adjustments.
4.
Perform
the
following:
A. Remove
the
back
cushion.
B. On
both
sides
of
the
wheelchair,
loosen
but
DO
NOT
remove
the
two
socket
head
screws
that
secure
the
washer
plate,
nut
plate
and
back
mounting
bracket
to
the
back
shell.
C. Adjust
the
hardware
until
the
desired
height
is
obtained
and
the
receivers
are
fully
seated
onto
the
back
cane
mounting
assemblies
as
shown
in
Make
sure
the
back
is
centered
between
the
back
canes.
D. On
both
sides
of
the
wheelchair,
tighten
the
two
socket
head
screws
that
attach
the
washer
plate,
nut
plate
and
back
mounting
bracket
to
the
back
shell.
E. Install
the
back
cushion.
5.
On
each
back
mounting
bracket,
rotate
the
latch
outward
and
down
to
the
locked
position.
NOTE:
Make
sure
an
audible
“click”
is
heard
for
each
latch.
6.
Tighten
the
socket
head
screws
on
the
back
cane
mounting
assemblies.
7.
Pull
up
on
the
back
to
make
sure
it
is
locked
in
place.
FIGURE 2.4
Align the back mounting hardware
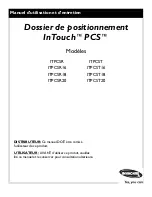
FIGURE 2.5
Secondary adjustments
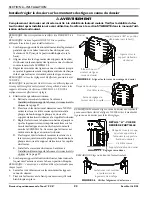
FIGURE 2.6
Check hardware alignment
Back
Receiver on Back
Mounting Bracket
Ball and Cone on Back Cane
Mounting Assembly
Latch
(rotated 180° to the up
(unlocked) position)
Socket Head Screws
Washer Plate
DETAIL “A” -
PARTIAL BACK VIEW
NOTE:
Back
Cane
Mounting
Assembly
not
shown
for
clarity.
DO
NOT
remove
the
back
cane
mounting
assembly
to
make
this
adjustment.
Socket Head Screw
Height Adjustment Slot in
Back Shell
Nut Plate
(cut away to show slot in back
mounting bracket)
Back Mounting Bracket
Hardware is centered
and seated in the
receivers
NOTE:
This
view
is
from
the
top
of
the
wheelchair,
looking
down
at
the
seat.


