background image

InTouch™ Stabilite/Stabilite OM Cushion

6

Part No 1141448

Installing ThinAir Bladder

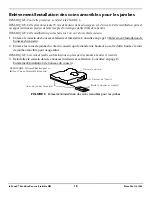
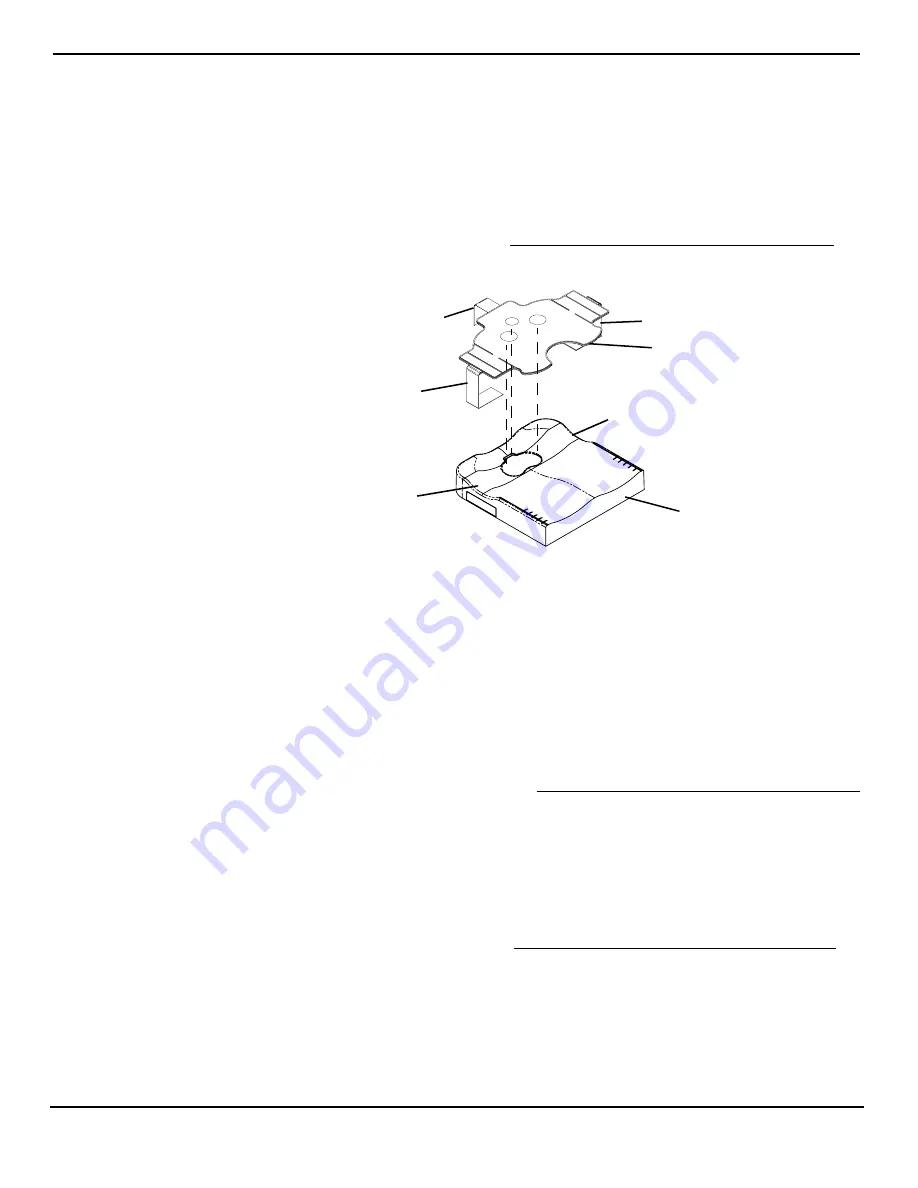
1. Center


the


ThinAir


bladder


on


the


foam


so


that


the


side


straps


are


centered


in


the


contours


on


each


side


of


the


foam.

2. Fasten


the


side


straps


and


rear


strap


to


the


bottom


of


the


foam.

NOTE:


DO


NOT


over

tighten


the


straps.


The


ThinAir


bladder


must


be


free


to


move


with


the


cushion.

3. Reinstall


cushion


into


inner


and


outer


covers.


Refer


to


Removing/Installing


the


Cushion


Covers


on


page 4.

FIGURE 4   

Removing/Installing the ThinAir Bladder

Modifying the Cushion to Accommodate Obliquity

NOTE:


For


this


procedure,


refer


to


FIGURE 5


on


page


7.

Modification for approximately 1/2-inch of obliquity

NOTE:


This


modification


can


be


done


on


either


side


of


the


cushion.


1. Determine


which


side


of


the


cushion


needs


to


be


lowered.

2. Remove


the


cushion


from


inner


and


outer


covers.


Refer


to


Removing/Installing


the


Cushion


Covers


on


page 4.

3. On


the


side


of


the


cushion


that


needs


to


be


lowered,


remove


the


obliquity


insert


by


pulling


on


the


tab.

NOTE:


Remove


only


one


obliquity


insert.


The


cushion


is


not


intended


to


be


used


with


both


obliquity


inserts


removed.

4. Install


the


cushion


into


inner


and


outer


covers.


Refer


to


Removing/Installing


the


Cushion


Covers


on


page 4.

ThinAir bladder

Cushion

Foam contour

Side strap

Side strap

Rear strap 

Foam contour

NOTE:


The


ThinAir


bladder


is


an


option


on


the


Stabilite


OM


cushion.

Summary of Contents for InTouch Stabilite Cushion

Page 1: ... the hook and loop fastening straps are securely attached between the seating surface and cushion before using The InTouch Stabilite cushion has a weight limitation of 250 lbs for cushion widths up to and including 20 inches and 350 lbs for cushion widths over 20 inches The InTouch Stabilite OM cushion has a weight limitation of 300 lbs for cushion widths up to and including 20 inches and 500 lbs ...

Page 2: ...adder is available as an option for the InTouch Stabilite OM cushion To order the ThinAir bladder contact customer service at 1 800 333 6900 Outer Inner Covers The outer cover is made from a water resistant fabric to protect the foam The top is fabricated from a stretch fabric The bottom is fabricated from a heavyweight non skid fabric A water resistant inner cover allows air circulation while pro...

Page 3: ... of cushion with front edge of seating surface 3 Perform one of the following Hook Attachment Strips Secure the cushion to the seating surface making sure that the strips of loop on the cushion cover are securely attached to the strips of hook on the seating surface No Attachment Strips Place the cushion on the seating surface Loop Attachment Strips 1 Verify the double sided hook strips are secure...

Page 4: ...FIGURE 2 NOTE The ThinAir bladder is standard on the InTouch Stabilite cushion The ThinAir bladder is available as an option for the InTouch Stabilite OM cushion To order the ThinAir bladder contact customer service at 1 800 333 6900 1 Position the cushion with inner cover and the ThinAir bladder in place toward the rear of the outer cover NOTE When installed properly the ThinAir bladder is at the...

Page 5: ... and tuck into the bottom of the cover 4 Fold the bottom flap back 5 Reinstall the cushion with inner cover in place into the outer cover Refer to Installing Outer Cover on page 4 FIGURE 3 Removing Inner Cover Installing Inner Cover Removing Installing the ThinAir Bladder NOTE For this procedure refer to FIGURE 4 on page 6 Removing ThinAir Bladder 1 Remove cushion from inner and outer covers Refer...

Page 6: ...re refer to FIGURE 5 on page 7 Modification for approximately 1 2 inch of obliquity NOTE This modification can be done on either side of the cushion 1 Determine which side of the cushion needs to be lowered 2 Remove the cushion from inner and outer covers Refer to Removing Installing the Cushion Covers on page 4 3 On the side of the cushion that needs to be lowered remove the obliquity insert by p...

Page 7: ...p Pull on the tab to make sure that the obliquity inserts are securely in place before installing the covers 7 Install the cushion into inner and outer covers Refer to Removing Installing the Cushion Covers on page 4 FIGURE 5 Modifying the Cushion to Accommodate Obliquity DETAIL A MODIFICATION FOR APPROXIMATELY INCH OF OBLIQUITY Obliquity Inserts Tab Tab Top of cushion Bottom of cushion Bottom of ...

Page 8: ...ve the cushion from the inner and outer covers Refer to Removing Installing the Cushion Covers on page 4 2 Remove the leg wedge from the side of the cushion that requires a lower seat to floor height Save the removable leg wedge for future use NOTE Leg wedges secure in place with hook and loop strips 3 Install cushion into inner and outer covers Refer to Removing Installing the Cushion Covers on p...

Page 9: ...it or parts must be returned for warranty inspection using the serial number when applicable as identification within thirty days of return authorization date DO NOT return products to our factory without our prior consent C O D shipments will be refused please prepay shipping charges LIMITATIONS AND EXCLUSIONS THE FOREGOING WARRANTY SHALL NOT APPLY TO SERIAL NUMBERED PRODUCTS IF THE SERIAL NUMBER...

Page 10: ... Consultez votre médecin ou votre thérapeute si vous avez des questions concernant le soulagement de votre poids l auto examen de la peau oui si vous avez des limitations ou besoins spécifiques personnels Avant utilisation assurez vous que les bandes d attache à boucles et crochets soient fermement attachées entre la surface d assise et le coussin Le coussin Stabilite InTouch a une limite de poids...

Page 11: ...t d une déviation pelvienne légère ou modérée Le coussin InTouch Stabilite OM présente l avantage supplémentaire de permettre au thérapeute ou au fornisseur de matériel de réhabilitation de tenir compte ou de corriger une déviation légère ou modérée par le repositionnement des inserts de déviation Consultez en page 16 Modification du coussin pour l adapter à la déviation Housses intérieure extérie...

Page 12: ...ace d assise et au siège AVANT utilisation Si le coussin n est pas bien attaché à la surface d assise soyez prudent lors du transfert de et vers le fauteuil roulant Bande d attache à crochets Pas de bande d attache 1 Enlevez la bande à crochets double face du dessous du siège 2 Alignez le bord avant du coussin avec le bord avant de la surface d assise 3 Procédez à un des deux Bande d attache à cro...

Page 13: ... temps sous risque d endom mager le tissus de la housse intérieure Installation de la housse extérieure REMARQUE Pour cette procédure se référer à la FIGURE 2 REMARQUE Lorsqu elle est installeée correctement la vessie ThinkAir est à la partie suérieure de la housse intérieure REMARQUE La fereture éclair est à l arrière et le tissus stretch est à la partie supérieure de la housse extérieure 2 Gliss...

Page 14: ...de la housse intérieure REMARQUE Pour cette procédure se référer à la FIGURE 3 1 Positionnez le coussin avec sa vessie ThinAir vers l arrière de la housse intérieure nouvelle existante REMARQUE La face arrière du coussin est marquée REAR arrière 2 Glissez le coussin dans la housse intérieure 3 Pliez le rabat supérieur vers le dessus et poussez le dans le fond de la housse 4 Repliez le rabat inféri...

Page 15: ...les courroies latérales soient centrées dans les profils de chaque côté de la mousse 2 Attachez les courroies latérales et la courroie arrière en dessous de la mousse REMARQUE NE PAS serrer excessivement les courroies La vessie ThinAir doit pouvoir bouger avec le coussin 3 Réinstallez le coussin dans les housses intérieure et extérieure Consultez en page 13 Enlèvement Installation de housses du co...

Page 16: ...lation de housses du coussin Modification pour une déviation d environ 25 mm REMARQUE Cette modification peut se faire sur l un ou l ature côté de coussin 1 Définissez d abord quel côté du coussin doit être abaissé 2 Enlevez le coussin des housses extérieure et intérieure Consultez en page 13 Enlèvement Installation de housses du coussin 3 Du côté du coussin qui doit être abaissé enlevez l insert ...

Page 17: ...TION Dessous du Coussin Dessus du Coussin Enlevez un insert de déviation pour une modification 12 mm Alignez les arêtes chanfreinées des inserts de déviation Placez l inserrt de déviation enlevé à l ÉTAPE 3 sur l insert de déviation qui se trouve sur le coussin pour une modification pour 25 mm de déviation REMARQUE Cette modification peut se faire sur l un ou l ature côté de coussin REMARQUE Cette...

Page 18: ...ieure et intérieure Consultez en page 13 Enlèvement Installation de housses du coussin 2 Enlevez les coins de jambe du côté du coussin qui demande une hauteur au sol réduite Gardez le coin de jambe amovible pour usage futur REMARQUE Les coins de jambe sont maintenus en place par des bandes à boucles et crochets 3 Réinstallez le coussin dans les housses intérieure et extérieure Consultez en page 13...

Page 19: ...ant le numéro de série le cas échéant comme identification dans les trente jours qui suivent la date d autorisation Ne renvoyez PAS les produits à l usine sans notre accord préalable Les expéditions en port du seront refusées veuillez s v p payer le fret d avance LIMITATIONS ET EXCLUSIONS LA PRÉSENTE GARANTIE NE S APPLIQUE PAS AUX PRODUITS PORTANT DES NUMÉROS DE SÉRIE SI CES NUMÉROS ONT ÉTÉ SUPPRI...

Page 20: ...ciones y necesidades individuales Cerciórese de que las tiras adherentes estén firmemente unidas entre la superficie del asiento y el cojín antes de usarlo El cojín Stabilite de InTouch tiene un límite de peso de 250 lbs 114 Kg para anchos de cojín hasta 20 pulgadas 508 mm inclusive y 350 lbs 159 KG para anchos mayores El cojín Stabilite OM de InTouch tiene un límite de peso de 300 lbs 136 Kg para...

Page 21: ... para el cojín Stabilite OM de InTouch Para pedirla comuníquese con el servicio al cliente llamando al 1 800 333 6900 Fundas externa interna La funda externa está hecha de una tela impermeable que protege la espuma La parte superior está fabricada de tela elástica La parte inferior está hecha de una tela gruesa antideslizante La funda interna impermeable permite la circulación del aire y a su vez ...

Page 22: ...n con el borde delantero de la superficie del asiento 3 Siga uno de los siguientes procedimientos Tiras adherentes macho Asegure el cojín a la superficie del asiento cerciorándose de que las tiras adherentes hembra en la funda del cojín queden firmemente unidas a las tiras macho en la superficie del asiento Sin tiras adherentes Coloque el cojín en la superficie del asiento Tiras adherentes hembra ...

Page 23: ...que el cojín en la funda interna y la bolsa ThinAir en su lugar hacia la parte posterior de la funda externa NOTA Cuando está correctamente instalada la bolsa ThinAir queda situada en la parte superior de la funda interna NOTA La cremallera está en la parte posterior y la tela elástica en la parte superior de la funda externa 2 Deslice el cojín al interior de la funda externa 3 Cierre la funda ext...

Page 24: ...r hacia la parte posterior de la funda interna nueva existente NOTA La superficie posterior del cojín está marcada con la palabra ʺREAR 2 Deslice el cojín dentro de la funda interna 3 Doble la solapa superior e introdúzcala en la parte inferior de la funda 4 Doble la solapa inferior hacia atrás 5 Vuelva a instalar el cojín con la funda interna en su lugar en la funda externa Consulte la sección so...

Page 25: ...ón de las fundas en la página 23 FIGURA 4 Retiro instalación de la bolsa ThinAir Modificación del cojín para adaptarlo a la oblicuidad NOTA Para este procedimiento consulte la FIGURE 5 Modificación para una oblicuidad aproximada de 1 2 pulgada 12mm NOTA Esta modificación puede hacerse en cualquier lado del cojín 1 Determine el lado del cojín que debe reducirse 2 Retire el cojín de las fundas inter...

Page 26: ...e que los insertos de oblicuidad estén firmemente instalados en su lugar 7 Instale el cojín en las fundas interna y externa Consulte la sección sobre Retiro instalación de las fundas en la página 23 FIGURA 5 Modificación del cojín para adaptarlo a la oblicuidad DETALLE A MODIFICACIÓN PARA UNA OBLICUIDAD APROXIMADA DE 1 2 PULGADA 12MM Insertos de oblicuidad Lengüeta Lengüeta Parte superior del cojí...

Page 27: ... de las fundas interna y externa Consulte la sección sobre Retiro instalación de las fundas en la página 23 2 Retire la cuña para piernas del lado del cojín que requiere una menor altura entre el asiento y el piso Conserve la cuña para usarla en el futuro NOTA Las cuñas se afianzan en su lugar con las tiras adherentes 3 Instale el cojín en las fundas interna y externa Consulte la sección sobre Ret...

Page 28: ...ntes contar con nuestra autorización No se aceptan envíos con pago contra entrega C O D Devuelva el producto con flete prepagado LIMITACIONES Y EXCLUSIONES LA PRESENTE GARANTÍA NO SE APLICARÁ A PRODUCTOS CUYO NÚMERO DE SERIE HAYA SIDO RETIRADO O ESTROPEADO A PRODUCTOS AFECTADOS POR USO NEGLIGENTE ACCIDENTES USO INCORRECTO MANTENIMIENTO O ALMACENAMIENTO INADECUADOS USO COMERCIAL O INSTITUCIONAL A P...

Reviews: