18
REPLACING THE BACK
UPHOLSTERY (FIGURE 2)
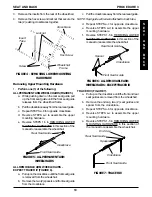
1. Remove the screws and washers that secure the
existing back upholstery to the back canes.
2. Position new back upholstery on back canes as
shown in FIGURE 2.
REPLACING THE SEAT
UPHOLSTERY (FIGURE 3)
1. Remove the eight (8) screws that secure the exist-
ing seat upholstery to the crossbraces.
2. Remove the existing seat upholstery from the
crossbraces.
3. Install the new seat upholstery by reversing STEPS 1-2.
FIGURE 3- REPLACING THE SEAT UPHOLSTERY
Screws
ADJUSTING SEAT WIDTH
WARNING
Adjusting the seat width of the wheelchair MUST
be performed ay an authorized Invacare dealer
or qualified technician.
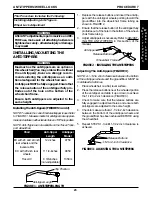
Removing Lower Mounting Hardware
(FIGURE 4)
1. Remove the existing back and seat upholstery from
the wheelchair. Refer to REPLACING THE BACK
UPHOLSTERY and REPLACING THE SEAT UP-
HOLSTERY in this section of the manual.
NOTE: If adjusting the seat width of the wheelchair, back and
seat upholstery as well as the crossbraces MUST be replaced.
2. Remove the four (4) screws and locknuts that se-
cure the insert tube to the lower wheelchair frame.
FIGURE 2 - REPLACING BACK UPHOLSTERY
Seat Upholstery
This Procedure Includes the Following:
Fold Down Back - Tracer Transport Only
Replacing Back Upholstery
Replacing the Seat Upholstery
Adjusting Seat Width
WARNING
After ANY adjustments, repair or service and BEFORE
use, make sure all attaching hardware is tightened
securely - otherwise injury or damage may result.
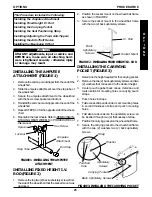
FOLD DOWN BACK - TRACER
TRANSPORT ONLY (FIGURE 1)
Folding
1. Lift up on the two (2) release levers on the back canes.
2. Pull back on the handles to the desired position.
Unfolding
WARNING
Make sure the release levers are securely
locked in place BEFORE using the wheelchair.
1. Pull up on the two (2) back canes until the release
levers lock in place.
NOTE: There will be an audible click.
2. Pull on the handles to make sure the back is locked
in place.
FIGURE 1 - FOLD DOWN BACK - TRACER
TRANSPORT ONLY
PROCEDURE 3
SEAT AND BACK
S
E
A
T
A
N
D
B
A
C
K
Release Lever
Back Cane
Handle
Washers
Washers
Back Upholstery
Screws
3. Securely tighten the new back upholstery to the back
canes with the screws and washers.


