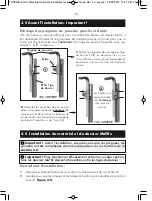
3.0 Before Installation- Important!
Exchanging the Left & Right Push Handle Assemblies:
1.
Remove the push handles from the ETAC
back canes by loosening the 5mm bolts (x2)
and sliding the push handle assembly up
and off of the back cane
2
.
Reinstall the push handles onto the
op-
posite
back canes (so that the clamp is on
the outside of the back cane). Refasten the
push handle assembly via the 5mm bolts
(x2).
Push Handle
Clamp
ETAC
Back Cane
Clamps are
repositioned to
the
outside
of
back canes
REAR VIEW
REAR VIEW
1
2
In order to provide sufficient clearance for the Matrx Back mounting hardware, the
left & right push handle assemblies must be exchanged so that the clamp assembly is
re-positioned to the
outside
of the back canes. Refer to steps
1.
and
2.
below.
4.0 Hardware and MaTRx Back Installation
Important!
Prior to installation, ensure the Push Handle Assemblies have
been swapped per the instructions in
Section 3.0
.
Important!
To function effectively and provide proper support, all MaTRx
backs should be centered between the back canes.
Installation Instructions:
1
Remove existing wheelchair back/upholstery (if applicable).
2
Ensure the mounting plates and mounting clamp assemblies are in the proper
orientation (refer to
Figure 2.0
)
TRD0305- ETAC Mounting Hardware Installation Instructions- Europe, Rev 1.0_Layout 1 29/02/2012 12:43 PM Page 4
- 4 -


