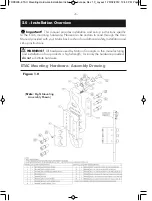
4.0 Hardware and MaTRx Back Installation
3
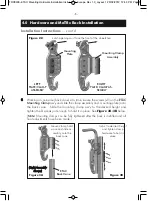
Working on one side (back cane) at a time, loosen the screws
(x3)
on the
ETAC
Mounting Clamp
ass’y and slide the clamp assembly
(incl. mounting plate)
onto
the back cane. Slide the mounting clamp ass’y to the desired height and
tighten the 3 screws just enough to hold it in place. See
Figure 3A
/
3B
below.
(
Note:
Mounting clamps can be fully tightened after the back is installed and all
final adjustments have been made.)
Installation Instructions
... cont’d
Mounting Clamp
Assembly
Latch opening must face the front of the wheelchair
Mounting
Plate
RIGHT
RIGHT
PLATE/CLAMP AS-
SEMBLY
LEFT
LEFT
PLATE/CLAMP
ASSEMBLY
Figure 2.0
Adjust to desired height
and tighten clamp
hardware to hold in
place
ETAC
Back Cane
Figure 3A
Loosen clamp hard-
ware and slide as-
sembly onto the
back cane
Figure 3B
(Right Assembly
Shown)
TRD0305- ETAC Mounting Hardware Installation Instructions- Europe, Rev 1.0_Layout 1 29/02/2012 12:43 PM Page 5
- 5 -


