background image

SECTION 9—JOYSTICK

Part No. 1118386

43

P9000

 XDT

SECTION 9—JOYSTICK


WARNING

After ANY adjustments, repair or service and BEFORE use, make sure that all 

attaching hardware is tightened securely - otherwise injury or damage may result.
Before performing any maintenance, adjustment or service verify that On/Off 

switch on the joystick is in the OFF position.

Preparing the Joystick for Use

NOTE: For this procedure, refer to FIGURE 9.1.
NOTE: The joystick is factory installed on the right side of the wheelchair. To reposition the joystick 

onto the left side of the wheelchair, refer to Repositioning the Joystick on page 44. The joystick 

should be repositioned by a qualified technician.

1. Turn the adjustment lock lever to release the joystick mounting tube from the 

mounting bracket.

2. Slide joystick mounting tube to the desired position.
3. Turn the adjustment lock lever to secure the joystick mounting tube in the mounting 

bracket.

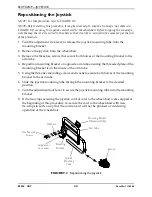
FIGURE 9.1   

Preparing the Joystick for Use

Joystick Mounting Tube

Mounting Bracket

Adjustment Lock Lever

Summary of Contents for P9000 XDT

Page 1: ...This manual MUST be given to the user of the wheelchair USER BEFORE using this wheelchair read this manual and save for future reference For more information regarding Invacare products parts and ser...

Page 2: ...CAL SUPPORT BEFORE ATTEMPTING TO SERVICE OR OPERATE THIS EQUIPMENT OTHERWISE INJURY OR DAMAGE MAY RESULT DEALERS AND QUALIFIED TECHNICIANS DO NOT SERVICE OR OPERATE THIS EQUIPMENT WITHOUT FIRST READIN...

Page 3: ...essure 12 Electrical Accessories 12 Batteries 12 Charging Batteries 13 Grounding Instructions 14 Rain Test 14 Weight Training 14 Weight Limitation 15 SECTION 2 EMI INFORMATION 16 SECTION 3 SAFETY HAND...

Page 4: ...gle Switch 28 Speed Control switch 28 Joystick 28 Information Gauge Display 29 Operating the Wheelchair 31 Turning the Power On Off 31 Using the Horn 31 Using the Joystick to Drive the Chair 31 SECTIO...

Page 5: ...tery Boxes 49 Installing Removing Battery Tray 50 Installing Removing Batteries Into From Battery Boxes 51 Connecting Battery Cables 52 Direct Mount Method 53 Battery Clamp Method 56 Replacing Battery...

Page 6: ...ervicing of your product 3 Receiving updates with product information maintenance tips and industry news Register ONLINE at warranty invacare com Please have your model number and purchase date availa...

Page 7: ...e of the restraints made available by the auto industry Invacare cannot and does not recommend any wheelchair transportation systems WARNING Invacare products are specifically designed and manufacture...

Page 8: ...page 66 for more information about the battery discharge indicator NOTE Includes seating system and accessories P9000 XDT SEAT WIDTH 18 inches SEAT DEPTH 16 or 18 inches by extension BACK HEIGHT 17 18...

Page 9: ...not meet your needs follow instructions below CAUTION Any wheel lock adjustments should embed wheel lock shoe at least 1 8 into tire when locked 3 16 on pneumatic tires INSTRUCTIONS FOR WHEEL LOCK AD...

Page 10: ...are used by incontinent users and or are frequently exposed to water may require replacement of electrical components more frequently Operating Information Performance adjustments should only be made...

Page 11: ...result in injury to the user or damage to the wheelchair Anti tippers MUST be used at all times When outdoors on wet soft ground or gravel surfaces anti tippers may not provide the same level of prote...

Page 12: ...blocks Before performing any maintenance adjustment or service verify that On Off switch on the joystick is in the Off position Avoid storing or using near external flame or combustible products Serio...

Page 13: ...als DO NOT attempt to recharge the batteries and operate the wheelchair at the same time DO NOT operate wheelchair with extension cord attached to the AC cable DO NOT attempt to recharge the batteries...

Page 14: ...ssistant sufficient time to remove his her power wheelchair from a rain storm and retain wheelchair operation DO NOT leave power wheelchair in a rain storm of any kind DO NOT use power wheelchair in a...

Page 15: ...care recommends that only heavy duty wheelchairs should be used for individuals weighing more than 250 lbs Further the activity level of the individual wheelchair user is important For instance a 170...

Page 16: ...tion from the more common sources of radiated EMI There are a number of sources of relatively intense electromagnetic fields in the everyday environment Some of these sources are obvious and easy to a...

Page 17: ...te hand held transceivers transmitters receivers such as citizens band CB radios or turn ON personal communication devices such as cellular phones while the powered wheelchair is turned ON 2 Be aware...

Page 18: ...for the new wheelchair user and assistant with safety as the most important consideration for all Stability and Balance WARNING ALWAYS wear your seat positioning strap The seat positioning strap is a...

Page 19: ...stacles can be alleviated somewhat by learning how to manage your wheelchair Keep in mind your center of gravity to maintain stability and balance While the P9000 XDT is designed for use primarily in...

Page 20: ...able non detachable part of the wheelchair frame when lifting the wheelchair and stabilizing the wheelchair when the wheelchair is being lowered to the ground The first assistant should turn the anti...

Page 21: ...ir may result in injury to the user or damage to the wheelchair The weight of the wheelchair without the user and batteries is between 80 and 127 lbs Follow this procedure for moving the wheelchair be...

Page 22: ...NOTE For this procedure refer to FIGURE 3 1 1 Position the wheelchair as close as possible along side the seat to which you are transferring with the casters pointing parallel to it 2 After the wheel...

Page 23: ...guard for the wheelchair user FIGURE 3 2 Reaching Leaning and Bending Forward Reaching and Bending Backward WARNING DO NOT lean over the top of the back upholstery This will change your center of grav...

Page 24: ...ls straight no excessive drag or pull to one side Ensure that all fasteners on the clothing guards are secure Ensure that the arms are secure but easy to release and adjustment levers engage properly...

Page 25: ...tension when caster is spun Caster should come to a gradual stop Ensure that casters are free of debris Loosen tighten caster locknut if wheel wobbles noticeably or binds to a stop Ensure that the whe...

Page 26: ...heck that both casters contact ground at the same time SYMPTOM PROBABLE CAUSE SOLUTIONS Batteries draw excessive current when charging Battery failure Electrical malfunction Have batteries checked for...

Page 27: ...tion Clean terminals Contact dealer Invacare DON T DO Don t perform any installation or maintenance with out first reading this manual Don t make it a habit to discharge batteries to the lowest level...

Page 28: ...the joystick housing This provides easy access for charging the wheelchair batteries This port also serves as the Remote Programmer Communication connection On Off Toggle Switch This toggle switch is...

Page 29: ...R LEDs are lit indicating batteries are moderately charged Recharge batteries before taking a long trip C Only RED LED is lit indicating batteries are running out of charge Recharge batteries as soon...

Page 30: ...h steady display Joystick is in program ming inhibit and or charg ing mode The steady LEDs indicate the current state of the battery charge Right GREEN LED is flash ing Joystick is in Speed Limit mode...

Page 31: ...ovides smooth control of speed and direction It is equipped with 360 degrees of mobility for ease of operation The joystick is spring loaded and automatically returns to the upright neutral position w...

Page 32: ...ery charge FIGURE 5 2 Using the Joystick to Drive the Chair MOVEMENT ACTION FORWARD Push forward on the joystick REVERSE Pull back on the joystick Turn RIGHT Move the joystick RIGHT Turn LEFT Move the...

Page 33: ...re applies to the swingaway footrest and elevating legrest Installing 1 Turn the swingaway footrest assembly to the side open footplate is perpendicular to wheelchair 2 Install the hinge plates on the...

Page 34: ...strap if installed 3 Pull the cam lock lever up to the unlocked position 4 Push in the release buttons and reposition the lower footrest assembly to the desired height 5 Ensure that the release button...

Page 35: ...cure 7 Insert the lower footrest assembly into the upper footrest assembly to desired height 8 Ensure that the release buttons fully protrude from holes on both sides of the upper footrest support 9 R...

Page 36: ...d raise elevating legrests until the desired height is obtained 2 To lower the elevating legrest perform the following A Support user leg with one hand B Push release lever downward with other hand C...

Page 37: ...position before using the wheelchair NOTE For this procedure refer to FIGURE 7 1 1 Unlock the armrest by flipping the height adjustment lever on the top front of the armrest to the up horizontal posi...

Page 38: ...rm towards the front of the wheelchair and then downward into the arm socket NOTE Armrest release lever MUST be in the unlocked position when placing armrest into the arm sockets 4 Lock the swing back...

Page 39: ...tion Replacing the Seat Upholstery NOTE For the following procedure refer to FIGURE 8 1 1 Remove the mounting screws that secure the existing seat upholstery to the wheelchair frame NOTE Refer to the...

Page 40: ...aps that secure the existing back upholstery to the wheelchair frame 4 Securely tighten the new back upholstery to the back canes with the six mounting screws and washers starting with the top hole of...

Page 41: ...wheelchair frame 2 Reposition the back canes to the desired height adjustment position 3 Reinstall the mounting screws and locknuts that secure the back canes to the wheelchair frame and securely tig...

Page 42: ...he two halves of the seat positioning strap from the crossbraces 4 Position the two new seat positioning strap halves between the seat upholstery and the crossbraces 5 Reinstall the rear phillips scre...

Page 43: ...o FIGURE 9 1 NOTE The joystick is factory installed on the right side of the wheelchair To reposition the joystick onto the left side of the wheelchair refer to Repositioning the Joystick on page 44 T...

Page 44: ...mounting bracket on opposite arm tube ensuring the threaded plate of the mounting bracket is on the inside of the arm tube 5 Using the three hex mounting screws and washers secure both halves of the...

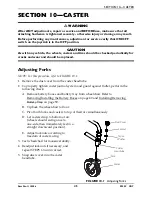
Page 45: ...ube 2 To properly tighten caster journal system and guard against flutter perform the following check A Remove battery boxes and battery tray from wheelchair Refer to Removing Installing the Battery B...

Page 46: ...batteries frequently Do not wait until the battery charge is low to recharge A battery s life is extended if the charge level is maintained well above a low condition The information gauge is the prim...

Page 47: ...ption and Use of Battery Chargers The charger automatically reduces the charge from an initially high rate to a zero reading at a fully charged condition If left unattended the charger should automati...

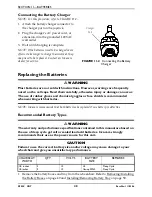
Page 48: ...y or damage can occur The use of rubber gloves and chemical goggles or face shields is recommended when working with batteries NOTE Invacare recommends that both batteries be replaced if one battery i...

Page 49: ...a match near batteries If the caps of the battery cells are removed NEVER look directly into them while charging batteries 1 Examine battery clamps and terminals for corrosion 2 Verify that the plasti...

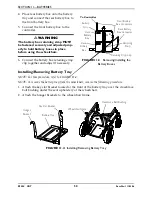
Page 50: ...he Battery Boxes Installing Removing Battery Tray NOTE For this procedure refer to FIGURE 11 4 NOTE To remove the battery tray from the wheelchair reverse the following procedure 1 Attach the key slot...

Page 51: ...or battery tools for U1 battery removal installation WARNING ALWAYS use a battery lifting strap when lifting a battery It is the most convenient method and assures that the battery acid will not spill...

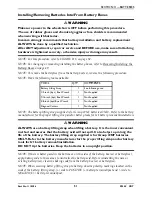
Page 52: ...GURE 11 5 Installing Removing Batteries Into From Battery Boxes Connecting Battery Cables WARNING The use of rubber gloves and chemical goggles or face shields is recommended when working with batteri...

Page 53: ...11 8 and FIGURE 11 9 Direct Mount Method NOTE For this procedure refer to FIGURE 11 7 on page 55 1 Install battery terminal cap s onto battery cable s A Dual U1 Batteries i ORANGE battery terminal cap...

Page 54: ...ost B POSITIVE RED battery cable to POSITIVE battery terminal post 3 Secure the battery cable s ring terminal s to the battery terminal s post s BLACK to NEGATIVE and RED to POSITIVE with the provided...

Page 55: ...Post GREY Terminal Cap ORANGE Terminal Cap Tie Wraps Detail B Dual Group 22 NF Batteries Detail C Installing Battery Terminal Cap onto Battery Cable POSITIVE Terminal Post NEGATIVE Terminal Post NEGA...

Page 56: ...f the following If the battery clamp of the POSITIVE battery terminal post is NOT mounted in the orientation shown in FIGURE 11 8 perform the following i Loosen the hex nut that secures the battery cl...

Page 57: ...late and battery clamp of POSITIVE battery terminal post 4 Secure the battery cable s ring terminal s to the battery clamp s BLACK to NEGATIVE and RED to POSITIVE with existing hex screws as shown in...

Page 58: ...TIVE BLACK Cable NEGATIVE Terminal Post and Clamp POSITIVE RED Cable POSITIVE Terminal Post and Clamp Fuse box placement when box top is installed Group 22NF Battery Detail A Top View Detail B Tie Wra...

Page 59: ...osition and orientation of the battery box retaining strap as it passes through the slots of the battery tray and the adjustable end of the battery box retraining strap buckle 3 Feed the existing batt...

Page 60: ...ge the clutches 1 Locate the clutch handles on motors WARNING If clutch handles are forced to engage in the wrong direction as shown in FIGURE 12 1 the motors will be damaged and will need to be repla...

Page 61: ...on the wheelchair frame 2 Loosely install the hex screw and locknut that secures the wheel lock to the wheelchair frame 3 Make sure wheel lock is disengaged from rear wheel 4 Measure the distance bet...

Page 62: ...wheels 1 To engage the wheel locks grip the handle and push forward to the lock position 2 To release reverse STEP 1 CAUTION DO NOT use the wheel locks when the wheelchair power is on and the clutches...

Page 63: ...und or gravel surfaces anti tippers may not provide the same level of protection against tipover Extra caution must be observed when traversing such surfaces 1 Press the two release buttons in and ins...

Page 64: ...4 ANTI TIPPERS P9000 XDT 64 Part No 1118386 FIGURE 14 1 Installing Removing Adjusting Anti Tippers 1 to 2 inch Clearance Anti tipper Adjustment Holes Release Button Anti tipper Release Button Wheelcha...

Page 65: ...the Wheelchair WARNING Keep hands and fingers clear of moving parts to avoid injury DO NOT place hand or fingers on the underside of the seat rail when opening or closing the wheelchair DO NOT sit or...

Page 66: ...Transporting the P9000 XDT Refer to Removing Installing the Battery Boxes on page 49 and Installing Removing Battery Tray on page 50 Refer to Installing Removing Adjusting Anti Tippers on page 63 Ref...

Page 67: ...SECTION 15 TRANSPORTING Part No 1118386 67 P9000 XDT NOTES...

Page 68: ...ase write directly to Invacare at the address on the bottom of the back cover Provide dealer s name address date of purchase indicate nature of the defect and if the product is serialized indicate the...

Page 69: ...Invacare Australia 1 Lenton Place North Rocks NSW 2151 Australia www invacare com au email sales invacare com au Phone 1800 460 460 Fax 02 8839 5311...

Reviews: