10
60129676-A
Invacare
®
Softform Active
®
2 Rx
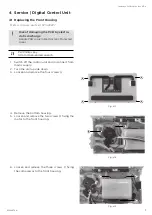
4. Unplug wires
A
, silicon tube
B
, and wires
C
from
the UIPCB.
5. Loosen and remove the seven screws fixing
the interface label to the front housing
6. Remove the non-functioning UIPCB from the
housing.
7. Install the new User's interface, which includes
a new - already attached - UIPCB, on the front
housing.
8. Position and tighten the provided screws.
9. Plug wires
A
, silicon tube
B
, and wires
C
into
the new UIPCB.
10. Reinstall the bottom housing
.
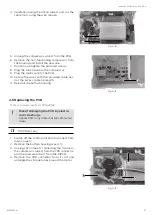
11. Place the unit with the Invacare logo facing
forward and install the new
digital control's
stick-on label as illustrated.
4.4 Replacing the Compressor
R
efers to spare parts kit SP1633124
Risk of damaging the PCB by electro-
static discharge
Handle PCB's only in Electrostatic Protected
Areas
PH1 Phillips key
Wire clippers
1. Switch off the control unit and disconnect from
mains supply.
2. Remove the bottom housing
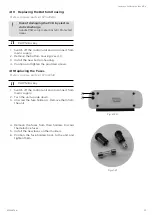
3. Loosen and remove the three screws
A
fixing
the compressor to the front housing.
A B
C
Fig. 4-11
Fig. 4-12
A
A
A
Fig. 4-13


