background image

SECTION 5—MOTORS

TDX® SI/SI-HD

48

Part No 1160845

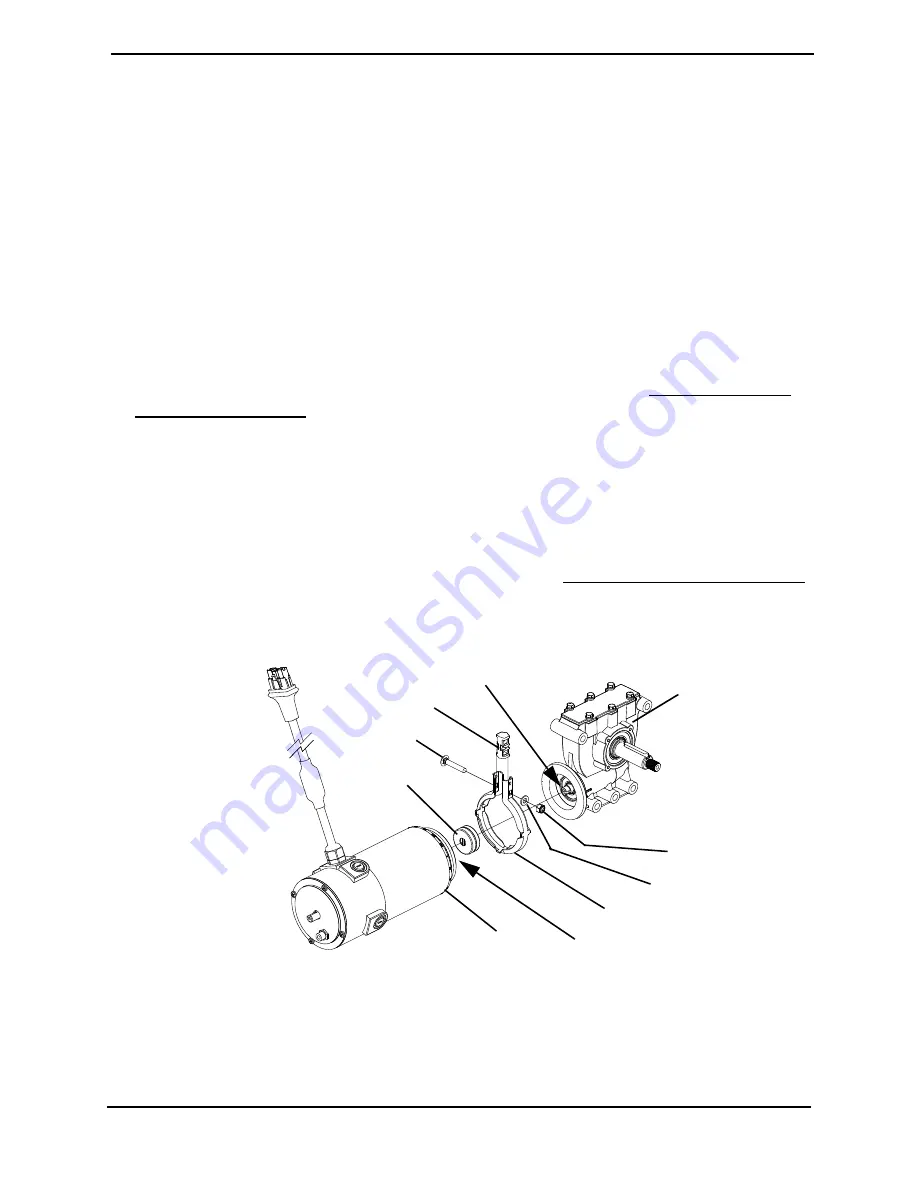
1. Remove the square neck bolt, spacer, washer and locknut securing the band clamp to 

the motor/gearbox assembly.

2. Pulling the band clamp open, remove the existing band clamp from the 

motor/gearbox assembly. Discard existing band clamp.

3. Firmly gripping the motor and the gearbox, pull to separate the motor from the 

gearbox.

4. Remove the existing coupling from between the motor and the gearbox.

5. Discard the existing coupling and either the existing motor or gearbox depending on 

which is being replaced.

6. Insert the new coupling onto the motor drive shaft.

7. Align the gearbox drive shaft with the new coupling.

8. Twist the motor to the proper alignment to the gearbox. Refer to Aligning the SSD 

Motor to the Gearbox on page 49.

9. Push the motor into the gearbox.

NOTE: When installing the new band clamp, it may be necessary to pull the band clamp open to slide 
the new band clamp around the motor/gearbox.

10. Use the new band clamp, and the existing square neck bolt, spacer, washer and 

locknut to secure the motor to the gearbox. Torque locknut to 75 in-lbs ± 10%.

11. If replacing the motor, install the brake lever. Refer to Installing the SSD Brake Lever 

on page 50.

FIGURE 5.5   

Replacing the SSD Motor or Gearbox Only

Square Neck Bolt

Spacer

Washer

Locknut

Band Clamp

Motor

Gearbox

Coupling

Gearbox Drive Shaft

Motor Drive Shaft

TDX SP, TDX SI and 3G Storm Series Wheelchairs

Summary of Contents for TDX SI

Page 1: ...ER Keep this manual The procedures in this manual MUST be performed by a qualified technician For more information regarding Invacare products parts and services please visit www invacare com TDX SI SI HD Wheelchair Base ...

Page 2: ...ND ANY ADDITIONAL INSTRUCTIONAL MATERIAL SUCH AS OWNER S MANUALS SERVICE MANUALS OR INSTRUCTION SHEETS SUP PLIED WITH THIS PRODUCT OR OPTIONAL EQUIPMENT IF YOU ARE UNABLE TO UNDERSTAND THE WARNINGS CAUTIONS OR INSTRUC TIONS CONTACT INVACARE TECHNICAL SUPPORT BEFORE ATTEMPTING TO USE THIS EQUIPMENT OTHERWISE INJURY OR DAMAGE MAY OCCUR REFERENCE DOCUMENTS Refer to the table below for part numbers of...

Page 3: ...klists 18 Troubleshooting Mechanical 19 Troubleshooting Electrical 20 Troubleshooting Motor Gearbox Brake 26 Troubleshooting Battery 28 Troubleshooting Battery Charger 28 Checking Battery Charge Level 29 Field Load Test 30 Motor Brush Inspection and or Replacement 32 Electro Mechanical Parking Brake Testing 34 SECTION 4 WHEELS AND WHEEL LOCKS 35 Removing Installing the Drive Wheel 35 Removing Inst...

Page 4: ...he Fender Assembly 54 Removing Installing the Bumpers 55 SECTION 7 REAR FRAME 56 Removing Installing the Rear Suspension Assembly 56 Removing Installing the Rear Springs 57 Disassembling Assembling Rear Suspension Assembly 59 SECTION 8 BASE FRAME 60 Removing Installing Seat 60 Adjusting Seat Angle Non TRRO Wheelchairs Only 61 Removing Installing the Wheelchair Shrouds 63 Checking the Clearance bet...

Page 5: ...alling the Controller 79 Preparing MK6i Joystick For Use 81 Removing Installing Repositioning MK6i Joystick 81 Routing Securing Motor Cables 82 SECTION 11 TRANSPORT READY PACKAGE TRRO 85 About Transport Ready Packages 86 Compliance Information 86 Securing the Wheelchair to the Vehicle 87 Securing the Occupant 88 LIMITED WARRANTY 92 ...

Page 6: ... with a weight of 125 to 165 lbs for Junior seat sizes or a 168 lb crash dummy which corresponds to a person with a weight of 168 to 300 lbs for Adult seat sizes TRBKTS includes four factory installed wheelchair transport brackets TRBKTS has not been crash tested in accordance with WC 19 Use these transport brackets only to secure an unoccupied wheelchair during transport As of this date the Depar...

Page 7: ...heelchairs previously used This Power Wheelchair has Invacare s SureStep technology a feature that provides the wheelchair with optimum traction and stability when driving forward over transitions and thresholds of up to 3 inches The following warning applies specifically to the Sure Step feature TDX SI HD ONLY DO NOT use on inclines greater than 6 TDX SI ONLY DO NOT use on inclines greater than 9...

Page 8: ...ve Terminal Negative Terminal Positive Terminal Negative Terminal P N 1114847 Rev B 2 04 Cross Hole DO NOT use this battery terminal configuration 22NF batteries with terminal configuration positive on the left and negative on the right as shown MUST be used 22NF batteries that have the reverse terminal configuration MUST not be used Terminals MUST have a cross hole located as shown for proper bat...

Page 9: ...NS Part No 1160845 9 TDX SI SI HD Wheelchairs with TRRO Wheelchairs without TRRO NOTE Also on opposite side NOTE Auto style seat positioning strap shown This label is also on the airline style seat positioning strap ...

Page 10: ...th Precision Sealed Bearings CASTER FORKS Two side fork Standard One sided fork Optional BATTERY REQUIREMENTS Use MK p n M22NFSLDG batteries only FOOTRESTS Telescoping Front Rigging Supports 2 inch and 4 inch long Pivot Slide Tube SEAT TILT ANGLE ADJUSTMENT Adjustable 0 to 10 OPERATING TEMPERATURE 122 F 50 C Maximum to 13 F 25 C Minimum STORAGE TEMPERATURE 149 F 65 C Maximum to 58 F 40 C Minimum W...

Page 11: ... of electrical components to water and or liquids Electrical components damaged by corrosion MUST be replaced immediately Wheelchairs that are used by incontinent users and or are frequently exposed to water liquids may require replacement of electrical components more frequently Repair or Service Information WARNING Set up of the Electronic Control Unit is to be performed ONLY by qualified techni...

Page 12: ...ching hardware that is loosely secured could cause loss of stability resulting in serious injury or damage After ANY adjustments repair or service and before use make sure that all attaching hardware is tightened securely Improper mounting or maintenance of the Sip n Puff control including the mouthpiece and breath tube may cause injury or damage Water inside the Sip n Puff interface module may ca...

Page 13: ...d use of the wheelchair that is not set to the correct specifications may cause erratic behavior of the wheelchair resulting in death serious injury or damage Performance adjustments should only be made by professionals of the healthcare field or persons fully conversant with this process and the driver s capabilities After the wheelchair has been set up adjusted check to make sure that the wheelc...

Page 14: ...indful of potential pinch points and use caution when using this product WARNING If the seating system must be moved ALWAYS inspect to ensure the wheelchair DOES NOT easily tip forward or backward WARNING Risk of Minor to Serious Injury Pinch points can cause minor to serious injury Be mindful of potential pinch points and use caution when using this product G Trac WARNING Risk of Serious Injury o...

Page 15: ...a qualified electrician and have the two prong receptacle replaced with a properly grounded three prong wall receptacle in accordance with the National Electrical Code If you must use an extension cord use ONLY a three wire extension cord having the same or higher electrical rating as the device being connected In addition Invacare has placed RED ORANGE WARNING TAGS on some equipment DO NOT remove...

Page 16: ...ection from the more common sources of radiated EMI There are a number of sources of relatively intense electromagnetic fields in the everyday environment Some of these sources are obvious and easy to avoid Others are not apparent and exposure is unavoidable However we believe that by following the warnings listed below your risk to EMI will be minimized The sources of radiated EMI can be broadly ...

Page 17: ...LEASE OR POWERED WHEELCHAIR MOVEMENT WHICH COULD RESULT IN SERIOUS INJURY 1 Do not operate hand held transceivers transmitters receivers such as citizens band CB radios or turn ON personal communication devices such as cellular phones while the powered wheelchair is turned ON 2 Be aware of nearby transmitters such as radio or TV stations and try to avoid coming close to them 3 If unintended moveme...

Page 18: ...he wheelchair is serviced Safety Inspection Checklists Inspect Adjust Initially CAUTION As with any vehicle the wheels and tires should be checked periodically for cracks and wear and should be replaced Ensure wheelchair rolls straight no excessive drag or pull to one side Inspect all fasteners Inspect TRRO TRBKTS fasteners and hardware Ensure clothing guards are secure Arms are secure but easy to...

Page 19: ...ve for function Inspect seat positioning strap for any signs of wear Ensure buckle latches Verify hardware that attaches strap to frame is secure and undamaged Replace if necessary Inspect foam handgrips for damage If damaged have them replaced by a qualified technician Inspect motor brushes and gearbox coupling Inspect electrical components for signs of corrosion Replace if corroded or damaged Fo...

Page 20: ...t will flash The number or type of flashes indicates the nature of the error If multiple errors are found only the first error encountered by the control module will be displayed Information Gauge Display Diagnostics DISPLAY DESCRIPTION DEFINITION COMMENTS All LEDs are off Power is off All LEDs are on Power is on Fewer than three LEDs on implies reduced battery charge Left RED LED is flashing Batt...

Page 21: ... Motor Short Circuit Check the left motor connections and motor cable 01 Left Motor Open Circuit 02 Left Motor Connection Fault B 03 Motor Terminal Connected to B 04 Left Motor Voltage Fault 05 Left Motor Bridge Fault 06 Too Many Hardware Current Limit Events 07 Current Offset Out of Range 08 Hardware Current Limit Fault 4 E04 Right Motor Fault 00 Right Motor Short Circuit Check the right motor co...

Page 22: ...Park Brake Fault 00 Right Park Brake Drive Time Test Failed Check the right park brake connections and cable 01 Right Park Brake Output Enabled When Wheelchair Idle 02 Right Park Brake Output Did not Enable When Entering Drive Mode 03 Right Park Brake fault during power up testing 04 Right park brake feedback low during drive park brake short 7 E07 Remote Fault 00 Local SR Fault CPU EEPROM etc Che...

Page 23: ...lt 11 Electronics fault Thermistor 12 Calibration setting fault 9 E09 Communications Fault 00 Remote connection lost Check connections and wiring Replace Bus cable 01 Low communication mode 10 E10 General Fault 00 General fault Check all connections and wiring Contact Invacare Technical Service 11 E11 Incompatible incorrect Remote 00 Incompatible incorrect Remote Wrong type of remote connected Ens...

Page 24: ...ice is sending a value outside of the reverse forward left or right limits Error codes E01 E02 E03 or E04 Replace joystick or input device NEUTRAL TESTING displays The joystick neutral test has failed Error code E18 Release the joystick and try to get the joystick back into the center most position BAD JOYSTICK CAL VALUES displays and the wheelchair does not drive The joystick calibration values a...

Page 25: ...d Replace batteries if necessary Refer to Replacing Batteries on page 69 Motor chatters or runs irregular Electrical malfunction Contact Invacare for service Joystick erratic or does not respond as desired Damaged motor coupling Electrical malfunction Controller programmed improperly Inspect motor coupling Refer to Removing Installing the Gearbox Coupling on page 44 Contact Invacare for service Ch...

Page 26: ...function Check for error codes with programmer Refer to the MK6i Electronics Programming Guide part number 1141471 Wheelchair veers to the left or right when driving on level surface Uneven tire pressure Motors out of balance Inflate tires Replace tires if worn Use programmer to balance motors E09 E10 error code will not go away Bad motor connection Bad brake coil Check all connections Ohm out eac...

Page 27: ...if necessary or replace motor if internal damage is determined Ohm out motor to check for possible internal damage worn out brushes may be possible Controller power stage board or relays may be damaged Replace controller or send to Invacare for repair Motor runs but loses power Controller senses heavy load and has entered the current rollback mode Stop driving and let electronics cool Wheelchair l...

Page 28: ...battery wiring harness E14 Error code Low voltage Recharge or replace batteries SYMPTOM PROBABLE CAUSE SOLUTIONS No LED s on Charger Charger not plugged into outlet or disconnected from wiring harness on wheelchair Make sure the charger is plugged into the outlet and check the wiring on the wheelchair No AC power at outlet Check for AC power with digital volt meter Damaged power cord Check for dam...

Page 29: ...erstand this manual and any service information that accompanies a battery and charger before operating the wheelchair Don t perform any installation or maintenance without first reading this manual Move the wheelchair to a work area before opening battery box or installing service batteries Don t perform installation or maintenance of batteries in an area that could be damaged by battery spills R...

Page 30: ...ck If reading is 2 5 volts or less for a pair the batteries must be charged NOTE Read these instructions carefully and the manufacturer s instructions on the digital voltmeter before using the digital voltmeter NOTE Invacare recommends that only a qualified technician perform this test 1 Ensure that power is Off 2 Make sure battery is fully charged An extremely discharged battery will exhibit the ...

Page 31: ...hile under load they should be replaced regardless of the unloaded voltages Refer to Replacing Batteries on page 69 FIGURE 3 1 Field Load Test Motor Testing NOTE For this procedure refer to FIGURE 3 2 1 On the 4 pin motor connector locate the two contacts in the red and black housings 2 Set the digital multimeter to measure resistance in ohms Ω 3 Measure the resistance between the two motor contac...

Page 32: ... the motor The existing motor brush MUST be placed into the motor exactly the same way to ensure good contact with the commutator 6 Place a temporary mark on the motor casting and on the top of the motor brush to indicate the orientation 7 Remove the motor brush from the brush holder 8 Inspect the motor brush thoroughly for excessive wear or chips in the brush and any discoloration in the shunt wi...

Page 33: ...ched driving Refer to the electronics manual for latched programming instructions iv Run the motors forward for one hour v Turn motors off and allow 30 minutes for motors to cool off vi Run the motors in reverse for one hour vii When process is complete remove wheelchair from blocks and test drive the wheelchair NOTE If wheelchair still does not perform properly call Invacare Technical Service at ...

Page 34: ...ding is between 40 80 ohms depending on the motor NOTE A reading of 0 ohms Ω or a very high reading i e mohms or O L Open Line indicates a shorted brake or an open connection respectively If either condition exists send the motor to Invacare Technical Service for inspection repair WARNING A shorted electro mechanical brake will damage the brake output section in the controller DO NOT connect a sho...

Page 35: ...i Remove the drive wheel from the motor gearbox assembly To Remove the Drive Wheel and Wheel Hub i Remove the five 5 16 18 x 88 inch cap screws securing the drive wheel to the wheel hub ii Remove the drive wheel from the motor gearbox assembly iii Remove the 1 2 20 locknut and 511 501 x 1 290 x 12 flat washer securing the wheel hub to the motor gearbox assembly iv Remove the wheel hub from the mot...

Page 36: ...eize compound over the entire drive shaft iv Using the 1 2 20 locknut and 511 501 x 1 290 x 12 flat washer secure the wheel hub to the drive shaft v Secure the drive wheel to the wheel hub with the five 5 16 18 x 88 inch cap screws Torque to 160 in lbs 2 Remove the 5 inch blocks from under the wheelchair frame 3 Install the batteries Refer to Removing Installing the Batteries From Into the Wheelch...

Page 37: ... that secure the inside rim to the outside rim 3 Remove the inside rim and tire Installing 1 Place the outside rim against one side of the tire 2 Place the inside rim against the other side of the tire NOTE Align the mounting holes in the inside rim with the mounting holes in the outside rim 3 Secure the inside rim and the outside rim to the tire with the five 5 16 18 x 7 8 inch hex head cap screw...

Page 38: ...pinning 1 Remove the 7 16 20 x 3 1 4 inch hex head screw two 15 32 x 5 8 x 3 64 inch washers and 7 16 20 locknut that secure the existing caster to the fork 2 Remove the existing caster and discard 3 Using the 7 16 20 x 3 1 4 inch hex head screw two 15 32 x 5 8 x 3 64 inch washers and 7 16 20 locknut secure the new caster to the fork Torque to 13 ft lbs 20 FIGURE 4 3 Replacing the Front Rear Caste...

Page 39: ...h washer and 5 8 x 7 8 x 1 8 inch washer securing the existing caster to the single sided fork 3 Remove the existing caster and discard 4 Place new caster onto the single sided fork 5 Using the cotter pin 7 16 20 hex slotted nut the 15 32 x 5 8 x 3 64 inch washer and 5 8 x 7 8 x 1 8 inch washer secure the new caster to the fork 6 Using the two M6 x 1 x 45MM Phillips counter sunk screws and M6 x 1 ...

Page 40: ...e to inspect adjust the caster assembly A Tip back the wheelchair B Pivot both caster assemblies to top of their arc simultaneously C Let casters drop to bottom of arc casters should swing once to one side then immediately rest in a straight downward position D Adjust 5 8 1 8 inch locknuts according to freedom of caster swing 3 Test wheelchair for maneuverability 4 Readjust 5 8 1 8 inch locknuts i...

Page 41: ...tube Installing 1 If necessary insert the two bearings and tolerance bearings into the head tube 2 Insert the threaded post of the caster assembly into the head tube 3 Using the 5 8 1 8 locknut 5 8 x 1 5 16 x 1 8 inch washer and 5 8 x 1 1 8 x 3 16 inch stem spacer secure the caster assembly to the headtube 4 Adjust the caster assembly Refer to Adjusting Caster Assembly on page 40 5 Insert the head...

Page 42: ... lock bracket Refer to Removing Installing the Wheel Lock Bracket on page 43 Installing 1 If necessary install the wheel lock bracket Refer to Removing Installing the Wheel Lock Bracket on page 43 2 Position the wheel lock onto the wheel lock bracket 3 Secure the wheel lock to the wheel lock bracket using the two 5 16 18 x 88 inch hex head cap screws 330 x 625 x 050 inch flat washers and 5 16 18 l...

Page 43: ...ssembly Refer to Removing Installing the Walking Beam Assembly on page 51 2 Remove the three 3 8 x 1 00 inch shoulder screws 7 16 x 13 16 x 1 8 inch washers and 5 16 18 locknuts securing the wheel lock bracket and walking beam to the motor 3 Align the replacement wheel lock bracket with the three mounting holes of the walking beam and motor NOTE If wheel lock and wheel lock bracket was not previou...

Page 44: ...s not installed then three 3 8 x 1 00 inch shoulder screws are used 3 Remove the three shoulder screws 7 16 x 13 16 x 1 8 inch washers and 5 16 18 locknuts securing the motor and the wheel lock support bracket if installed to the walking beam 4 Remove the motor from the walking beam FIGURE 5 1 Removing Installing the Motor Removing Installing the Gearbox Coupling NOTE For this procedure refer to F...

Page 45: ...ng and gearbox MUST be aligned for proper installation 2 Carefully align the motor with the gearbox coupling and place the motor against the gearbox Torque to 75 in lbs 3 Turn gearbox drive shaft until the gearbox coupling seats into the gearbox Torque to 280 in lbs 4 Install two M6 x 1 x 20 mm socket head cap screws and 1 4 inch lock washers Torque to 75 in lbs 5 To install the motor assembly Ref...

Page 46: ... same position and orientation as it was removed from 6 Cut and remove any tie wrap securing the motor cable to the wheelchair base frame and other cables 7 Disconnect the motor cable from the controller 8 Remove the four hex head screws securing the motor gearbox assembly to the suspension arm 9 Remove the motor gearbox from the suspension arm 10 If necessary Repeat STEPS 5 9 to remove the remain...

Page 47: ... drive wheel to the wheel hub 3 Remove the drive wheel from the wheel hub 4 If necessary remove the locknut washer wave washer and 5mm spacer securing the wheel hub on the drive shaft 5 If necessary repeat STEPS 2 3 to remove the remaining drive wheel FIGURE 5 4 Removing Installing the SSD Motor Drive Wheel Wheel Hub Replacing the SSD Motor or Gearbox Only NOTE For this procedure refer to FIGURE 5...

Page 48: ... Align the gearbox drive shaft with the new coupling 8 Twist the motor to the proper alignment to the gearbox Refer to Aligning the SSD Motor to the Gearbox on page 49 9 Push the motor into the gearbox NOTE When installing the new band clamp it may be necessary to pull the band clamp open to slide the new band clamp around the motor gearbox 10 Use the new band clamp and the existing square neck bo...

Page 49: ...ring the band clamp to the motor gearbox assembly 2 Align the motor to the gearbox according to the table below 3 If adjusting an assembled motor gearbox securely tighten the square neck bolt spacer washer and locknut Torque locknut to 75 in lbs 10 WHEELCHAIR TDX SP 4 POLE LEFT SIDE RIGHT SIDE 180 Indicator Mark Motor Indicator Mark Gearbox Indicator Mark Gearbox 0 Indicator Mark Motor ...

Page 50: ...it around the brake lever stop 3 Securely tighten the set screw securing the brake lever to the brake lever post 4 If necessary perform STEPS 1 3 to install the remaining brake lever FIGURE 5 6 Installing the SSD Brake Lever Installing the SSD Motor Push Drive Label NOTE For this procedure refer to FIGURE 5 7 1 Peel the label from the adhesive backing 2 Position the label on the motor near the bra...

Page 51: ...moving tie wraps 5 Cut tie wraps securing the motor cable to the base frame 6 Remove the 1 4 20 locknut securing the 5 16 x 2 25 inch socket head shoulder screw and the stability assist cylinder to the walking beam 7 Pull the 5 16 x 2 25 inch socket head shoulder screw out away from the base frame and the stability assist cylinder to free the stability assist cylinder from the walking beam assembl...

Page 52: ...embly and coved spacer onto the walking beam mounting pin 7 Using the 1 2 20 locknut and 505 x 1 124 x 100 inch washer secure the motor with attached walking beam assembly to the base frame Torque to 13 ft lbs 20 then back off 1 4 turn 8 Connect the motor connector to the controller 9 Install the drive wheel Refer to Removing Installing the Drive Wheel on page 35 10 Remove the two 5 inch blocks un...

Page 53: ...he stability assist cylinder to the walking beam 4 Pull the 5 16 x 2 25 inch socket head shoulder screw out away from the base frame to free the stability assist cylinder and 31 x 69 nylon washer from the walking beam assembly 5 Position the stability assist cylinder against the wheelchair frame 6 Remove 5 16 x 375 inch socket head shoulder screw and two 31 x 69 nylon washers securing the stabilit...

Page 54: ...hex head screws that secure the fender to the walking beam 3 Remove the fender from the walking beam Installing 1 Align the fender with the walking beam 2 Secure the fender to the fender bracket with the three 10 32 x 5 8 inch mounting screws Securely tighten Torque to 40 in lbs 3 Install the drive wheel Refer to Removing Installing the Drive Wheel on page 35 FIGURE 6 3 Removing Installing the Fen...

Page 55: ...ll the bumper Bolt On Bumpers 1 Remove the drive wheel Refer to Removing Installing the Drive Wheel on page 35 2 Remove the 5 16 18 keps nut and 328 x 75 x 060 washer securing the bumper to the wheelchair frame 3 Remove the bumper from wheelchair frame NOTE If necessary repeat STEPS 1 3 on remaining bumpers FIGURE 6 4 Removing Installing the Bumpers 328 x 75 x 060 Washer Bumper 5 16 18 Keps Nut TD...

Page 56: ... leads and the joystick cable from the controller 6 Remove the two 1 2 13 x 1 25 inch mounting screws and rear pivot bushings securing the rear suspension assembly to the base frame 7 Remove the rear suspension assembly from the base frame Installing 1 Position the rear suspension assembly between the mounting brackets of the base frame 2 Secure the rear suspension assembly to the base frame using...

Page 57: ... replace both springs to ensure proper operation of wheelchair Removing 1 Place two 5 inch blocks under the base frame NOTE If necessary move the motors up and down to gain access to the rear spring hardware Rear Suspension Assembly Base Frame 1 2 13 x 1 25 inch Mounting Screws Rear Pivot Bushings 3 8 x 1 00 inch Socket Head Shoulder Screw 408 x 807 x 060 Washer Mounting Bracket NOTE Tie wraps and...

Page 58: ...m this procedure with a new spring 1 Position the two rear springs between the wheelchair base frame and the rear frame assembly 2 Lift the rear frame assembly up and add spacers under the rear casters until the rear springs remain compressed 3 Using the two socket head screws locknuts and four washers secure the two nylon stops to the wheelchair base frame Torque to 75 in lbs 20 4 Install the two...

Page 59: ...he rear suspension assembly 1 Remove the rear springs from the rear suspension assembly Refer to Removing Installing the Rear Springs on page 57 2 Remove the rear suspension assembly from the base frame Refer to Removing Installing the Rear Suspension Assembly on page 56 3 Separate the two rear swingarms from the pivot bar 4 Remove the center bushing assembly from the pivot bar FIGURE 7 3 Disassem...

Page 60: ...securing the front of the seat bracket to the base frame 3 Lifting up remove the seat assembly from the base frame Installing 1 Position the seat assembly onto the base frame 2 Using the four rear 5 16 18 x 88 hex head screws 8 4 washers and two 5 16 18 plates secure the rear of the seat bracket to the base frame Torque to 13 ft lbs 20 3 Using the two front 5 16 18 x 88 hex head screws four 8 4 wa...

Page 61: ... screws 11 32 x 13 16 x 3 4 ground washers and four 5 16 18 plates secure the seat frame to the base frame Torque to 13 ft lbs 20 3 Remove seating system and seat pan FIGURE 8 2 Removing Installing Seat Adult Size Seats Adjusting Seat Angle Non TRRO Wheelchairs Only WARNING Wheelchairs with TRRO Only Adjusting the back angle from the factory setting will void TRRO compliance After adjusting the ba...

Page 62: ...head screws thread into the interface plate mounting holes When tightening the two center 5 16 18 x 75 inch hex head screws ensure the interface plate mounting holes remain aliened with the mounting holes in the base frame and the seat to floor height bracket 5 Tighten the two center 5 16 18 x 75 inch hex head screws Torque to 13 ft lbs 20 6 Reinstall the two front and two rear 5 16 18 x 75 inch h...

Page 63: ...rs Only Removing Installing the Wheelchair Shrouds NOTE For this procedure refer to FIGURE 8 5 on page 64 NOTE The following tools are required to perform this procedure Phillips Head Screwdriver 5 16 inch Allen Wrench Top Shroud NOTE Reverse this procedure to install the top shroud 1 Remove the seat from the base frame Refer to Removing Installing Seat on page 60 2 Remove the four 10 32 x 1 2 inc...

Page 64: ...frame 3 If necessary to replace the front shroud or the battery retention bracket perform the following A Remove the four 8 16 x 5 8 inch Phillips screws securing the battery retention bracket to the front shroud B Separate the front shroud from the battery retention bracket C Discard the item to be replaced and replace with new front shroud or battery retention bracket D Using four 8 16 x 5 8 inc...

Page 65: ...t setting to position the footplate as close as possible to the front shroud 2 Measure the gap For swingaway front riggings measure between the front caster and the footplate For center mount front rigging measure between the footplate and the front shroud 3 Perform one of the following If the gap is between 1 inch and 1 inches the seat frame is in the proper mounting position If the gap is greate...

Page 66: ...as possible towards the rear of the wheelchair FIGURE 9 Leave 1 to 1 inch of clearance between the front riggings and the front casters in all caster positions Wheelchairs with Manual or Power Center Mount Front Rigging Slide the seat frame as far as possible towards the rear of the wheelchair FIGURE 9 Leave 1 to 1 inch of clearance between the center mount front riggings and the front shroud 3 En...

Page 67: ...E Part No 1160845 67 TDX SI SI HD FIGURE 9 Adjusting the Seating System Mounting Position Mounting Screws Locknut Locknuts Interface Mounting Bracket Seat Frame Formula CG Seating System Base Only Shown Rear of Wheelchair ...

Page 68: ...Y adjustments repair or service and before use make sure all attaching hardware is tightened securely otherwise injury or damage may result 22NF batteries weigh 37 pounds each Use proper lifting techniques lift with your legs to avoid injury ALWAYS use a battery lifting strap when lifting a battery It is the most convenient method and assures that the battery acid will not spill It also helps to p...

Page 69: ...teries NOTE For this procedure refer to FIGURE 9 1 on page 70 1 Remove the batteries from the wheelchair Refer to Removing Installing the Batteries From Into the Wheelchair on page 71 2 Cut the tie wraps that secure the battery terminal covers to the battery terminals 3 Slide the RED battery terminal cover back on the RED battery cable to expose the POSITIVE battery terminal 4 Slide the BLACK batt...

Page 70: ...battery cable to the POSITIVE battery post with existing mounting screw and 1 4 20 inch hex flange nut Securely tighten 11 Position each battery terminal cover over top of each battery terminal 12 Secure battery terminal covers in place with one tie wrap 13 Install batteries into wheelchair Refer to Removing Installing the Batteries From Into the Wheelchair on page 71 FIGURE 9 1 Replacing Batterie...

Page 71: ...y not dull 4 Carefully dust off all metal particles Removing Installing the Batteries From Into the Wheelchair Removing the Front Shroud Battery Retention Bracket and Rear Shroud CAUTION Place the wheelchair in a well ventilated area where work can be performed without risking damage to carpeting or floor covering NOTE For this procedure refer to FIGURE 9 2 on page 72 1 Verify the joystick On Off ...

Page 72: ...d Rear Shroud Removing the Batteries from Wheelchair NOTE For this procedure refer to FIGURE 9 3 1 Slide battery tray with batteries out 2 Disconnect the battery straps 3 Unplug front battery from rear battery 4 Remove the front battery 5 Slide the rear battery forward and remove it from the tray Front Shroud Disconnect Batteries from the controller here 10 32 x 1 2 inch Pan Head Screws Rear Shrou...

Page 73: ...ttery connector bracket in the rear of the battery tray in the orientation as shown Detail A of FIGURE 9 4 NOTE Front of battery tray is designated by the battery stop Rear of the battery tray is the opposite end NOTE Orientation of the battery is critical otherwise batteries will not connect to the controller or each other 2 Position the remaining battery in the front of the battery tray in the o...

Page 74: ... 72 1 Reinstall the front shroud battery retention bracket onto front of wheelchair frame 2 Install two 5 16 18 x 5 8 inch socket head screws on the sides of the front shroud battery retention bracket WARNING When installing batteries ensure battery connector is securely engaged to the controller connector otherwise serious personal injury may result 3 Connect the controller to the batteries at th...

Page 75: ...y box 3 Remove the two 10 32 x 50 inch riv nuts 200 193 x 334 x 062 inch lock washers and 10 32 x 75 inch socket head screws 4 Slide battery tray out of battery box Installing 1 Slide battery tray into battery box 2 Install the two 10 32 x 50 inch riv nuts 200 193 x 334 x 062 inch lock washers and 10 32 x 75 inch socket head screws one in each side of the battery box Torque to 25 in lbs 20 3 Insta...

Page 76: ...e taking a long trip C RED LEDs are lit indicating batteries are running out of charge Recharge batteries as soon as possible FIGURE 9 6 SPJ Joysticks MPJ Joystick NOTE For this procedure refer to FIGURE 9 7 on page 78 The far right side of the screen is the Battery Gauge Display BGD It provides information on the remaining charge in the batteries At full charge solid blocks fill in all ten segmen...

Page 77: ...ing recommended batteries should be approximately five to nine hours of typical operation Extensive use on inclines may substantially reduce per charge mileage Description and Use of Battery Chargers The charger automatically reduces the charge from an initially high rate to a zero reading at a fully charged condition If left unattended the charger should automatically shut off when full charge is...

Page 78: ...low eight hours for normal charging Larger batteries greater than 55 ampere hours or severely discharged batteries may require up to sixteen hours to be properly charged and equalized NOTE It is advantageous to recharge frequently rather than only when necessary In fact a battery s life is extended if the charge level is maintained well above a low condition NOTE If the batteries need to be charge...

Page 79: ...left motor cables from the controller 3 Disconnect the joystick cable from the controller 4 Disconnect the battery cable from the controller 5 Lift the controller up until the two 9 16 ID x 1 1 16 OD x 3 8 inch washers release from the base frame 6 Pull the controller away to remove from the wheelchair frame 7 If necessary to replace the controller mounting hardware perform the following A Remove ...

Page 80: ...x 3 8 inch washers into the two large openings of the base frame and push down until the controller is securely locked into position 4 Connect the battery cable to the controller 5 Connect the joystick cable to the controller 6 Connect the right and left motors to the controller 7 Install the rear shroud Refer to Removing Installing the Wheelchair Shrouds on page 63 FIGURE 10 2 Removing Installing...

Page 81: ...e from the mounting bracket 2 Remove the rear shroud Refer to Removing Installing the Wheelchair Shrouds on page 63 3 Disconnect the joystick connector from the controller connector 4 Cut the tie wraps that secure the joystick cable in place 5 Remove the joystick from wheelchair 6 If repositioning joystick perform the following A Remove the three hex head mounting screws and washers that secure bo...

Page 82: ...nstalling the Wheelchair Shrouds on page 63 11 Secure joystick cable in place with new tie wraps FIGURE 10 4 Removing Installing Repositioning MK6i Joystick Routing Securing Motor Cables NOTE For this procedure refer to FIGURE 10 5 on page 84 NOTE This procedure applies to both sides of the wheelchair 1 If necessary place two 5 inch blocks under the base frame so that all six wheels are suspended ...

Page 83: ...e the motor cable to the wheelchair base frame in the following order A Ensure there is approximately 5 inches of motor cable beyond the cable mounting position B Secure the motor cable to the wheelchair base frame in a loop as shown in the side view of FIGURE 10 5 C Secure the motor cable to the wheelchair base frame above the rear spring D Secure the motor cable to the wheelchair base frame belo...

Page 84: ...me STEP 3A STEP 3B STEP 3C STEP 4D Tie wrap STEP 4C Tie wrap STEP 4B Tie wrap STEP 4A Approximately 5 inches Spring Cylinder Motor Cable Front Head Tube Walking Beam Side View Top Bumper Lower Bumper Rear View Controller STEP 3D Pivot Bar STEP 4E Tie wrap STEP 3E Motor Cable Connector Right STEP 3E Motor Cable Connector Left ...

Page 85: ...the SAE Society of Automotive Engineers J2249 Recommended Practice during travel in a motor vehicle This wheelchair has been tested for seating in a motor vehicle with the factory installed wheelchair seating system ONLY This wheelchair MUST be in a forward facing position during travel in a motor vehicle This wheelchair is equipped and has been dynamically tested to rely on WHEELCHAIR ANCHORED pe...

Page 86: ...lchair transport brackets TRBKTS has not been crash tested in accordance with WC 19 Use these transport brackets only to secure an unoccupied wheelchair during transport As of this date the Department of Transportation has not approved any tie down systems for transportation of a user while in a wheelchair in a moving vehicle of any type It is Invacare s position that users of wheelchairs should b...

Page 87: ...rear clear zone of 16 inches is measured from the rearmost point on an occupant s head The frontal clear zone is measured from the frontmost point on an occupant s head and is 26 inches with pelvic and upper torso belt s and 37 inches with ONLY a pelvic belt The frontal clear zone may not be achievable for wheelchair seated drivers The estimated seated height HHT from the ground or floor to the to...

Page 88: ...e tie down brackets in accordance with the manufacturer s instructions and SAE J2249 Securing the Occupant Wheelchair Anchored Belts WARNING The pelvic belt that is provided by Invacare has been tested for use in a motor vehicle on this wheelchair ONLY DO NOT replace the pelvic belt with a different style pelvic belt NOTE For this procedure refer to FIGURE 11 2 on page 89 The wheelchair has been p...

Page 89: ...elvic belt onto the belt mounting brackets The male end of the pelvic belt Detail A of FIGURE 11 2 has a pin which is used to secure the vehicle anchored upper torso belt 2 Repeat STEP 1 for the opposite belt mounting bracket 3 Install the vehicle anchored upper torso belt onto the pin on the male end of the pelvic belt FIGURE 11 2 Wheelchair Anchored Belts Pin Pin Pin Used to secure the vehicle a...

Page 90: ...X SI Junior A This rating is scored as follows The test for Lateral Stability Displacement for Point P is shown in FIGURE 11 3 The average test result for point P is TDX SI with Two 22NF Batteries TDX SI Adult 0 53 inches 13 4 mm TDX SI Junior 0 57 inches 14 4 mm FIGURE 11 3 Vehicle Anchored Belts RATING DESCRIPTION A Excellent B Good C Fair D Poor Point P Test Platform 45 NOTE Rear view of the wh...

Page 91: ...he user and the belt due to compliance of seat cushions and belt movement thereby reducing the tendency for the user to slip under the belt and for the belt to ride up on the soft abdomen during normal use Steeper belt angles also reduce the tendency for upper torso belts to pull the pelvic belt onto the abdomen during frontal impact loading NOTE For this procedure refer to FIGURE 11 4 1 The pelvi...

Page 92: ... Canada 570 Matheson Blvd E Unit 8 Mississauga Ontario L4Z 4G4 Canada 800 668 5324 2016 Invacare Corporation All rights reserved Republication duplication or modification in whole or in part is prohibited without prior written permission from Invacare Trademarks are identified by and All trademarks are owned by or licensed to Invacare Corporation or its subsidiaries unless otherwise noted Part No ...

Reviews: