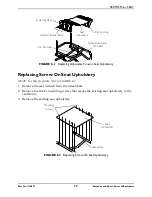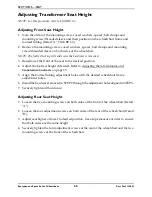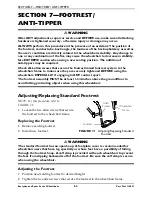
SECTION 7—FOOTREST/ ANTI-TIPPER
Everyday and Sport Series Wheelchairs
62
Part No 1114851
SECTION 7—FOOTREST/
ANTI-TIPPER
WARNING
After ANY adjustments, repair or service and BEFORE use, make sure all attaching
hardware is tightened securely - otherwise injury or damage may occur.
ALWAYS perform this procedure in the presence of an assistant. The position of
the footrest, camber tube, back angle, the tautness of the back upholstery as well as
the user's condition are directly related to the wheelchairs stability. Any change to
one or any combination of the five may cause the wheelchair to decrease in stability.
Use EXTREME caution when using a new seating position. The addition of
anti-tippers may be required.
Check ALL allen screws that secure the footrest/raised footrest system to the
wheelchair frame to make sure they are securely tightened BEFORE using the
wheelchair. ESPECIALLY if engaging in ANY contact sport.
The footrest assembly MUST be at least 1-3/4-inches above the ground/floor to
avoid hitting protruding objects when using this wheelchair.
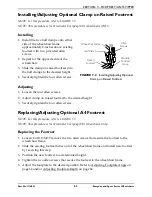
Adjusting/Replacing Standard Footrest
NOTE:
For
this
procedure,
refer
to
FIGURE 7.1.
1. Loosen
the
two
allen
screws
that
secure
the
footrest
to
the
wheelchair
frame.
Replacing the Footrest
1. Remove
existing
footrest.
2. Install
new
footrest.
FIGURE 7.1
Adjusting/Replacing Standard
Footrest
WARNING
The standard footrest has an open hoop. A footplate cover is recommended for
wheelchair users that have leg spasticity or whose feet have a possibility of falling
through the footrest hoop. A calf strap is provided with each wheelchair to prevent
the feet from slipping backwards off of the footrest. Be sure the calf strap is secure
when using the wheelchair.
Adjusting the Footrest
1. Position
new/existing
footrest
to
desired
height.
2. Tighten
the
two
allen
screws
that
secure
the
footrest
to
the
wheelchair
frame.
Footrest
Allen
Screws
Wheelchair
Frame


