EN - 4
The operator is able to operate the machine and use the
main controls, always staying behind the handle at a safe
distance from the rotating cutting means.
If the operator leaves the machine, the motor and cutting
means will stop within a few seconds.
Intended use
This machine is designed and built to cut (and collect) grass
in gardens and grassy areas, with a height according to its
cutting capacity, driven by an operator walking behind it.
Generally speaking this machine can:
1.
Mow the grass and collect it in the grass catcher bag.
2.
Mow the grass and discharge it on the ground through
the rear part (if available).
3.
Mow the grass and discharge it on the ground laterally
(if available).
4.
Mow the grass, chop it and discharge it on the ground
(mulchingeffect-ifavailable).
The use of special attachments provided for by the Manu-
facturer as original equipment or which may be purchased
separately, allows this work to be done in various operating
modes, illustrated in this manual or the instructions that
accompany the single attachments.
3.1.1
Improper use
Anyotherusage,differentthantheafore-mentionedmaybe
hazardous and harm persons and/or damage things.
Examples of improper use may include, but are not limited to:
• Allowing children, animals or other passengers on the
machineastheycouldfalloffandinjurethemselvesor
compromise safe driving by the operator;
• Letting oneself be transported by the machine;
• Using the machine to tow or push loads;
• Using the cutting means on surfaces other than grass;
• Using the machine for leaf or debris collection;
• Using the machine to trim hedges, or for cutting vegeta-
tion other than grass;
• using of the machine by more than one person.
IMPORTANT
Improper use of the machine will in-
validate the warranty, relieve the Manufacturer from all
liabilities, and the user will consequently be liable for all
and any damage or injury to himself or others.
3.1.2 User types
This machine is intended for use by consumers, i.e.
non-professional operators.
It is intended for "DIY" use only.
IMPORTANT
The machine must be used by one
operator.
3.2 SAFETY SIGNS
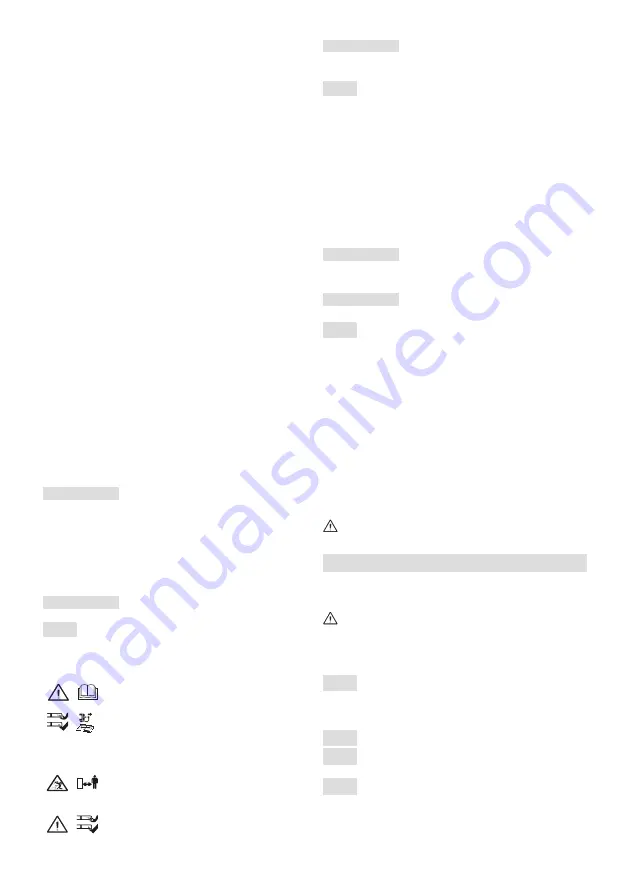
The machine has various symbols on it (Fig.2.0). Their func-
tion is to remind the operator of the correct conduct for use,
with due care and caution. Meanings of the symbols:
Warning.
Read the instructions before
operating the machine
Warning!Do not put hands or feet inside
the compartment of the cutting means.
Remove the spark plug cap and read the
instructions before carrying out any main-
tenance or repair work.
Danger! Risk of thrown objects. Keep all
persons away from the work area whilst
working.
Danger! Danger of cutting.
Cutting
means in motion. Do not put hands or in-
side the housing of the cutting means.
IMPORTANT
Any damaged or illegible decals must
be replaced. Order replacement decals from an Author-
ised Service Centre.
3.3 IDENTIFICATION LABEL
Theidentificationlabelholdsthefollowingdata(Fig.1.0).
1.
Sound power level.
2.
CE conformity marking.
3.
Year of manufacture.
4.
Type of machine.
5.
Serial number.
6.
Name and address of Manufacturer.
7.
Article code.
8.
Nominal power and maximum operating engine speed.
9.
Weight in kg.
Writetheidentificationdataofthemachineinthespecific
space on the label on the back of the cover page.
IMPORTANT
Quote the information on the product
identification label whenever you contact an Authorised
Service Centre.
IMPORTANT
The example of the Declaration of Con-
formity is provided on the last pages of the manual.
3.4 MAIN COMPONENTS
(
Fig.1)
A.
Chassis.
B.
Engine.
C.
Cutting means.
D.
Rear discharge guard.
E.
Side discharge guard (if equipped).
F.
Side discharge chute (if equipped).
G.
Grass catcher.
H.
Handle.
I.
Engine brake lever / cutting means.
J.
Drive engagement lever.
Strictly observe the indications and the safety regu
-
lations described in chap. 2..
4. ASSEMBLY
Certain components of the machine are not installed in the
factory and have to be assembled after unpacking, follow-
ing the instructions below.
Unpacking and completing the assembly should be
done on a flat and stable surface, with enough space for
moving the machine and its packaging.
.
Do not use the
machine until all the instructions provided in the “AS-
SEMBLY” section have been carried out.
4.1 UNPACKING
(
Fig.3.0)
1.
Remove all the unassembled parts from the box.
2.
Take out the machine and dispose of the box and
packaging in compliance with local regulations.
4.2 HANDLE ASSEMBLY
(
Fig.4.A/B/C)
4.3 GRASS CATCHER ASSEMBLY
(
Fig.5,6,7)
4.4 CONNECTING THE BATTERY
•
Models with push-button electric start
:
refer to the owner's manual of the engine.
Summary of Contents for CP1 434 K
Page 5: ...A C F B H I J D G E 2 1 kW min s n 9 5 8 1 kg 2 3 6 4 7 Type Art N ...
Page 6: ...B A C 3 mm 0 mm 4 3 ...
Page 7: ...1 2 3 5 6 1 2 3 4 ...
Page 8: ...A B 9 A B 8 1 2 3 4 7 ...
Page 9: ...10 A A B C 11 A D B C 12 ...
Page 10: ...D C A B E 13 B C D D A E E 14 ...
Page 11: ...15 I ...
Page 12: ...B 3 mm II 16 0 mm ...
Page 13: ...17 A B 18 B D A A 19 20 2 1 ...
Page 14: ...21 A D B C A 22 ...
Page 15: ...25 23 A B D C A B C ...
Page 16: ...27 28 26 A B A 24 ...
Page 85: ...171506302 0 12 2018 ...

