


13
Montage der Schienen -
Assembly of rails
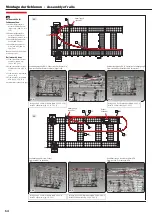
Aufbauschritte für
Schienenaufbau
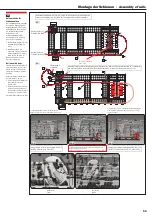
8. Beachten Sie Seite E4 für den
Aufbau der Treppe
9. Von Achse/Arm AE-8 bis
Treppe (Abb. 29, 29-2)
10. Von der Freifall-Spirale
(Ausgang A) bis
Aufzugeingang BJ2 auf 1.
Ebene (Abb. 29, 29-3)
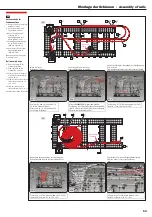
11. Von Ausgang Abzweigung B
bis zur Trichter-Spirale
(Abb. 30, 30-1, 30-2)
12. Vom „Bypass Slip“ bis zum
Eingang Abzweigung B
(Abb. 30, 30-3)
Montieren Sie die Schienen, wie
rechts dargestellt
Rail assembly steps
8. Please note page E4 for
stairway installation
9. From shaft/arm AE-8 to
stairway (fig. 29, 29-2)
10. From free fall helix (exit A) to
first floor elevator entry BJ2
(fig. 29, 29-3)
11. From the junction B exit to the
funnel-shaped helix (fig. 30,
30-1, 30-2)
12. From the „bypass slip“ to
junction B entry (fig. 30, 30-3)
Assemble rail as shown on the right
30
29
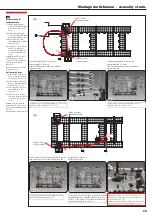
Beachten Sie Abb. 29, 29-1 und Seite
E4 für den Aufbau der Treppe
Please note fig. 29, 29-1 and page E4
for stairway installation
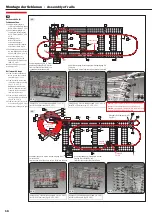
Verlegen Sie 2 x 475cm Schienen (Abb. 30, 30-1, 30-2)
Install 2 x 475cm rails (fig. 30, 30-1, 30-2)
Verlegen Sie 2 x 55cm Schienen (Abb. 30, 30-3)
Install 2 x 55cm rails (fig. 30, 30-3)
Verlegen Sie
EINE
550cm Schiene (Abb. 29+29-2).
Beachten Sie Seite E4 für den Aufbau der Treppe (Abb. 24)
Install 1 x 550cm rails (fig. 29+29-2). Please note page
E4 for stairway installation (fig. 24)
Verlegen Sie 2 x 75cm Schienen (Abb. 29+29-3)
Install 2 x 75cm rails (fig. 29+29-3)
Ausgang A
Exit A
Aufbau der Treppe
Installation of stairway
Von Ausgang Abzweigung B bis zur Trichter-Spirale
From the junction B exit to the funnel-shaped helix
Vom „Bypass Slip“ bis zum Eingang Abzweigung B
From the „bypass slip“ to junction B entry
Von Achse/Arm AE-8 bis Treppe
From shaft/arm AE-8 to stairway
Von der Freifall-Spirale (Ausgang A) bis Aufzugeingang
BJ2 (1. Ebene)
From free fall helix (exit A) to first floor elevator entry BJ2
29-1
30-1
29-2
30-2
29-3
30-3
Abzweigung B
Junction B
16


