background image


let  the  temperature  rise  naturally  until  the  frost  melts.  Then  wipe 

away  the  remaining  ice  and  water,  after  this  plug  the  freezer  back 

into the mains supply. 


Note

: To avoid damaging the freezing compartment wall, do not use 

any sharp objects to remove the frost or separate the frozen 

food. 

Cleaning your freezer 

Before  you  start  to  clean  your  freezer  remove  the  mains  plug  from 

the power supply. 

Use a clean sponge or soft and a mild detergent in warm water. Do 

not use abrasive or harsh cleaners. 

Hand wash, rinse and dry all surfaces thoroughly. 

Do  not  use  cleaning  waxes,  concentrated  detergents,  bleaches  or 

cleaners containing petroleum on plastics and rubber parts. 

Never  use  paper  towels,  window  sprays,  scouring  cleansers  or 

flammable  fluids  on  plastic  parts  as  these  can  scratch  or  damage 

material. 

Clean  with  a  cloth  soaked  in  this  solution  and  then  dry  with  a  soft 

cloth. 


PROLONGED OFF PERIODS 

If  the  freezer  is  not  in  use  for  a  long  period  of  time,  proceed  as 

follows: 

Disconnect  the  freezer  from  the  main  supply  by  removing  the  plug 

from the wall socket. 

Clean and dry the inside as instructed under the heading of cleaning 

the Freezer. 

Leave the door open to prevent any unpleasant smells from building 

up while the freezer is not in use. 

Summary of Contents for INVMVF86A

Page 1: ...r User s Manual English Thank you for choosing INVENTOR unit please read this manual carefully and keep it for future reference INVMVF86A freezer For correct use of this E L E C T R I C A P P L I A N...

Page 2: ...ad through the simple instructions in this booklet Please ensure that the packing material is disposed of in accordance with the current environmental requirements When disposing of any Freezer equipm...

Page 3: ...2 CAUTION The appliance is not intended for use by young children or infirm persons without supervision Young children should be supervised to ensure that they do not play with the appliance...

Page 4: ...es such as hotels offices student dormitories and houses It is mostly suitable for refrigerating and preserving foods such as fruits and beverage It enjoys the advantages of small size Lightweight Low...

Page 5: ...removed by rubbing a small amount of liquid dish soap over the adhesive with your fingers Wipe with warm water and dry Do not use sharp instruments rubbing alcohol flammable fluids or abrasive cleane...

Page 6: ...wing open Never install your Freezer near heat source and direct sun shins ELECTRICAL REQUIREMENT WARNING DO NOT REMOVE GROUND PRONG DO NOT USE AN ADAPTOR DO NOT USE EXTENSION CORD Failure to follow t...

Page 7: ...someone push against the top of the Freezer take some weight off the leveling leg This makes it easier to adjust the leveling leg USE OF THE APPLIANCE To obtain the best possible results form your Fr...

Page 8: ...is advisable to freeze the food by packing it into separate meal portions and not in bulk form Never put hot or even warm foodstuffs into the freezer Prior to storing the frozen food pack it in plasti...

Page 9: ...all surfaces thoroughly Do not use cleaning waxes concentrated detergents bleaches or cleaners containing petroleum on plastics and rubber parts Never use paper towels window sprays scouring cleansers...

Page 10: ...freezer is level and it is not in contact with another appliance or kitchen furniture The freezer does not cool sufficiently Check if If the door has been opened too often or it has been left open for...

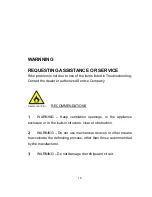
Page 11: ...horized Service Company RECOMMENDATIONS 1 WARNING Keep ventilation openings in the appliance enclosure or in the built in structure clear of obstruction 2 WARNING Do not use mechanical devices or othe...

Page 12: ...supervision or instruction concerning use of the appliance by a person responsible for their safety 7 Children should be supervised to ensure that they do not play with the appliance 8 If the supply c...

Page 13: ...o return your used device please use the return and collection systems or contact the retailer where the product was purchased They can take this product for environmental safe recycling Name Of Compa...

Page 14: ...13 2 Remove the screws fixed the top hinge with cross slot screwdriver...

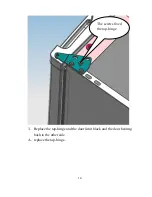
Page 15: ...14 3 Replace the top hinge and the door limit block and the door bearing bush to the other side A replace the top hinge The screws fixed the top hinge...

Page 16: ...15 B replace the door bearing bush and the limit block...

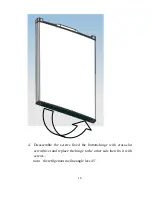
Page 17: ...16 4 Disassemble the screws fixed the bottom hinge with cross slot screwdriver and replace the hinge to the other side then fix it with screws note the refrigerator incline angle less 45...

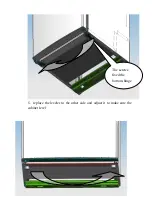
Page 18: ...17 5 replace the leveler to the other side and adjust it to make sure the cabinet level The screws fixed the bottom hinge...

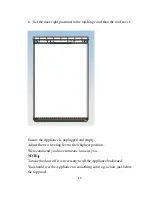
Page 19: ...pliance is unplugged and empty Adjust the two leveling feet to their highest position We recommend you have someone to assist you NOTE To take the door off it is necessary to tilt the Appliance backwa...

Page 20: ...19 Do not lay the Appliance completely flat as this may damage the coolant system...

Page 21: ...Notes...

Page 22: ......

Reviews: