background image

10

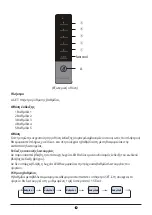
Λειτουργία γρήγορης ψύξης

Είσοδος: Λειτουργία γρήγορης ψύξης για τη διαμόρφωση της κυκλοφορίας.

Χειρισμός: Η ένδειξη γρήγορης ψύξης ανάβει και το ψυγείο λειτουργεί στους 2°0.

Έξοδος: 1. Παραμονή για 150 λεπτά στη λειτουργία γρήγορης ψύξης. 

2. Με τη ρύθμιση της θερμοκρασίας μπορεί να γίνει έξοδος από τη λειτουργία 

γρήγορης ψύξης.

● 

 Έλεγχος θερμοκρασίας του θαλάμου κατάψυξης

Η θερμοκρασία κατάψυξης είναι σχετικά χαμηλή στη θέση «COLDER», ενώ η θερμοκρασία 

κατάψυξης είναι σχετικά υψηλή στη θέση «COLD», άρα συνήθως χρησιμοποιείται η θέση 

«ΝΟΗΜΑΙ».

‘Οταν η θερμοκρασία περιβάλλοντος είναι υψηλή το καλοκαίρι, η θερμοκρασία πρέπει να είναι 

στην περιοχή από «ΝΟRΜΑL» έως «COLD». Αν η θερμοκρασία περιβάλλοντος είναι πάνω από 

35° ζ πρέπει να επικρατεί η θέση «COLD».

‘Οταν η θερμοκρασία περιβάλλοντος είναι χαμηλή το χειμώνα, η θερμοκρασία πρέπει να είναι 

στην περιοχή από «NORMAL» έως «COLDER». Αν η θερμοκρασία περιβάλλοντος είναι κάτω 

από 10°0, πρέπει να επικρατεί η θέση «COLDER».
4.2 Θόρυβος στο εσωτερικό της συσκευής!
Μπορείτε να παρατηρήσετε ότι η συσκευή σας κάνει ασυνήθιστους θορύβους. Οι περισσότεροι 

από αυτούς είναι απολύτως φυσιολογικοί, αλλά θα πρέπει να είστε ενημερωμένοι γι’ αυτούς!
Αυτοί οι θόρυβοι προκαλούνται από την κυκλοφορία του ψυκτικού υγρού στο σύστημα ψύξης. 

Έχουν γίνει πιο έντονοι μετά την εισαγωγή αερίων χωρίς CFC. Αυτό δεν είναι βλάβη και δεν 

επηρεάζει την απόδοση της συσκευής σας. Είναι ο ηλεκτροκινητήρας του συμπιεστή που 

λειτουργεί, καθώς αντλεί το ψυκτικό υγρό μέσαστο σύστημα.
4.3 Συμβουλές για τη διατήρηση των τροφίμων στην συσκευή

u

 Τα μαγειρεμένα κρέατα/ψάρια πρέπει πάντα να αποθηκεύονται ένα ράφι πάνω από τα ωμά 

κρέατα/ψάρια για την αποφυγή της μεταφοράς βακτηρίων. Διατηρείτε τα ωμά κρέατα/ψάρια 

σε ένα δοχείο που είναι αρκετά μεγάλο για να συλλέγει τους χυμούς και να τα καλύπτει 

σωστά. Τοποθετείτε το δοχείο στο χαμηλότερο ράφι.

u

 Αφήνετε χώρο γύρω από το φαγητό σας, για να επιτρέπετε στον αέρα να κυκλοφορεί στο 

εσωτερικό της συσκευής. Βεβαιωθείτε ότι όλα τα μέρη της συσκευής διατηρούνται δροσερά.

u

 Για να προληφθεί η μεταφορά οσμών και η ξήρανση, συσκευάζετε ή καλύπτετε το φαγητό 

χωριστά. Τα φρούτα και τα λαχανικά δεν χρειάζεται να τυλίγονται.

u

 Πάντα αφήνετε το προμαγειρεμένο φαγητό να κρυώσει πριν το βάλετε στη συσκευή. Αυτό θα 

συμβάλλει στη διατήρηση της εσωτερικής θερμοκρασίας της συσκευής.

u

 Για την αποτροπή της διαφυγής ψυχρού αέρα από τη συσκευή, προσπαθείτε να ανοίγετε 

λιγότερες φορές την πόρτα. Σας συνιστούμε να ανοίγετε την πόρτα μόνο όταν πρέπει να 

βάλετε ή να βγάλετε τρόφιμα.

Summary of Contents for PS18860LIN

Page 1: ...PS18860LIN PS18860LW...

Page 2: ...8 4 2 Noise Inside the Unit 10 4 3 Tips for Keeping Food in the Unit 10 4 4 Change the Light Bulb 11 5 CLEANING 11 5 1 Defrosting 11 5 2 Cleaning the Interior and the Exterior of the Unit 11 5 3 Clea...

Page 3: ...knowledge if they have been given supervision or instruction concerning use of the appliance in a safe way and understand the hazards involved Children shall not play with the appli ance Cleaning and...

Page 4: ...the unit not to perform properly This unit is not designed for use in a garage or outdoor installation Do not drape the unit with any covering When installing the unit ensure that 10 cm of free space...

Page 5: ...5 3 Cap the screw caps on the handle screws 4 Take out the screw caps from the handle screw holes 5 Remove the screw and take the handle down 6 Cap the screw caps on the door handle holes again...

Page 6: ...6 7 Install the handles into the door handle holes of the other side in accordance with the handle installation instructions 2 3 Reversing the Door Swing 1 Take off knuckle guard 2 Take off top hinge...

Page 7: ...embly to left side of the cabinet 5 Take off the door of freezing chamber 9 Assemble the door of refrigerating 6 Take off hinge assembly with a screw driver Assemble lower hinge assem bly to left side...

Page 8: ...ormation refer to the Cleaning section 2 7 Before Using Your Unit The refrigerator adopts 220 240V 50Hz AC power voltage fluctuations over the range of 187 264V will cause malfunction or even damage D...

Page 9: ...bursts and other losses Before placing any food in your unit turn it on and wait for 24 hours to make sure it is working properly and to allow it time to fall to the correct temperature Your unit sho...

Page 10: ...et AII images in this instruction manual are for indication only please refer to your individu al unit for details 4 OPERATION 4 1 Operation Instructions Temperature control Temperature control of fre...

Page 11: ...tate of running Display of normal running On the occurrence of a failure the corresponding LED light will give a combined display of fail ure code loop display Where there is no failure the LED light...

Page 12: ...of them These noises are caused by the circulation of the refrigerant liquid in the cooling system It has become more pronounced since the introduction of CFC free gases This is not a fault and will...

Page 13: ...t 5 3 Cleaning Tips Condensation may appear on the outside of the unit This may be due to a change in room temperature Wipe of any moisture residue If the problem continues please contact a qualified...

Page 14: ...nt opening of refrigerator door Illuminating light does not shine Whether the refrigerator is connected to power whether the illumi nating light is damaged The refrigerator door can not be properly cl...

Page 15: ...and label food to reduce door openings and extended searches Remove as many items as needed at one time and close the door as soon as possible 9 DISPOSAL Old units still have some residual value An e...

Page 16: ...nditioner com warranty inventor l essage will be sent to your email Full Name Address Postal Code Phone Number E mail Unit Type Serial Number of the unit Date of Purchase Invoice Number Additional Det...

Page 17: ......

Page 18: ...1 1 2 2 2 1 2 2 2 2 2 3 4 2 4 6 2 5 6 2 6 6 2 7 6 2 8 7 3 8 4 8 4 1 8 4 2 10 4 3 10 5 11 5 1 11 5 2 11 5 3 11 6 11 6 1 11 6 2 11 6 3 11 6 4 11 6 5 12 7 12 7 1 12 8 12 9 13...

Page 19: ...1 1 1 2 3 4 5 6 8 7 8 9 10 Bed and breakfast 11...

Page 20: ...2 2 2 1 10 cm 10 cm 30 cm 2 2 1 2...

Page 21: ...3 3 4 5 6...

Page 22: ...4 7 2 3 1 2...

Page 23: ...5 3 4 8 5 9 6 10 7...

Page 24: ...6 2 4 x 990 x 1025mm 2 5 2 6 2 7 220 240V 50Hz AC 187 264V 24 W D...

Page 25: ...7 24 u u 2 8...

Page 26: ...8 3 4 4 1 2 c 3 c 4 c 6 c 8 c TEMPERATURE FASTCOOL A fast cool...

Page 27: ...9 A fast cool A SET 1 1 2 2 3 3 4 4 5 5 3 L D L D 5 15 1 2 3 4 5...

Page 28: ...10 2 0 1 150 2 COLDER COLD R L COLD 35 COLD NORMAL COLDER 10 0 COLDER 4 2 CFC 4 3 u u u u u...

Page 29: ...11 4 4 Change the Light Bulb Lamp replacement by professionals 5 5 1 5 2 u u u u 5 3 6 6 1 6 2 6 3 6 4...

Page 30: ...12 6 5 6 6 6 7 7 0 7 1 u u u 8...

Page 31: ...13 3 5 mm u u u u u 9...

Page 32: ...email newsletter Inventor l link QR code https www inventoraircondition gr egiisi inventor l email A...

Page 33: ......

Page 34: ...NOTES...

Page 35: ......

Page 36: ...TOP BOTTOM REFRIGERATOR Scan here to download the latest version of this manual...

Reviews: