background image

7

7

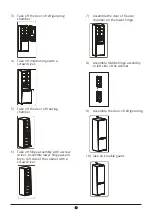
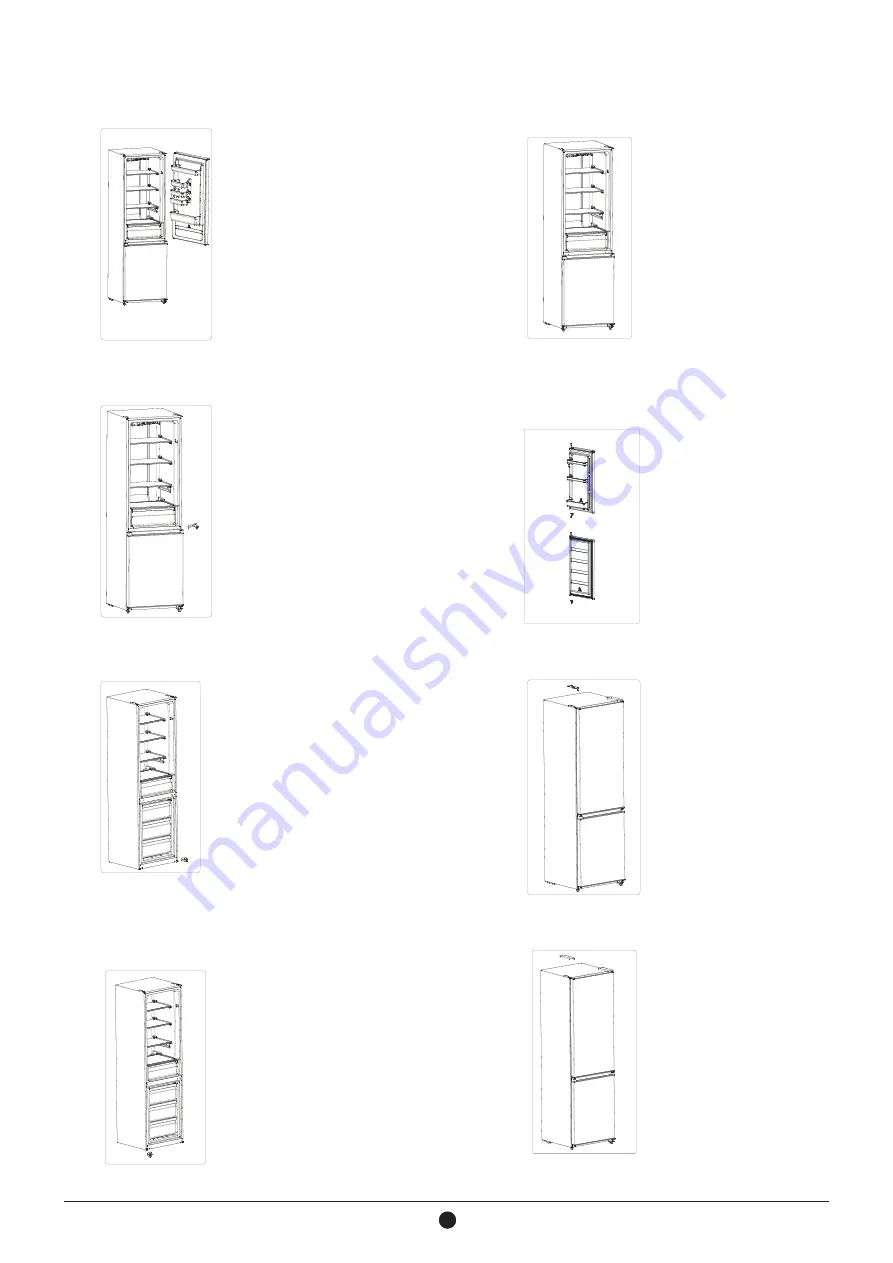
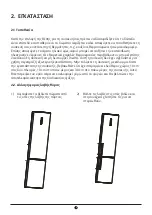
3)  Take off the door of refrigerating 

chamber.

4)  Take off middle hinge with a 

screw driver.

8) 

Assemble middle hinge assembly 
to left side of the cabinet.

5)  Take off the door of freezing 

chamber.

9) 

Assemble the door of refrigerating.

6)  Take off hinge assembly with a screw 

driver , Assemble lower hinge assem-
bly to left side of the cabinet with a 
screw driver.

10)  lake on knuckle guard.

7) 

Assemble the door of freezer 
chamber on the lower hinge.

Summary of Contents for PS18861LIN

Page 1: ...USER S MANUAL MANUAL UTILIZATORULUI ENGLISH ROMANA BOTTOM FREEZER MODELS PS18861LIN PS18861LW REFRIGERATOR...

Page 2: ...ise Inside the Unit 12 4 3 Tips for Keeping Food in the Unit 12 4 4 Error code 12 5 CLEANING 13 5 1 Defrosting 13 5 2 Cleaning the Interior and the Exterior of the Unit 13 5 3 Cleaning Tips 13 6 MAINT...

Page 3: ...d knowledge if they have been given supervision or instruction concerning use of the appliance in a safe way and understand the hazards involved Children shall not play with the appli ance Cleaning an...

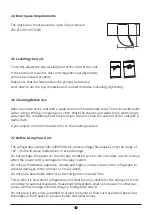
Page 4: ...ause the unit not to perform properly This unit is not designed for use in a garage or outdoor installation Do not drape the unit with any covering When installing the unit ensure that 10 cm of free s...

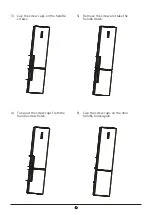
Page 5: ...5 5 3 Cap the screw caps on the handle screws 4 Take out the screw caps from the handle screw holes 5 Remove the screw and take the handle down 6 Cap the screw caps on the door handle holes again...

Page 6: ...6 7 Install the handles into the door handle holes of the other side in accordance with the handle installation instructions 2 3 Reversing the Door Swing 1 Take off knuckle guard 2 Take off top hinge...

Page 7: ...sembly to left side of the cabinet 5 Take off the door of freezing chamber 9 Assemble the door of refrigerating 6 Take off hinge assembly with a screw driver Assemble lower hinge assem bly to left sid...

Page 8: ...ormation refer to the Cleaning section 2 7 Before Using Your Unit The refrigerator adopts 220 240V 50Hz AC power voltage fluctuations over the range of 187 264V will cause malfunction or even damage D...

Page 9: ...t bursts and other losses Before placing any food in your unit turn it on and wait for 24 hours to make sure it is working properly and to allow it time to fall to the correct temperature Your unit sh...

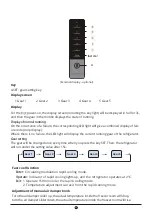
Page 10: ...ir outlet and return air inlet AII images in this instruction manual are for indication only please refer to your individu al unit for details 4 OPERATION 4 1 Operation Instructions Temperature contro...

Page 11: ...refrigerator Gear setting The gear will be changed once every time when you press the key SET Then the refrigerator will run under the setting value after 15s External display optional Gear 1 Gear 2...

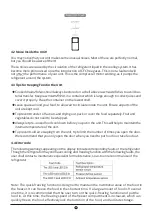
Page 12: ...em The following warnings appearing on the display indicate corresponding faults of the refrigerator Though the refrigerator may still have cooling and freezing function with the following faults the...

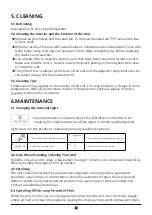
Page 13: ...ues please contact a technician for assistance 6 MAINTENANCE 6 1 Changing the Internal Light Any replacement or maintenance of the LED lamps is intended to be made by the manufacturer its service agen...

Page 14: ...uent opening of refrigerator door Illuminating light does not shine Whether the refrigerator is connected to power whether the illumi nating light is damaged The refrigerator door can not be properly...

Page 15: ...ze and label food to reduce door openings and extended searches Remove as many items as needed at one time and close the door as soon as possible 9 DISPOSAL Old units still have some residual value An...

Page 16: ...esign and the specifications of the product for reasons such as product improvement are subject to change without any prior notice Please consult with the manufacturer at 30 211 300 3300 or with the S...

Page 17: ...lick SEND button at the end of the submission form once the warranty submission has been completed a confirmation message will be sent to your email l l Fill all the fields as shown below once the war...

Page 18: ...18 18 1 1 2 2 2 1 2 2 2 2 2 3 4 2 4 6 2 5 6 2 6 6 2 7 6 2 8 7 3 8 4 8 4 1 8 4 2 10 4 3 4 4 4 4 10 10 5 11 5 1 11 5 2 11 5 3 11 6 11 6 1 11 6 2 11 6 3 11 6 4 11 6 5 12 7 12 7 1 12 8 12 9 13...

Page 19: ...1 1 1 1 2 3 4 5 6 8 7 8 9 10 Bed and breakfast 11...

Page 20: ...2 2 2 2 1 10 cm 10 cm 30 cm 2 2 1 2...

Page 21: ...3 3 3 4 5 6...

Page 22: ...4 4 7 2 3 1 2...

Page 23: ...5 5 3 4 8 5 9 6 10 7...

Page 24: ...6 6 2 4 x 991 x 975mm 2 5 2 6 2 7 220 240V 50Hz AC 187 264V 24 W D...

Page 25: ...7 7 24 u u 2 8...

Page 26: ...8 8 3 LED 4 4 1...

Page 27: ...9 9 A fast cool A SET 1 1 2 2 3 3 4 4 5 5 3 L D L D 5 15 1 2 3 4 5 2 0 1 150 2...

Page 28: ...10 10 4 2 CFC 4 3 4 4 LED1 LED2 LED1 LED3 LED1 LED4...

Page 29: ...11 11 5 5 1 5 2 5 3 6 6 1 6 2 6 3 6 4 LED 1 3 4 2...

Page 30: ...12 12 6 5 6 6 6 7 7 0 7 1 u u u 8...

Page 31: ...13 13 3 5 mm u u u u u 9...

Page 32: ...14 14 211 300 3300 www inventoraircondition gr media library...

Page 33: ...15 15 l link l il 1 https www inventoraircondition gr egiisi inventor QR 2 4 mail email 5 Inventor 3 email email newsletter Inventor l link l il A l il A l link l link...

Page 34: ...nstructiuni de operare 24 4 2 Zgomot in interiorul unitatii 26 4 3 Sfaturi pentru pastrarea alimentelor 26 4 4 Coduri de eroare 26 5 CURATAREA 27 5 1 Decongelare 27 5 2 Curatarea interioara si exterio...

Page 35: ...nte daca li s a acordat supraveghere sau instructiuni privind utilizarea aparatului intr un mod sigur si inteleg pericolele implicate Copiii nu trebuie sa se joace cu aparatul Curatarea si intretinere...

Page 36: ...atea sa nu functioneze corespunzator Aceasta unitate nu este conceputa pentru a fi utilizata intr un garaj sau in instalatii exterioare Nu acoperiti unitatea Cand instalati unitatea asigurati va ca su...

Page 37: ...uruburilor de pe suruburile manerului 4 Scoateti capacele suruburilor din orificiile suruburilor manerului 5 Scoateti surubul si luati manerul in jos 6 Inchideti din nou capacele surubu rilor de pe or...

Page 38: ...nstalati manerele in orificiile manerului usii din cealalta parte conform cu instructiunile de instalare a manerului 2 3 Inversarea balansului usii 1 Pozitionati l in picioare 2 Prindeti balamaua supe...

Page 39: ...aua centrala in partea stanga a dulapului 5 Scoateti usa congelatorului 9 Asamblati usa frigiderului 6 Scoateti balamaua cu o surubelnita asamblati balamaua inferioara in partea stanga a dulapului cu...

Page 40: ...7 Inainte de a utiliza unitatea Frigiderul foloseste curent alternativ de 220 240V 50Hz fluctuatiile de tensiune in intervalul de 187 264V vor provoca defectiuni sau chiar daune Nu deteriorati cablul...

Page 41: ...de a plasa orice aliment in unitatea dvs porniti l si asteptati 24 de ore pentru a va asigura ca functioneaza corect si pentru a i permite sa coboare la temperatura optima Unitatea dvs nu trebuie sup...

Page 42: ...LED raft sertar tava usii imaginile din acest manual de instructiuni sunt doar cu titlu orientativ va rugam sa consultati unitatea dvs individuala pentru mai multe detalii 4 OPERATIUNI 4 1 Instructiun...

Page 43: ...ptelor Afisarea functionarii normale Afisaj Treapta de viteza va fi schimbata o data de fiecare data cand apasati tasta SET Apoi frigiderul va functiona sub valoarea setata dupa 15 secunde Deplasati c...

Page 44: ...introduce in unitate Acest lucru va ajuta la mentinerea temperaturii interna a unitatii Pentru a preveni evacuarea aerului rece din unitate incercati sa limitati de cate ori deschideti usa Va recomand...

Page 45: ...a va rugam sa contactati un tehnician pentru asistenta 6 INTRETINEREA 6 1 Schimbarea luminii interne 6 2 Aveti grija cand manipulati miscati unitatea Tineti unitatea in jurul laturilor sau bazei sale...

Page 46: ...eti ali mentele pana nu sunt racite Deschiderea frecventa a usii frigiderului Lumina interioara nu functioneaza Daca frigiderul este conectat la curent daca lumina interioara este deteriorata Usa frig...

Page 47: ...nt u Organizati si etichetati alimentele pentru a reduce deschiderile usilor si cautarile extinse Scoateti cate articole este nevoie odata si inchideti usa cat mai curand posibil 9 ELIMINAREA Unitatil...

Page 48: ...ot schimba fara o notificare prealabila datorita imbunatatirii con tinue a echipamentelor noastre Pentru mai multe detalii va rugam sa contactati producatorul la numarul de telefon 30 211 300 3300 sau...

Page 49: ...ificati de asemenea si folderul Spam PASUL 5 Ati activat cu succes Garantia Inventor PASUL 3 Dati clic pe butonul TRIMITE situat in partea stanga jos a formularului de completare a datelor E mail Abon...

Page 50: ......
Page 51: ...BOTTOM FREEZER REFRIGERATOR Manufacturer INVENTOR A G S A 24th km National Road Athens Lamia 2 Thoukididou Str Ag Stefanos 14565 Tel 30 211 300 3300 Fax 30 211 300 3333 www inventor ac V 1 1 102021...

Reviews: