background image

•  Please read these instructions before operating the appliance 

and retain for future use.

•  The appliance is intended solely for domestic use within the home. Do 

not use corrosive chemicals or vapors in this appliance. This oven is 

especially designed to prepare food. It is not designed for industrial or 

laboratory use.

•  Do not place any object between the door of the oven. Don’t allow soil 

or cleaner residue to accumulate on the sealing surfaces.

• 

Warning:

 Liquids and other foods must not be heated in sealed 

containers since they are liable to explode. 

•  It is hazardous for anyone other than a competent person to carry out 

any service or repairs that involve the removal of the cover.

•  An electrical appliance is not a toy, and should therefore always be 

placed outside the reach of children. Children are not always able to 

understand potential risks. Teach children a responsible handling of 

electrical appliances.

•  This appliance shall not be used by children from 0 to 8 years. This 

appliance  can be used by children over the age of 8 and above if 

they are continuously supervised. This can be used by people with 

reduced physical, sensory or mental capabilities or lack of experience 

or knowledge, if they have been given supervision or instruction 

concering use of the appliance in a safe way and understand the 

hazards involved. Keep the appliance and its cord out of reach of 

children aged less than 8 years. 

•  Cleaning and maintenance shall not be made by children.

•  Children must not play with the appliance.

•  Only use utensils suitable for use in ovens.

•  The oven should be cleaned regularly and any food deposits should be 

removed.

•  The appliance may not be cleaned with a high-pressure cleaner or a 

steam cleaner.

•  When you see smoke, switch off and unplug the oven. Keep the door 

closed in order to stifle any flames.

•  Ensure that the appliance is switched off before replacing the lamp to 

avoid the possibility of electric shock.

•  Do not place accessories on the open oven door.

•  Never cover the bottom of the oven with aluminium foil. The foil 

English

safety instructions

1

16


 English

IOV6011-instructions.indd   16

15-12-2014   12:14:23

Summary of Contents for IOV6011RVS

Page 1: ...inbouw oven BUILT IN OVEN IOV6011RVS gebruiksaanwijzing instruction manual IOV6011 instructions indd 1 15 12 2014 12 14 17 ...

Page 2: ...2 IOV6011 instructions indd 2 15 12 2014 12 14 17 ...

Page 3: ... klok instellen pagina 9 5 kookwekker instellen pagina 9 6 bereidingstijd instellen pagina 9 7 einde van de bereidingstijd instellen pagina 10 8 uitgestelde begin van de bereidingstijd instellen pagina 10 9 instelling van de sterkte van het geluidssignaal pagina 10 1 safety instructions page 16 2 appliance description page 19 3 before first use page 20 4 setting the clock page 20 5 setting the min...

Page 4: ...en de gevaren niet die kunnen ontstaan bij het omgaan met elektrische apparaten Laat kinde ren daarom nooit zonder toezicht met elektrische apparaten werken Houd het apparaat en het snoer buiten bereik van kinderen jonger dan 8 jaar Het apparaat kan worden gebruikt door kinderen van 8 jaar en ouder en door personen met beperkte fysieke zintuiglijke of mentale vermogens of gebrek aan ervaring of ke...

Page 5: ...iting moet voldoen aan de nationale en lokale voorschriften De wandcontactdoos en de stekker moeten altijd bereikbaar blijven Het apparaat mag niet via een verdeelstekker of verlengsnoer op het elektriciteitsnet worden aangesloten Hiermee kan veilig gebruik van het apparaat niet worden gewaarborgd Het apparaat moet altijd geaard zijn Gebruik het apparaat niet wanneer de stekker het snoer of het ap...

Page 6: ...werkingsafdeling van uw gemeente Indien het apparaat na het inschakelen niet functioneert dan kan de zekering of de aardlekschakelaar in de elektra verdeelkast zijn aangesproken De groep kan te zwaar zijn belast of een aardlekstroom kan zijn opgetreden Dompel het apparaat het snoer of de stekker nooit onder in water Dit apparaat is uitsluitend geschikt voor huishoudelijk gebruik Wanneer het appara...

Page 7: ...Nederlands 7 IOV6011 instructions indd 7 15 12 2014 12 14 17 ...

Page 8: ...7 Rooster product omschrijving 2 8 Nederlands IOV6011RVS 1 2 3 8 9 10 11 12 13 14 15 8 Thermostaatcontrolelampje 9 Temperatuurknop 10 MIN toets 11 KLOK toets 12 PLUS toets 13 Klok display 14 Aan uit en Ovenfunctieknop 15 Controlelampje 4 5 6 7 IOV6011 instructions indd 8 15 12 2014 12 14 18 ...

Page 9: ...esterende tijd van de kookwekker te zien drukt u op de middelste toets KLOK De tijdsduur van de bereiding instellen waarna het functioneren van de oven beëindigd wordt Druk ongeveer 3 seconden op de middelste toets KLOK tot het symbool knipperend in het display verschijnt en druk nogmaals op de middelste toets KLOK waarna A U T O durin het display verschijnt Stel met de en toets de juiste bereidin...

Page 10: ...aal afgegeven dat uitgeschakeld kan worden door op een willekeurige toets te drukken instelling van de sterkte van het geluidssignaal 9 De sterkte van het geluidssignaal kunt u zelf aanpassen Druk de en toets tegelijkertijd in en druk daarna op de middelste toets KLOK In het display knippert ton1 als fabrieksinstelling Druk op de toets om de juiste sterkte te selecteren ton1 hoge toon ton2 normale...

Page 11: ...tisch uitgaan Vergeet niet om de knoppen terug te draaien op de uit stand bediening van de oven 10 Om de oven te bedienen beschikt deze over twee draaiknoppen Een knop voor het instellen van de temperatuur en een knop om de oven in te schakelen en een ovenfunctie te selecteren INSCHAKELEN Om de oven in te schakelen draait u de ovenfunctie knop op de gewenste stand en de temperatuurknop op de gewen...

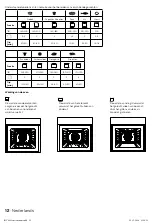
Page 12: ...tie C 160 200 160 200 160 180 200 230 210 220 200 2 3 2 2 1 3 2 4 5 Tijd min 30 60 30 60 20 40 10 20 45 60 14 18 Werking van de oven De warmte van de grill verwarmt het gerecht alleen van bovenaf Voor het grillen van vlees vis brood of gratineren De warmte van het element verwarmt het gerecht alleen van onderaf De warmte van de elementen zorgen ervoor dat het gerecht van boven en van onderen af wo...

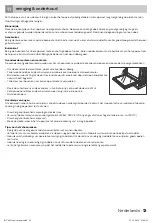
Page 13: ...door de twee hendeltjes die u zojuist heeft opgetild Til de deur naar boven en naar buiten op om deze te verwijderen Plaats de scharnieren van de ovendeur in hun behuizing Let op dat de deur recht zit Zet de twee hendeltjes bij de scharnieren weer terug in de juiste positie Sluit de ovendeur Ovenlamp vervangen Om een elektrische schok te vermijden schakelt u de oven volledig uit door de stekker ui...

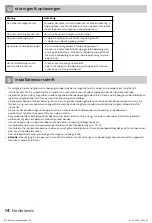
Page 14: ...g alleen worden uitgevoerd door een bevoegde electriciën Deze is op de hoogte van de landelijke en regionale veiligheidsvoorschriften waaraan de aansluiting moet voldoen De kookplaat behoort tot beschermingsklasse III en mag alleen worden gebruikt in combinatie met een geaarde aansluiting De fabrikant is niet aansprakelijk voor de ongeschikte werking en de mogelijke schade veroorzaakt door ongesch...

Page 15: ...en aan de zijwanden van het keukenmeubel Let op dat de schroeven niet te strak aangedraait worden anders kan het busje breken Sluit de ovendeur en steek de stekker in het stopcontact De oven is nu gebruiksklaar ELEKTRISCHE AANSLUITING De netspanning moet overeenstemmen met de spanning weergegeven op het typeplaatje in de oven De groep in de meterkast moeten gezekerd zijn met minimaal 16 Ampère elk...

Page 16: ... 0 to 8 years This appliance can be used by children over the age of 8 and above if they are continuously supervised This can be used by people with reduced physical sensory or mental capabilities or lack of experience or knowledge if they have been given supervision or instruction concering use of the appliance in a safe way and understand the hazards involved Keep the appliance and its cord out ...

Page 17: ...e connecting cable is damaged it may only be replaced by the manufacturer the manufacturer s service organisation or equivalently qualified persons in order to avoid dangerous situations Only use and store the appliance indoors Do not use the oven near water in a wet basement garage or near a swimming pool Attention Avoid touching hot surfaces especially the inside of the appliance Do not cover an...

Page 18: ...nded or is it not handled in accordance with the instruction manual the full responsibility for any consequences will rest with the user Any damages to the product or other things are not covered by the warranty Legislation requires that all electrical and electronic equipment must be collected for reuse and recycling Electrical and electronic equipment marked with the symbol indicating separate c...

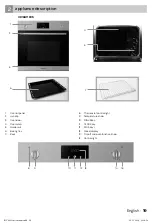
Page 19: ...ey 13 Clock display 14 On off and ovenfunction knob 15 Control light appliance description 2 1 Control panel 2 Handle 3 Oven door 4 Oven lamp 5 Guide rails 6 Baking tray 7 Rack English 19 IOV6011RVS 1 2 3 8 9 10 11 12 13 14 15 4 5 6 7 IOV6011 instructions indd 19 15 12 2014 12 14 24 ...

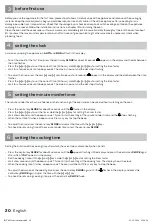
Page 20: ...s Hold the or key for setting the time faster Wait for a few seconds until a beep sounds The clock is now set and the dot stops flashing The minute minder timer has no influence on the functioning of the oven and can be used without switching on the oven Press the central key CLOCK for about 3 seconds until the flashes in the display Press the or key to set the timer Hold the or key for setting th...

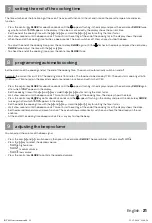
Page 21: ... on the set endtime At the end of the cooking time a beep sounds Press any key to stop the beep adjusting the beep volume 9 You can adjust the volume of the beep signal Press the keys and simultaneously then press the central key CLOCK The preset blinks in the display ton1 Press the key to select the desired volume ton1 high volume ton2 medium volume ton3 low volume Press the central key CLOCK to ...

Page 22: ...temperature knob to the right temperature As soon as the oven has reached the set temperature the thermostat light goes out Preheating the oven takes about 5 minutes depending on the desired temperature If required set the cooking time and the end of the cooking time with the central key CLOCK Temperature knob Ovenfunction knob The oven has the following functions Ovenfunctie Temperatuurinstelling...

Page 23: ...the dish is warmed from above as well as from below Beef Pork Poultry Vegetables Function C 225 250 210 230 160 180 190 210 170 190 2 2 2 2 3 Time min 120 150 90 120 45 60 40 50 40 50 The tables below are indicative for preparing different dishes Pastry flan Cupcakes cookies Pizza Fish Sausage Function C 160 200 160 200 160 180 200 230 210 220 200 2 3 2 2 1 3 2 4 5 Time min 30 60 30 60 20 40 10 20...

Page 24: ...wdriver Carefully close the door as far as the first stop caused by the raised levers Lift the door upwards and outwards to remove it from the mountings Place the hinges of the oven door in the mountings Make sure the door is level Lower the two levers at the hinges back Close the oven door Replacing the oven lamp Before proceeding disconnect the appliance from the power line to avoid the possibil...

Page 25: ...n is fitted must be heat resistant 75 C Ensure that the cabinet into which the oven is installed is secure For example by mounting it to the adjoining elements Damage caused by incorrect connection incorrect use or incorrect fitting is not covered by the guarantee Attention any change to the appliance s interior including fitting and changing the power cable must only be performed by a qualified e...

Page 26: ...ed screws to fasten the bushings to the cabinet Take care not to over tighten and break the bushing Close the oven door and plug the appliance in The oven is now ready for use ELECTRICAL CONNECTION Check that the voltage in your home corresponds with the voltage printed on the appliance These groups in the meter must be secured with at least 16 amps each The connection cable must have a cross sect...

Page 27: ...ng van het apparaat als gevolg van een gebeurtenis die gewoonlijk verzekerd is onder de inboedelverzekering Tot wie kunt u zich wenden Op www inventum eu vindt u naast gebruiksadviezen en schoonmaaktips alle antwoorden op uw service vragen Raadpleeg eerst de website voordat u zich meldt bij ons service center Via de website www inventum eu kunt u uw service aanvraag snel en eenvoudig online aanmel...

Page 28: ...ipment before use If any damage is found please contact your supplier within 5 working days after purchase From warranty and or replacement are excluded defects loss and damage to the appliance due to an event that usually is insured under the home contents insurance To whom can you turn to On www inventum eu you will find besides advice on how to use the appliance and cleaning tips all the answer...

Page 29: ...IOV6011 instructions indd 29 15 12 2014 12 14 28 ...

Page 30: ...g errors reserved Inventum Huishoudelijke Apparaten B V Generatorstraat 17 3903 LH Veenendaal T 31 0 900 468 36 88 info inventum eu www inventum eu twitter com inventum1908 facebook com inventum1908 youtube com inventum1908 persoonlijke verzorging klein huishoudelijk witgoed inbouw witgoed vrijstaand IOV6011 instructions indd 30 15 12 2014 12 14 28 ...

Reviews: