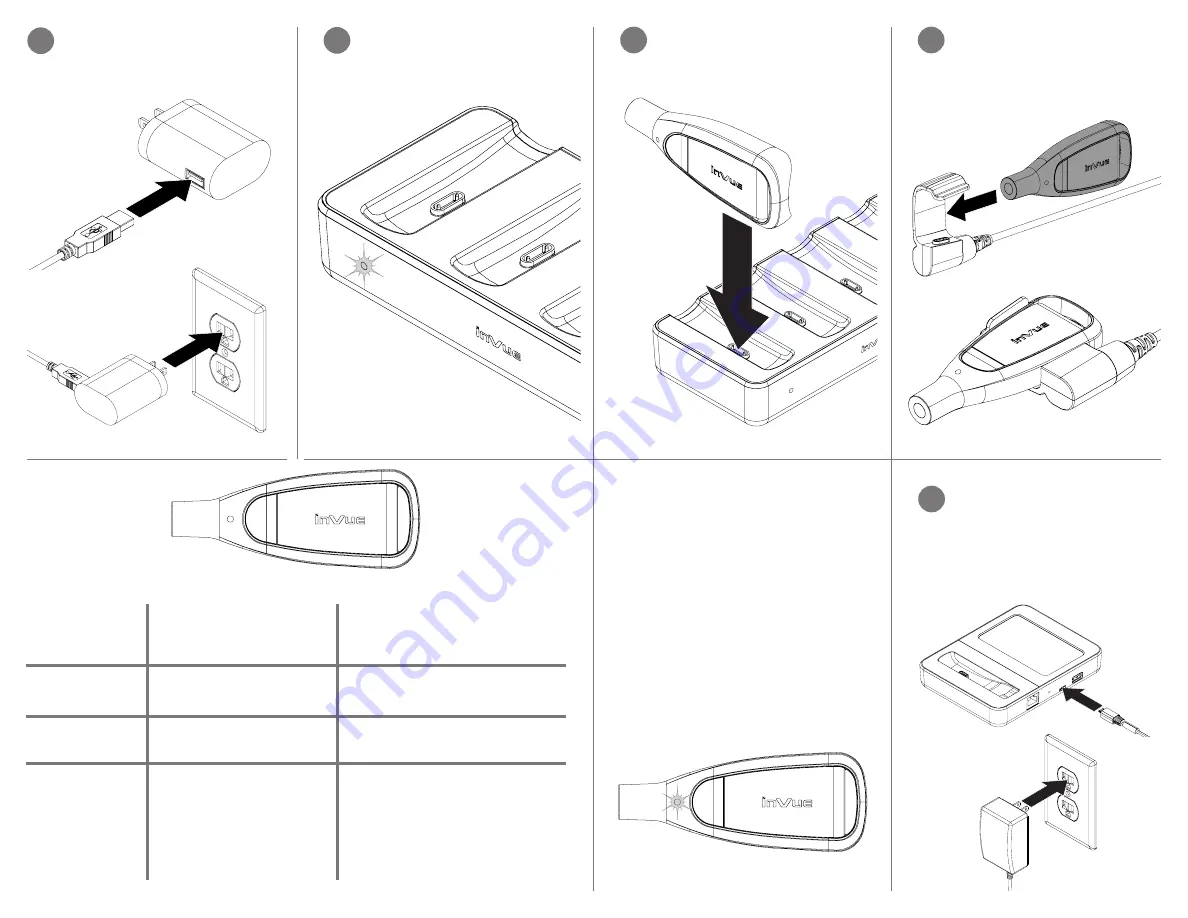
The LED on the charger will illuminate,
indicating that it is receiving power.
4
Place a Key onto the contacts in one
of the charger slots. Allow the Key to
charge for 6 hours before use.
5
Below is a breakdown of the IR4 Key’s LED
indicators.
• Green - Battery and Timeout are good for
continued use.
• Yellow - Return the Key to the Manager
within the hour. Battery is low or Timeout is
close to expiration.
• Red - Return the Key to the Manager
immediately. Battery is too low for
continued use or the Key has timed out.
• No LED - Return the Key to the Manager
immediately. Battery is completely
depleted.
3
Plug the power cable into a PS515
power supply. Plug the power supply
into a power outlet.
7a
Section 2: OneKEY Manager
Installation
Place the OneKEY Manager where
desired and plug the PS512 power
supply into the port on the back of
the Manager. Plug the power supply
into a power outlet.
If using the Single Key Charger
(OK4101), slide the OneKEY into the
charger. Ensure that the charging
contacts on the OneKEY align with
the charging contacts on the charger.
6
There are 2 versions of the OneKEY, here are the differences.
Batch Key
(OK4000 & OK4000-S)
LIVE Key
(OK4400, OK4401,
OK4406 & OK4500)
Activity
Tracking
Remote Key
Deauthorization
Parts
Needed
Batch updates when
docked with the
OneKEY Manager
Real time data transfer
over a LORA network
No
Yes
• OneKEY (Batch)
• OneKEY Manager & Power
Supply
• Single, 4x or 8x Charger &
Power Supply
• LAN Connection
• OneKEY (LIVE)
• OneKEY Manager & Power
Supply
• Single, 4x or 8x Charger &
Power Supply
• LAN Connection
• LORA Gateway


