background image

 -

8

-

(3) 

Installation for motherboards

A. For Intel Motherboards (LGA 115X/1200/1366/20XX/1700)

(1) Switch the Intel backplate pins according to the CPU socket of your 
     motherboard.

(2) Attach the Intel backplate to the bottom of the motherboard.

(3) Install the standoff screws onto your motherboard. Ensure to use the 
      correct standoff screws for your CPU socket.

Note: Intel LGA 20XX does not require back plate installation.

Note: Intel LGA 20XX does not require backplate installation.

Parts Required

Standoff Screws (LGA115X/1200/1366/20XX/1700)

LGA1700

LGA1366

LGA115x / 1200

Installation Guide

Summary of Contents for NR24

Page 1: ...User Manual All In One Nebula Liquid CPU Cooler ...

Page 2: ... 2 NR Series Product Video Product Video Information ...

Page 3: ...id CPU Cooler NR Series will provide your build with stellar visual aesthetics The water block is filled with crystal shimmering stars and the radiator is equipped with high static pressure fans Luna AL120 Gaze into the realms of Nebula Product Story ...

Page 4: ...W x H 66 x 50 x 31 mm 2 6 x 2 0 x 1 2 Materials PPS GF Pump Speed 5200 10 RPM Fan Model Luna Series AL120 Quantity Included 2 PCS 3 PCS Dimensions L x W x H 120 x 120 x 25 mm 4 7 x 4 7 x 1 0 Speed Mode PWM 400 1800 10 RPM Noise Level 25 dB A Normal Airflow 82 96 CFM Static Pressure 2 31 mm H2O Connectors 4 Pin 12V PWM 3 Pin 5V ARGB Rated Voltage DC 12V Bearing Type Long Lifespan Sleeve Bearing Pack...

Page 5: ...rews x 4 LGA 20XX g Standoff Screws x 4 LGA 115X 1200 1366 h Standoff Screws x 4 LGA 1700 i Standoff Screws x 4 AMD j Standoff Screws x 4 TR4 k 240 Radiator x 1 l ARGB Water Block Cable x 1 m ARGB Fan Cable x 1 n PWM Fan Cable x 1 o Washer x 8 p Fan Screws x 8 q Radiator Screws x 8 r ARGB One Click Controller x 1 s Thumbscrew Caps x 4 t Thermal Compound x 1 NR24 Package Contents ...

Page 6: ...te x 1 f Standoff Screws x 4 LGA 20XX g Standoff Screws x 4 LGA 115X 1200 1366 h Standoff Screws x 4 LGA 1700 i Standoff Screws x 4 AMD j Standoff Screws x 4 TR4 k 360 Radiator x 1 l ARGB Water Block Cable x 1 m ARGB Fan Cable x 1 n PWM Fan Cable x 1 o Washer x 12 p Fan Screws x 12 q Radiator Screws x 12 r ARGB One Click Controller x 1 s Thumbscrew Caps x 4 t Thermal Compound x 1 ...

Page 7: ...id damage to the product Installation Guide 1 Install AL120 Fans to Radiator 2 Install Fans and Radiator combo to your PC chassis Parts Required Radiator Screws Parts Required 240 mm 360 mm radiator Luna AL120 Fans Washers Fan Screws Note Please be sure to use a washer on each screw before installation ...

Page 8: ...tel backplate to the bottom of the motherboard 3 Install the standoff screws onto your motherboard Ensure to use the correct standoff screws for your CPU socket Note Intel LGA 20XX does not require back plate installation Note Intel LGA 20XX does not require backplate installation Parts Required Standoff Screws LGA115X 1200 1366 20XX 1700 LGA1700 LGA1366 LGA115x 1200 Installation Guide ...

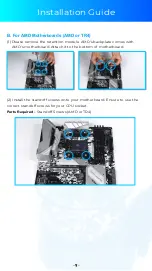
Page 9: ...n module AMD s backplate comes with AMD s motherboard Attach it to the bottom of motherboard 2 Install the standoff screws onto your motherboard Ensure to use the correct standoff screws for your CPU socket Parts Required Standoff Screws AMD or TR4 Installation Guide ...

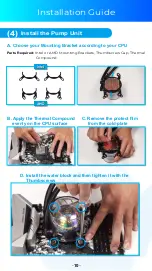
Page 10: ... CPU B Apply the Thermal Compound evenly on the CPU surface D Install the water block and then tighten it with the Thumbscrews C Remove the protect film from the cold plate Parts Required Intel or AMD Mounting Brackets Thumbscrew Cap Thermal Compound Intel AMD Installation Guide ...

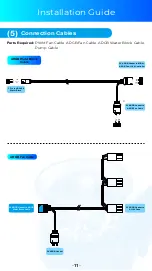
Page 11: ... 5V 1 2 3 GND KEY DATA 5V 1 4 2 3 1 4 2 3 GND KEY DATA 5V 3 Pin to NR24 36 Water Block 5V ARGB Header to ARGB Water Block Cable 5V ARGB Header 5V ARGB Header to AL120 Fans 5V ARGB Header to M B or ARGB One Click Controller 5V ARGB Header to ARGB Fan Cable ARGB Water Block Cable ARGB Fan Cable Installation Guide ...

Page 12: ... M B does not have an AIO_Pump you can connect the 3 Pin to a fan header but it is recommended to set the output to DC 12V 100 5 100 5 600 10 P2 P3 P4 GND FG PWM P1 GND PWM 2 4 1 12V 12V FG 3 GND PWM 2 4 1 12V GND PWM 2 4 1 12V 3 3 2 3 4 1 4 Pin Header to M B CPU_FAN Installation Guide ...

Page 13: ...r Installation If your motherboard does not support ARGB effects please use the included ARGB One Click Controller in order to use the 14 lighting modes ARGB Cable Header ARGB One Click Controller PSU s SATA Cable Installation Guide ...

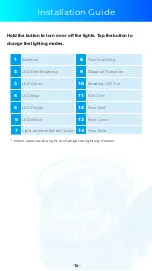
Page 14: ...ng LED Trio 4 LED Blue 11 Full Circle 5 LED Purple 12 Flow Red 6 LED White 13 Flow Green 7 Light at the endof the Tunnel 14 Flow Blue Hold the button to turn on or off the lights Tap the button to change the lighting modes InWin reserves the right to change the lighting modes Installation Guide ...

Page 15: ...es not operate properly please follow the instructions below 1 Please check your system s power 2 Please make sure all the connectors are connected properly 3 For more technical support please visit the InWin Forum website at https forum in win com ...

Page 16: ...o not put your hands or other objects into the fan blades when the fan is in operation And please make sure to keep away from children and pets 6 Please only use this product in a computer case 7 Please keep this product away from any liquids 8 Please use only this product s exclusively supplied cables Other cables may not be compatible and could cause serious damage to your system and power suppl...

Page 17: ... 17 Copyright 2021 In Win Development Inc All Rights Reserved ...

Reviews: