background image

  Hydra Super-S LCM                                                                                                       Appendix 

4  Appendix 

4.1  Safety Information 

4.1.1  6-pin FireWire cable 

When using a 6-pin FireWire cable, make sure NOT to insert the connector the wrong way (upside 
down), or you will damage the device! 
 

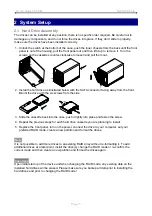
4.1.2  Location and placing precautions 

Do not cover the device and do not place the unit on other heat-sensitive equipment. Avoid 
positioning it in the following places: 

  Locations with direct sunlight, next to radiators or other sources of heat with high temperatures 

(more than 35° C) or high humidity (more than 90%). 

  Locations subject to vibration, shock, or with a slope. 

  Do not expose the product to water or humid conditions. 


4.1.3  Electricity and power plug 

Careful attention must be paid to the following points in order to avoid electric shock or fire: 

  Always connect the power cord to your device before you plug it into the wall socket. 

  Do not touch the power cable with wet hands and never try to modify the power cable. 

  If the unit should emit smoke, an unusual odour or noise, switch it off immediately. 

  Use only the cables supplied or recommended by your vendor in order to avoid malfunction. 


4.2  FAQ 

Q: What file system should I choose to format my drive? 
A:

 This will depend on how you want to use the drive but in general, we recommend: 

 Windows 

XP/Vista 

 NTFS 

 Mac 

OS 

 HFS+ (Mac OS Extended) 

  To use it on both PC and Mac 

 FAT32 (single files size is limited to 4GB) 


Q: How many drives can fail before I loose my data? 
A:

 This depends on the RAID mode. For RAID 0 and Spanning, any drive failure will result in the 

data being lost. For RAID 1, RAID 3, RAID 5 and RAID 10, more than one drive failure at the same 
time will mean the data can not be recovered anymore. 
 

Q: Will the hard drives spin down when my computer goes into stand-by mode? 
A:

 No, to provide immediate access to your data, the drives will always keep spinning as long as 

the power is turned on. 
 

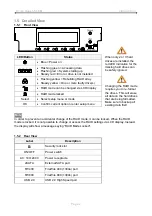
Q: Why does the LED indication for some of the drives light up red? 
A:

 If one of the HDD LEDs lights up red and at the same time the Rebuild LED lights up yellow, the 

drive is defective. If less than 4 drives are installed and the Rebuild LED does not light up at the 
same time, it simply indicates that there is no drive in that bay. 


© Copyright 2009 by Macpower & Tytech Technology Co., Ltd. all Rights Reserved 

The information contained in this manual is believed to be accurate and reliable. Macpower & Tytech Technology 
assumes no responsibility for any errors contained in this manual. Macpower & Tytech Technology reserves the right to 
make changes in the specifications and/or design of this product without prior notice. The diagrams contained in this 
manual may also not fully represent the product that you are using and are there for illustration purposes only. Macpower 
& Tytech Technology assumes no responsibility for any differences between the product mentioned in this manual and 
the product you may have. 

Page 15 

Summary of Contents for Hydra Super-S LCM

Page 1: ...EN Hydra Super S LCM 4 Bay RAID Storage Enclosure 3 5 SATA HDD User Manual July 30 2009 v1 2...

Page 2: ...I hard drives 1 5Gb s or 3 0Gb s Hard drives of identical capacities are recommended Supports large volumes in excess of 2TB Note In order for the computer to access volumes larger than 2TB both the h...

Page 3: ...d Flashing yellow Rebuilding RAID array Steady yellow One or more faulty drive s RAID mode can be changed via LCD display RAID mode locked Select Select setup menu or mode OK Confirm current option or...

Page 4: ...y Used where speed is the primary objective but RAID Level 0 also called striping is not redundant This form of array splits each piece of data across the drives in segments Since data is written with...

Page 5: ...e size of one drive RAID 5 uses block level striping with parity data distributed across all member disks and therefore provides the perfect balance between high performance and data integrity When on...

Page 6: ...ve with the six screws from the side 3 Slide the cassette back into the case push it lightly into place and fasten the screw 4 Repeat the previous steps for each hard drive cassette you are planning t...

Page 7: ...ray will take several hours depending on the drive capacity 4 For RAID 0 and Spanning erase the old partition create a new one and then format the drives again Note We recommend not turning off the po...

Page 8: ...ings menu offers options to change the device configuration 3 2 System Information Press the Select button until the system information menu is selected and then press the OK button to start displayin...

Page 9: ...the different information displaying each screen for about 8 seconds and then return to the main screen To fast forward press the Select button 1 The main screen of the HDD information menu 2 Displays...

Page 10: ...rger than 2TB both the hardware and Operating System need to have the capacity to support large volumes e g WinVista 32bit 64bit or Mac OS 10 4 and above or the 2TB option should be disabled Enabled S...

Page 11: ...the menu without changing any of the settings press the Select button until you see the Exit screen and then press the OK button To change the setting press the Select button to choose your preferred...

Page 12: ...ng press the Select button to choose your preferred mode and then press the OK button to confirm the change 3 4 4 TEMP Alarm Setup This is the alarm sound you hear when the internal temperature that i...

Page 13: ...d is set to high speed LowSpeed Fan speed is set to low speed OFF The fan is turned off This setting should only be used if the device is located in a cool and temperature controlled room Press the OK...

Page 14: ...turns off when the screen has been idle for more than three minutes 5min Backlight turns off when the screen has been idle for more than five minutes Press the OK button to enter the setup menu and p...

Page 15: ...ff and the display shows this message Press the OK button to temporarily mute the alarm and use the HDD LED s in order to locate the defective drive XX Cable Connected Shows which cable has been conne...

Page 16: ...T32 single files size is limited to 4GB Q How many drives can fail before I loose my data A This depends on the RAID mode For RAID 0 and Spanning any drive failure will result in the data being lost F...

Reviews: