Hardware Management
151
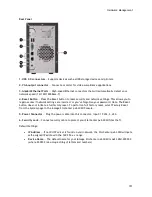
Rear Panel
1. USB 2.0 connectors
— Supports devices such as USB storage devices and printers.
2. VGA output connector
— Connect a monitor for video surveillance applications.
3. Gigabit Ethernet Ports
— High-speed Ethernet connectors that will automatically detect your
network speed (10/100/1000Base-T).
4. Reset Button
— Press the Reset button to reset security and network settings. This allows you to
regain access if network settings are incorrect or you’ve forgotten your password. Note: The Reset
button does not initiate a full factory reset. To perform a full factory reset, select Factory Reset
from the System page in the Iomega StorCenter px2-300d Console.
5. Power Connector
— Plug the power cable into this connector. Input: 19 Vdc, 3.42 A
6. Security Lock
— Connect security cable to protect your StorCenter px2-300d from theft.
Default Settings:
IP Address
— If not DHCP server is found on your network, the StorCenter px2-300d will get a
self-assigned IP address in the 169.254.x.x range.
Device Name
— The default name for your Iomega StorCenter px2-300d is px2-300d-XXXXXX
(where XXXXXX is a unique string of letters and numbers).
.
Summary of Contents for StorCenter px2-300d
Page 1: ...Iomega StorCenter px2 300d User Guide D31621200 ...
Page 2: ......
Page 12: ......
Page 60: ......
Page 65: ...Storage Pool Management 53 learn more about how content is stored ...
Page 72: ......
Page 76: ......
Page 116: ...Iomega StorCenter px2 300d User Guide 104 How do I create an Iomega Personal Cloud ...
Page 126: ......
Page 132: ......
Page 154: ......
Page 160: ......


