background image


Cub Instrument User Manual V2.4 


Unrivalled Gas Detect

ion.


Page 25 of 46 

ionscience.com 

Actions on Dock 

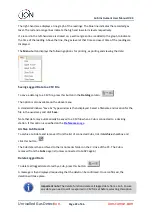
When you place a Cub in a Cub Doc Docking Station, logged data is automatically copied to the 
connected PC. Other actions may also take place, as specified by ticking the checkboxes in this 
section, in the order they are listed on the page. 


Cub data is downloaded to PC in CSV format. The location for the file is 
selected using the 

Browse

 button. 

Note that this function is in addition to the automatic copying of logged data mentioned above. Such 
data is viewed using CubPC, but is encoded and cannot be edited. Data transferred manually to CSV 
files may be freely edited and also loaded by other software. 


Data is deleted from the Cub once it has been downloaded to the PC. 


T

he Cub’s internal clock is synchronised to 

that of the PC. 


The Cub

’s

 firmware is automatically updated if an update is 

available. 

Data stored on the Cub will be deleted.


The Cub is automatically bump 
tested. 

Data stored on the Cub 

will be deleted.


Minimum and Maximum SPAN parameters can be set which, if exceeded, will automatically 

recalibrate the Cub instrument. Check the 

 checkbox. 


The Cub will be recalibrated. This function works independent of 
the previous bump test function. 

Data stored on the Cub will be 

deleted.


The last two actions are only available on Calibration Docking Stations. 

History 

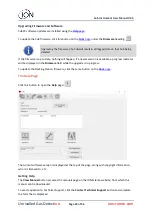
If logged data more than a certain number of days old is to be deleted from the PC, tick the checkbox 
in the 

History

 section of the page and enter the number of days in the field next to it. 

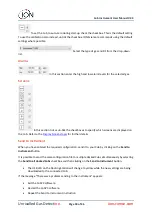
Calibration 

Please refer to the 

Calibration section

 for details of these settings. 

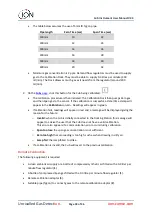
Bump Test 

Use this setting to specify whether during bump tests the bump gas used is the calibration gas or the 
PID gas selected for the Cub. 

See the Bump Tests topic

 for further details. 

Summary of Contents for CUB

Page 1: ...TAC Instrument User Manual V2 4 Unrivalled Gas Detection ionscience com Distributed by Air Met Scientific Pty Ltd Work with Confidence Air Met Sales Service P 1800 000 744 F 1800 000 774 E sales airmet com au Air Met Rental P 1300 137 067 E hire airmet com au W www airmet com au ...

Page 2: ...anty Thank you for purchasing your ION Science instrument The standard warranty of your instrument can be extended to two years To receive your extended warranty you must register your instrument online within one month of purchase terms and conditions apply Visit ionscience com instrument registration ...

Page 3: ...r Cub off 13 The Cub Display Overview 14 Display Screens 14 4 What do the alerts and alarms mean 16 5 Using the CubPC Software and Downloading Data 17 Overview 17 PC Requirements 17 Downloading and Installing 17 Connecting Docking Stations and Cubs to a PC 17 Starting the CubPC Software 18 Downloading Data Logged Readings 18 Main Menu Buttons 18 The Cubs Page 19 Viewing Download Records 20 Viewing...

Page 4: ...ge 26 6 Device Configuration 27 Name 27 Units 27 Auto Start 27 Clock 27 Data log 28 Calibration 28 Features 28 TWA STEL 28 Sound 29 Vibrate 29 PID 29 Alarms 30 Screens 30 Send to Instrument 30 7 Calibration 31 Calibration Facility 31 Calibration Overview 31 Cub Calibration Settings 31 Calibration Using a Cub Doc 32 Cub Doc Calibration Settings 32 Cub Doc Calibration Procedure 32 Remote Calibration...

Page 5: ...Removing the MiniPID Sensor 37 Replacing the MiniPID Electrode Stack 37 Lamp Removal and Examination 38 Lamp Cleaning 38 Replacing a Lamp 39 Bump Testing 40 9 Troubleshooting 41 Diagnostics 41 10 Appendix and Supporting Documents 42 EU Declaration of Conformity 42 Technical Specifications 44 Cub Specifications 44 Cub Doc Power Supply Requirements 45 Warranty 45 ION Science Contact Details 46 UK an...

Page 6: ...D TO INDICATE DANGER WARNINGS WHERE THERE IS A RISK OF INJURY OR DEATH Caution Used to indicate a caution where there is a risk of damage to equipment Information Important information or useful hints about usage Recycling Recycle all packaging WEEE Regulations Ensure that waste electrical equipment is disposed of correctly Warnings Cautions and Information notifications The following Cautions app...

Page 7: ...air intrinsic safety Ingress Protection Continuous exposure to wet weather conditions should be limited to less than one day and harsh water spray conditions should be avoided Proper Use If the equipment is used in a manner not specified by the manufacturer the protection provided by the equipment may be impaired The following Warnings Cautions and Information notifications appear later in this ma...

Page 8: ... deletes all logged data from a Cub Ensure any data you need to edit is exported in CSV format before selecting this option Upgrading the firmware of a Cub will result in all logged data on that Cub being deleted Important note Once the Cub memory has been completely filled the oldest data will automatically be over written with new data logs The data will be reassembled as one complete data set s...

Page 9: ...ation design providing accurate results and an extended run time in the most challenging environments With the option for parts per billion ppb sensitivity Cub sits within the breathing zone and is comfortable and unobtrusive to wear The Cub has a dynamic range of 0 to 5000 ppm and can measure 480 selectable compounds When worker exposure exceeds a Cub s programmed limits its audible vibrating and...

Page 10: ...d with Cub Doc Docking Stations These are used to recharge your Cub Depending on which model of Docking Station you use they can also be used to download data from your Cub and to calibrate it Cub Docs are equipped with coloured LEDs to indicate battery connection and calibration status There are three types of Cub Docs Cub Doc Type Charges device LED status indicators USB connection Calibration C...

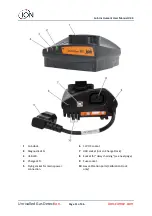
Page 11: ... of 46 ionscience com 1 Cub dock 2 Diagnostic LED 3 USB LED 4 Charge LED 5 Flying socket for mains power connection 6 12V DC socket 7 USB socket not on Charge Dock 8 Socket for daisy chaining see next page 9 Fuse socket 10 Gas calibration ports Calibration Dock only ...

Page 12: ...ged However prolonged periods of storage may result in the battery discharging We recommend charging the instrument for at least four hours before use Cubs are recharged using a Cub Doc Docking Station all types Cub Docs can be daisy chained together see below so that multiple Cubs can be recharged from a single power point 1 Cub Doc 2 Cub 3 Docking Stations daisy chained 4 Flying socket 5 3 core ...

Page 13: ... the bar from right to left Hold down the multi function button until this is no longer displayed i e for 3 seconds The alarm will then stop sounding and the red LED will turn off The screen will turn on and will cycle through various displays as the device sets itself up Finally a short alarm will sound and the LEDs will flash green The main gas detection display screen see below will then be dis...

Page 14: ...WITH NATIONAL SAFETY REGULATIONS The Cub can display a number of different data screens To cycle through these screens press the multi function button on top of the Cub When a new screen is accessed the display is illuminated with a different coloured light which will turn off after a few moments When the display is already lit up a different screen is displayed every time the multi function butto...

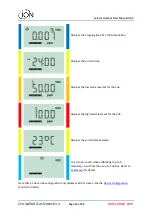
Page 15: ... Displays the low alarm level set for the Cub Displays the high alarm level set for the Cub Displays the current temperature This screen is used when calibrating the Cub remotely i e without the use of a Cub Doc Refer to Calibration for details Note that a Cub can be configured to only display specific screens see the Device Configuration section for details ...

Page 16: ...on the screen If the detected gas level triggers a low level alarm the display screen will flash orange and the lights on the top of the unit will flash red The low level alarm symbol will be displayed on the screen Depending on how the Cub was set up an alarm may also sound and the unit may vibrate If the alarm latch is set these alarm indications cannot be switched off until the gas level has dr...

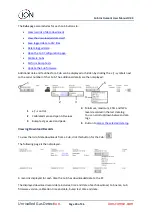
Page 17: ...r above installed This can be downloaded from http www microsoft com en us download details aspx id 25150 Downloading and Installing Download the CubPC software from our website at https www ionscience com wp content uploads 2018 06 0 0 0 51 zip Install the CubPC by following these instructions https www ionscience com wp content uploads 2016 10 Cub Installation instructions pdf Connecting Docking...

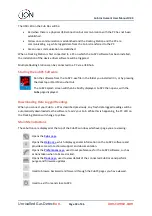
Page 18: ...t Menu shortcut The CubPC splash screen will then be briefly displayed CubPC then opens with the Cubs page displayed Downloading Data Logged Readings When you connect your Cub to a PC as described previously any fresh data logged readings will be automatically downloaded as the software reads your Cub While this is happening the PC LED on the Docking Station will change to yellow Main Menu Buttons...

Page 19: ...g Station will flash purple for a few seconds If a Cub is connected to a Cub Doc Docking Station this is indicated by its picture under the Status heading No Cub connected Cub connected For each connected Cub the following are displayed 1 Cub IRN number 2 Cub name if assigned on the Device configuration page 3 Cub Doc status 4 Time and date that the Cub was last calibrated 5 Time and date that the...

Page 20: ... of that Cub The additional details are then displayed 1 control 2 Calibrated zero and span AD values 3 Bump test gas used and peak 4 Minimum maximum STEL and TWA levels recorded in the last data log You can scroll up down between data logs 5 Button to access the selected data log Viewing Download Records To view the list of data downloads from a Cub click this button for the Cub The following pag...

Page 21: ... additional button for viewing details of the logged data Viewing Details of Logged Data To view details of a data log press this button in the Datalog column To view details of the most recent data log recorded by a Cub press the same button on the Cubs page for that Cub The number on the button indicates how many files are stored within the Cub The details of the reading recorded in the selected...

Page 22: ... A standard Windows Save As type window is then displayed Select a filename and location for the file in the usual way and click Save Note that data may automatically be saved to a CSV file when a Cub is connected to a docking station if this option is specified on the Preferences page Archive Cub Records To archive Cub data and remove it from the list of connected Cubs tick its Archive checkbox a...

Page 23: ...ion is available a progress indicator will be displayed in the Firmware field while the upgrade is in progress To update the Docking Station firmware click the same button on the Dock page The Help Page Click this button to open the Help page The current software version is displayed at the top of the page along with copyright information who is it licensed to etc Getting Help The View Manual butt...

Page 24: ...ion of the software will automatically shut down and be replaced by the new version which will then start up automatically To view the release notes for the software click View Release Notes To check whether an upgrade is available click the Poll Website now button Other Facilities It is recommended that this manual is viewed using Adobe Reader The Adobe Web Site button opens the Adobe Reader down...

Page 25: ... to that of the PC The Cub s firmware is automatically updated if an update is available Data stored on the Cub will be deleted The Cub is automatically bump tested Data stored on the Cub will be deleted Minimum and Maximum SPAN parameters can be set which if exceeded will automatically recalibrate the Cub instrument Check the checkbox The Cub will be recalibrated This function works independent o...

Page 26: ... If you have forgotten your password please contact Ion Science so that we can issue you with a master password Master passwords are generated daily and are only valid on the day of generation Dock Page Click this button to open the Dock page Use this page to view details of the connected Cub Docs and perform firmware updates on them The Dock column displays the serial number of each Cub Doc Click...

Page 27: ... page is displayed Name If required enter a name for the Cub in this field Units The units of measurement may be chosen as parts per million ppm or milligrams per cubic metre mg m3 Auto Start Tick the checkbox if the Cub is to start automatically when removed from the Docking Station Clock Set the time and date and tick the checkbox to the right of these fields to set the time on your Cub ...

Page 28: ...rop below this concentration Recorded data will be displayed as one data session until the device is restarted The exported csv file will also detail how many times the device reading exceeds the data log trigger level Important note Once the Cub memory has been completely filled the oldest data will automatically be over written with new data logs The data will be reassembled as one complete data...

Page 29: ...utton is pressed First multi function button press disables the sounder second multi function button press turns the LEDs off The alarm activates again when the signal goes above the alarm level again checkbox unticked When the Cub has gone into alarm signal alarm level the sounder and LEDs can be switched off first multi function button press disables the sounder second multi function button pres...

Page 30: ...hich screens are displayed on the Cub Refer to the Display Screens topic for further details Send to Instrument When you have entered the required configuration send it to your Cub by clicking on the Send to Instrument button It is possible to send the same configuration file to multiple docked Cubs simultaneously by selecting the Send to all docked Cubs checkbox and then clicking on the Send to I...

Page 31: ...e Ltd recommends annual return of all instruments for yearly service and calibration Calibration Overview The Cub is calibrated at ION Science after manufacture please note that subsequent calibration will overwrite the factory calibration Cub instruments leave ION Science Ltd pre set for gas type Isobutylene Instruments are factory calibrated against isobutylene and all response factors are equiv...

Page 32: ...lid calibration yellow if the calibration is out of date and green if the calibration is current Cub Doc Calibration Procedure Ensure you have the cylinder s of gas regulator s and or a zero carbon filter on hand before starting the procedure Alternatively a known clean air supply may be used as the zero gas Ensure you are familiar with the calibration procedure before starting 1 Connect the Zero ...

Page 33: ...ll appear in green If calibration fails readings will appear in red and a message will be displayed giving the reason for the failure o Invalid when the Cub is initially connected to the Docking Station this message will appear to advise the user that the Cub does not have a valid calibration This error also appears if a communication error occurs during calibration o Span too low the span gas con...

Page 34: ...ff This initiates the Zero stage of the procedure The screen will display a 0 Connect a clean ambient air supply or a bottle of compressed synthetic air Switch on the gas supply and then press the multi function button The screen will change and display a live reading from the sensor This number does not relate to gas concentration it simply indicates if the sensor output is changing The reading s...

Page 35: ... significant difference between the Zero and Span levels the calibration will be invalid and E 5 will be displayed If this occurs the previous valid calibration levels will be used At the end of the calibration sequence the Cub will revert to the general VOC normal running Important note Always check the calibration in normal running before use by carrying out a bump test Apply the same Zero and S...

Page 36: ... 2 Sensor out to dry and replace the Filter Disc as described previously Lamp Cleaning and Electrode Stack Replacement The Cub is a sensitive detector Internal components must be handled with clean hands and clean tools The Cub Lamp is fragile Handle with great care Never touch the window and do not drop When to Clean or Replace the Lamp The Cub PID uses an ultraviolet light source ionising VOC ga...

Page 37: ...nt so that the sensor parts will not be contaminated by dust oil or grease Remove the Sensor Cover 1 It can be unscrewed using your fingers Carefully lift pull the MiniPID 2 Sensor Body 4 from the Instrument Body 6 Using the Mini PID Electrode Stack Removal Tool provided locate its prongs in the slots in the side of the Mini PID 2 Sensor Body Using the forefinger to restrain the white Electrode St...

Page 38: ...sitioned screw the Sensor Cover 1 back onto the Instrument Body 6 Do not over tighten The instrument MUST now be re calibrated Lamp Removal and Examination The Cub is a sensitive detector Internal components must be handled with clean hands and clean tools The Cub Lamp is fragile Handle with great care Never touch the window and do not drop Following removal of the Electrode Stack as described pre...

Page 39: ...aning procedure is as follows 1 Open the vial of Aluminium Oxide polishing compound With a clean cotton bud collect a small amount of compound 2 Use this cotton bud to polish the Lamp detection window Use a circular action applying light pressure to clean the detection window Never touch the detection window with fingers 3 Continue polishing until an audible squeaking is made by the cotton bud wit...

Page 40: ... window face and the Electrode Stack Carefully align the Sensor Body over the Electrode Stack plus Lamp Push the Sensor Body down to secure the assembly two clicks should be heard Carefully align push the new MiniPID 2 Sensor Body 4 into the Instrument Body 6 Then ensuring the Filter Disc 2 and O Ring 3 are correctly positioned screw the Sensor Cover 1 back onto the Instrument Body 6 Do not over t...

Page 41: ...ation setup 2 Check calibration gas connection to the calibration dock 3 Contact distributor 6 Sensor power Contact distributor 7 Lamp strike fail 1 Replace electrode stack 2 Replace lamp 3 Contact distributor 8 i2c ADC error Contact distributor 9 ADC range error Contact distributor 11 Internal temperature of the cub is too high The Cub will stop charging until the temperature is less than 45 C Le...

Page 42: ...r measurement control and laboratory use EMC requirements Group 1 Class B equipment emissions section only BS EN 61326 1 2013 Electrical equipment for measurement control and laboratory use EMC requirements Industrial location immunity immunity section only BS EN 50270 2015 Electromagnetic compatibility Electrical apparatus for the detection and measurement of combustible gases toxic gases or oxyg...

Page 43: ...Cub Instrument User Manual V2 4 Unrivalled Gas Detection Page 43 of 46 ionscience com Signature Date 19th September 2019 Issued by Ion Science Ltd of the above address on the 19 09 2019 ...

Page 44: ...ection range above Accuracy 5 displayed reading one digit Linearity 5 displayed reading one digit Battery Lithium ion 12 hours Data log Including date time 30 000 Alarm visual Flashing Red and Amber LED Alarm audible 95 dB 300 mm Flow Rate Not applicable no pump Temperature Operating 20 to 60 C 4 to 140 F Storage 25 to 60 C 13 to 140 F Certified to 20 to 55 C 4 to 131 F Dimensions Instrument 61mm ...

Page 45: ...ed to a 12V car auxiliary cigarette lighter outlet Warranty Standard Warranty can be extended to up to 2 years on the Cub when registering your instrument via our website http ionscience com instrument registration To receive your Extended Warranty you need to register within one month of purchase Terms and Conditions apply You will then receive a confirmation email that your Extended Warranty Per...

Page 46: ...5 Web www ism d de Email info ism d de Italian Office ION Science Italia Via Emilia 51 c 40011 Anzola Emilia Bologna ITALY Tel 39 051 0561850 Fax 39 051 0561851 Web www ionscience it Email info ionscience it French Office ION Science France 41 Rue de Etoiles 83240 Cavalaire sur Mer FRANCE Tel 33 6 13 50 55 35 Email info ionscience fr Chinese Office ION Science China Ltd 1101 Bldg B Far East Intern...

Reviews: