English
Box Contents:
Smart Badge, USB
Charging Cable, Metal Plate,
Quickstart Guide.
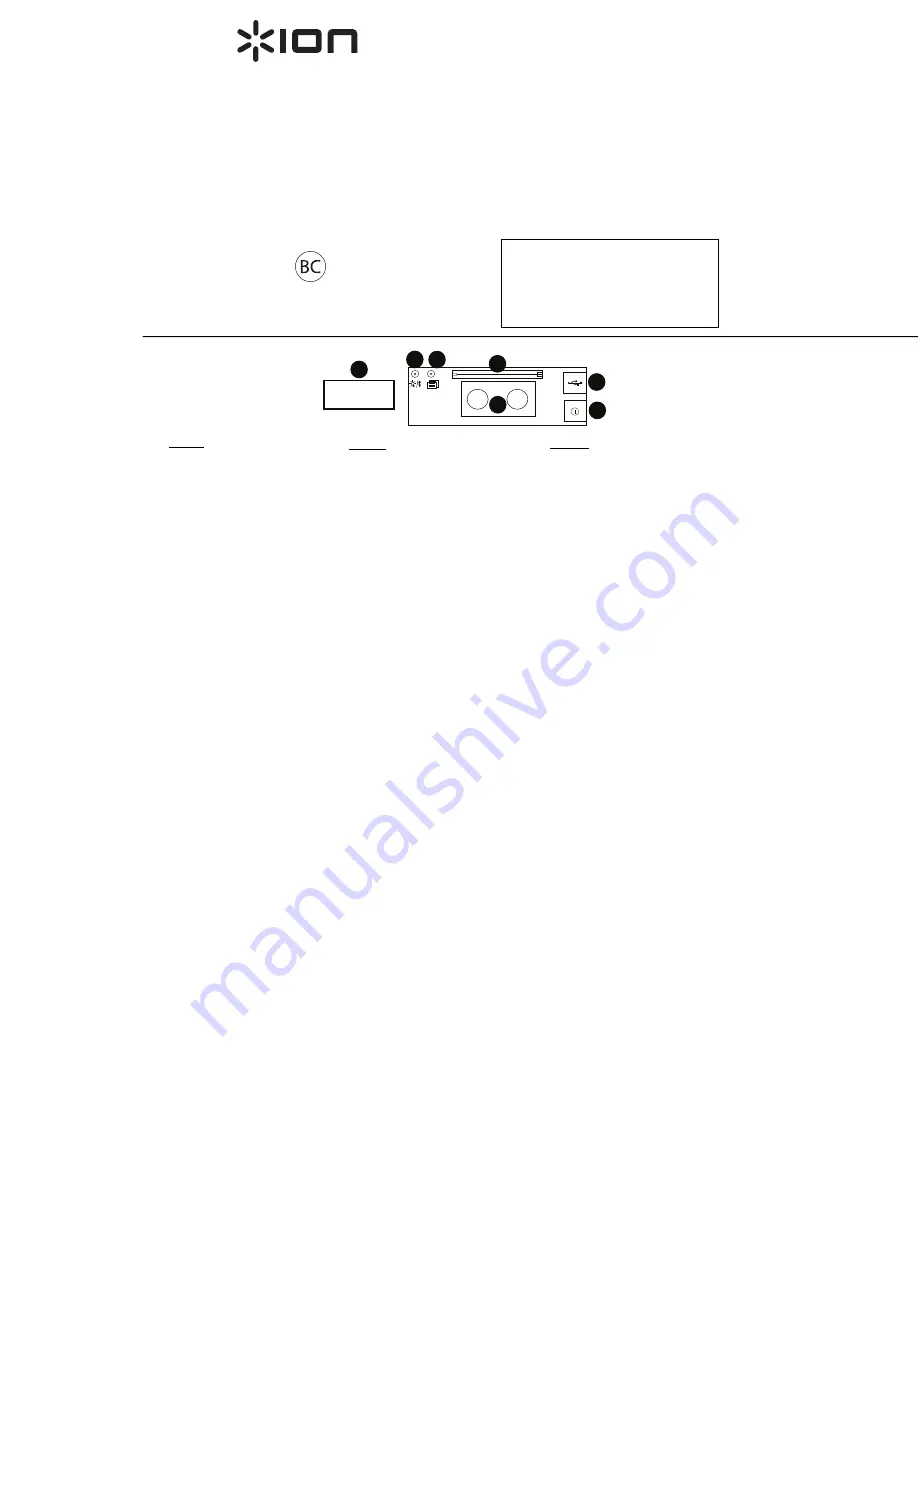
Controls:
1.
Micro USB:
Connect the micro-
USB cable here to charge Smart
Badge.
2.
Power On/Off:
Move this switch
to the up position to power on
Smart Badge. Move the switch in
the down position to power off
Smart Badge.
3.
Metal Plate:
Place the metal
plate under clothing to secure to
the magnetic panel.
4.
Magnetic Panel:
Place the panel
near the metal plate to
magnetically connect.
5.
Pin:
Use this to secure Smart
Badge to your clothing.
6.
Brightness/Bluetooth Pairing:
Press and release this button to
cycle through the 3 brightness
levels: 50%, 75%, and 100%. To
enter Bluetooth pairing mode,
press and hold this button for 2
seconds. To disconnect from a
paired Bluetooth device, press
and hold this button for 3
seconds.
7.
Message Locations:
Select from
one of 8 messages. Create and
save custom messages to these
locations using the Smart Badge
app.
Charging Smart Badge:
Use the
included micro-USB cable to
connect Smart Badge to a USB
power adapter connected to a power
outlet or your computer (powered
on).
Using Smart Badge:
1.
Download the Smart Badge app
from the App Store or Google
Play store.
2.
Power on Smart Badge.
Note:
Remove the protective film
from the display screen for clear
viewing.
3.
Press and hold the
Bluetooth
Pairing
button for 2 seconds to
enter Bluetooth pairing mode.
4.
Open the Smart Badge app on
your device (smartphone, tablet,
etc.) to pair Smart Badge with
your device and to create custom
messages.
Note:
There is no need to connect
using your device’s Bluetooth
settings menu. As long as your
device’s Bluetooth is turned On, the
Smart Badge app will handle
connecting.
Clock Mode:
Hold the
Message
Select
button for 3 seconds to show
the time. Press and release the
Message Select
button again to
toggle between 12 and 24 hour
formats. Press and hold the
Message Select
button for 3
seconds to leave Clock mode.
Español
Contenido de la caja:
Smart Badge,
cable USB de carga, placa metálica, guía
de inicio rápido.
Controles:
1.
Micro USB:
Conecte aquí el cable
micro USB para cargar el Smart
Badge.
2.
Power On/Off
(Encendido/apagado)
:
Mueva este interruptor hacia arriba
para encender el Smart Badge. Mueva
el interruptor hacia abajo para apagar
el Smart Badge.
3.
Placa metálica:
Coloque la placa
metálica bajo su ropa para sujetar el
panel magnético.
4.
Panel magnético:
Coloque el panel
cerca de la placa metálica para
conectarlo magnéticamente.
5.
Alfiler:
Utilícelo para sujetar el Smart
Badge a su ropa.
6.
Brightness/Bluetooth Pairing
(Brillo/Apareamiento de Bluetooth)
Pulse y suelte este botón para alternar
por los 3 niveles de brillo. 50, 75, y
100%. Para entrar al modo de
apareamiento Bluetooth, mantenga
pulsado este botón durante 2
segundos. Para desconectarlo de un
dispositivo Bluetooth apareado,
mantenga pulsado este botón durante
3 segundos.
7.
Ubicaciones del mensaje:
Seleccione
uno de 8 mensajes. Cree y guarde
mensajes personalizados en estas
ubicaciones mediante la aplicación de
Smart Badge.
Carga del Smart Badge:
Utilice el cable
micro USB incluido para conectar el
Smart Badge a un adaptador de
alimentación USB conectado a una toma
de corriente o a su ordenador
(encendido).
Uso del Smart Badge:
1.
Descargue la aplicación de Smart
Badge desde App Store o Google
Play.
2.
Encienda el Smart Badge.
Nota:
Quite la película protectora de la
pantalla para una mejor visualización.
3.
Mantenga pulsado el botón
Bluetooth
Pairing
durante 2 segundos para
entrar al modo de apareamiento de
Bluetooth.
4.
Abra la aplicación Smart Badge en su
dispositivo (teléfono inteligente
[smartphone], tableta, etc.) para
aparear el Smart Badge con su
dispositivo y crear mensajes
personalizados.
Nota:
No es necesario conectarse
utilizando el menú de ajustes Bluetooth
de su dispositivo. Siempre que su
dispositivo Bluetooth se encienda, la
aplicación Smart Badge se encargará de
realizar la conexión.
Modo reloj:
Mantenga pulsado
Message
Select
(Seleccionar mensaje) durante 3
segundos para mostrar la hora. Pulse y
suelte el botón
Message Select
nuevamente para alternar entre los
formatos de 12 y 24 horas. Mantenga
pulsado el botón
Message Select
durante 3 segundos para salir del modo
de reloj.
Français
Contenu de la boîte :
Smart Badge, câble
de rechargement USB, plaque métallique,
guide de démarrage.
Commandes :
1.
Micro-USB :
Branchez le câble de
rechargement USB à ce port afin de
recharger l’insigne Smart Badge.
2.
Interrupteur d’alimentation
:
Pour
mettre le Smart Badge sous tension,
relevez l’interrupteur. Pour mettre le
Smart Badge hors tension, abaissez
l’interrupteur.
3.
Plaque métallique
:
Placez la plaque
métallique sous les vêtements pour fixer
la plaque de fixation magnétique.
4.
Plaque de fixation magnétique :
Placez
la plaque de fixation magnétique près de
la plaque métallique afin qu’elles se lient
magnétiquement.
5.
Épingle :
Utilisez cette épingle pour fixer
l'insigne Smart Badge à vos vêtements.
6.
Luminosité/Jumelage Bluetooth
:
Appuyez et relâchez cette touche afin de
parcourir les 3 niveaux de luminosité :
50 %, 75 %, et 100 %. Pour jumeler un
appareil Bluetooth, maintenez cette
touche enfoncée pendant 2 secondes.
Pour déjumeler un appareil Bluetooth,
maintenir cette touche enfoncée pendant
3 secondes.
7.
Emplacements de sauvegarde des
messages :
Sélectionnez l’un des 8
messages.
Vous pouvez créer et
sauvegarder des messages personnalisés
dans ces emplacements en utilisant
l'application Smart Badge.
Rechargement du Smart Badge :
Utilisez le
câble micro-USB inclus afin de brancher le
Smart Badge à un adaptateur d’alimentation
USB branché à une prise secteur ou à un
ordinateur sous tension.
Utilisation du Smart Badge :
1.
Téléchargez l'application Smart Badge
sur l'App Store ou Google Play.
2.
Mettez le Smart Badge sous tension.
Remarque :
Retirez le film protecteur de
l'écran.
3.
Maintenez la touche de
jumelage
pendant 2 secondes pour lancer le
jumelage Bluetooth.
4.
Lancez l'application Smart Badge sur
votre appareil (smartphone, tablette, etc.)
afin de jumeler le Smart Badge avec votre
appareil et pour créer des messages
personnalisés.
Remarque :
Pour établir la connexion, vous
n’avez pas à accéder au menu de
configuration Bluetooth de votre appareil.
Tant que le mode Bluetooth de votre
appareil est activé, l’application Smart
Badge se chargera de la connexion.
Mode horloge
:
Maintenez la touche de
sélection des messages
enfoncée pendant
3 secondes afin d’afficher l’heure. Appuyez
et relâchez la touche de
sélection des
messages
afin de sélectionner l’affichage 12
ou 24 heures. Maintenez la touche de
sélection des messages
enfoncée pendant
3 secondes afin de quitter le mode horloge.
Manual Version 1.2
Smart Badge
Quickstart Guide
English
Guía de inicio rápido
Español
Guide d'utilisation rapide Français
Guida rapida
Italiano
Schnellstart-Anleitung
Deutsch
Snelstartgids
Nederlands
Stop! Don’t return this product!
If you're having problems using Smart
Badge, our support team can help.
Visit
ionaudio.com/support
to e-mail our
technical support team, or call us at 401-
658-3743 (U.S.) or 01252 896 080 (U.K).
ionaudio.com/support
For technical support.
Para soporte técnico.
Pour obtenir de l’assistance technique.
Per assistenza tecnica.
Für technischen Support.
Voor technische ondersteuning.
ionaudio.com/warranty
For complete warranty information.
Para información completa sobre la garantía.
Pour obtenir toutes les informations relatives à la garantie.
Per informazioni complete in merito alla garanzia.
Für komplette Garantieinformationen.
Voor volledige informatie over de garantie.
ON OFF
1
2
4
5
6 7
3


