background image


61 


DÉPANNAGE 


Veuillez contacter Ion Audio ou votre détaillant avant de retourner ce 

produit.  Voir les Consignes de sécurité pour plus d’information. 


AUCUN SON 

:


o


Si l’application logicielle ne reçoit aucun son, retournez au menu préférence, 
tel qu’indiqué ci-dessus, et assurez-vous que vous avez bien sélectionné 
l’option USB pour l’appareil d’enregistrement.  

o


Si vous ne parvenez pas à entendre l’audio mais que vous visionnez la forme 
d’ondes à l’écran, ouvrez le menu Préférence et assurez-vous que l’appareil 
de lecture audio par défaut est la carte son de l’ordinateur, si vous désirez 
contrôler l'audio via l'ordinateur, ou « USB audio codec », si vous désirez 
contrôler l’audio via la sortie casque d’écoute du microphone. 

o


Période d’alimentation: Fermez Audacity et débranchez le câble USB. 


Rebranchez le câble USB et relancez Audacity. 

o


Vérifiez que le volume (VOL) du microphone USB est activé et qu’il est réglé à 
des niveaux adéquats. 

o


Vérifiez le potentiomètre du microphone pour vous assurer qu’il est au 
maximum, c’est à dire, complètement à la droite, tel qu’indiqué à la figure ci-
dessous : 


MAUVAISE QUALITÉ SONORE 

:


o


Si l’enregistrement semble être déformé ou qu’il y a du gargouillement durant 
la lecture, il se peut que vous ayez à ajuster les niveaux dans Audacity.  Dans 
Audacity, déplacez le potentiomètre vers la gauche pour diminuer les 
niveaux.Vous pouvez utiliser l’effet de normalisation, tel que décrit plus haut, 
pour ramener les niveaux à la normale après l’enregistrement. 

o


Si vous avez des sons bizarres provenant de vos enregistrements, essayez de 
fermer toutes les applications et de redémarrer l’ordinateur, et en ouvrant 
uniquement Audacity durant l’enregistrement. 


Summary of Contents for U-CAST

Page 1: ...USB MIC PODCASTING KIT U CAST REFERENCE MANUAL ENGLISH 3 21 MANUAL DE REFERENCIA ESPAÑOL 22 41 GUIDE D UTILISATION FRANÇAIS 42 61 BEDIENUNGSANLEITUNG DEUTSCH 62 81 MANUALE DI RIFERIMENTO ITALIANO 82 101 ...

Page 2: ......

Page 3: ...ING WINDOWS VISTA TO WORK WITH THE USB MICROPHONE 6 CONFIGURING WINDOWS XP TO WORK WITH THE USB MICROPHONE 8 AUDACITY CONFIGURATION FOR WINDOWS 10 AUDACITY CONFIGURATION FOR MAC 10 4 AND ABOVE 12 RECORDING INTO THE COMPUTER 16 ADJUSTING YOUR AUDIO LEVEL optional 17 EXPORTING YOUR RECORDING 18 LISTENING AND EXPORTING TO WAV MP3 18 UPLOADING YOUR PODCASTS 19 TROUBLESHOOTING 21 ...

Page 4: ... software that supports USB Audio devices We have included Audacity however you may prefer to use a variety of 3rd party software packages Audacity software is distributed under the General Public License GPL More information as well as open source code can be found on the CD included or on the web at http audacity sourceforge net Audacity works on both Windows 98 and greater as well as Mac OS X 1...

Page 5: ...ort on the USB microphone to the USB port of your computer 2 Turn your computer on and allow it to boot fully if it is not on already 3 Insert the included CD 4 Open the CD icon on the desktop 5 Double click the Audacity Recording Software folder 6 Double click the Apple folder 7 Drag the Audacity folder located inside to your hard drive We recommend that you move the folder to your Applications f...

Page 6: ...the Sound control panel If you don t see a choice called Sound choose the Switch to Classic View option in the panel on the left of the window and the Sound Control Panel should become available on the right 5 Select the Recording tab at the top of the Sound Control Panel 6 Under the Recording tab choose Microphone USB Audio Codec as the default device The USB Audio Codec represents your microphon...

Page 7: ... setup and click Set Default to confirm your selection Note Do NOT choose Speakers USB Audio Codec as your playback device USB Audio Codec represents your microphone and can only be used as recording input not a playback output 10 Click Set Default to confirm your choice 11 Click Apply if possible then click OK to close the Control Panel 12 Click Apply if possible then click OK 13 Make sure that y...

Page 8: ...ed Sounds and Audio Devices choose the Switch to Classic View option in the panel on the left of the window and the Sounds and Audio Devices should become available on the right 5 Select the Voice tab at the top of the Sounds and Audio Devices control panel 6 Under Voice Playback choose your internal sound card as the default device This varies by computer but should not be set to USB Audio Codec ...

Page 9: ...soft Sound Mapper 10 Under Sound Recording select USB Audio Codec for your default device this is the USB microphone 11 Check the box titled Use only default devices 12 Click Apply if possible then click OK 13 Make sure that your computer s speakers if not built in are plugged into your computer s audio output and turned on so you can hear your recording If your computer has a headphone output you...

Page 10: ...your Playback Device to your internal sound card Since different computers have different internal sound cards your selection may be different from the image below Figure 2 The correct selection however will NOT be USB Audio Codec Microsoft Sound Mapper or Modem 5 Set your Recording Device to USB Audio Codec This represents your microphone Note The USB microphone may show up with a different name ...

Page 11: ...Under the output level meter is an icon that looks like a microphone Next to the microphone is a black arrow that points down Click this arrow and select Monitor Input If you don t see the input and output level meters open your Preferences again as described above select the Interface tab and make sure that Enable Mixer Toolbar is checked You should be all ready to record These settings will be s...

Page 12: ...ct Preferences from the Audacity menu 3 Under the Audio I O tab set your Playback Device to Built In Audio 4 Under the Audio I O tab set your Recording Device to USB Audio Codec 5 Under the Audio I O tab set your Channels to 2 Stereo 6 Check the box labeled Software Playthrough 7 Under the Quality Tab set the Default Sample Format to 16 bit ...

Page 13: ...hat looks like a microphone Next to the microphone is a black arrow that points down Click this arrow and select Monitor Input If you don t see the input and output level meters open your Preferences again as described above select the Interface tab and make sure that Enable Mixer Toolbar is checked These settings will be saved when you exit However you will need to select Monitor Input from the i...

Page 14: ...until you tell your Mac not to use the microphone as an output device Here s how to change these settings so that your internal sound card will always be used for playback whether or not your microphone is connected via USB The Audio Midi Setup Utility 1 Open your Finder 2 Open your Applications folder 3 In the Applications folder open the Utilities folder 4 In the Utilities folder open the Audio ...

Page 15: ...15 Now programs other than Audacity will only use your internal sound card for audio output ...

Page 16: ...n the screen as it is recording You will hear the audio coming from the output of your computer s soundcard No Audio Go back to the Preferences menu and make sure you have Software Playthrough selected and the speaker volume up on your computer See Troubleshooting at the end of this manual for more help 5 Press Stop when you have finished recording 6 SAVE YOUR FILE NOW by clicking on File f Save P...

Page 17: ... can also use CTRL A on a PC or APPLE A on a Macintosh to quickly select all 2 Select the Effect menu and choose the desired effect a There are various types of effects which are described further in the software s help section as well as on the web b Normalize should be used to have the correct volume on the recording ...

Page 18: ...for the file LISTENING AND EXPORTING TO WAV MP3 To listen to your digitized audio you will need a third party application that can play WAV files There are a variety of applications built into many operating systems as well as free downloads on the internet You can also use any standard audio CD burning software to burn your WAV files to an audio CD There are many free software applications that c...

Page 19: ...ING 1 Once you have activated your account by clicking on the link provided in the email that you received go to www cyberears com and log in using your Login ID and password that you created 2 After you have successfully logged into Cyberears you will be taken to the My Audio section This is where you will upload and manage your podcasts In addition other functions are provided to assist you with...

Page 20: ...com so that any person downloading the audio file will get the information tagged on it that is consistent with the Podcast information you have submitted 11 And you are all done You have successfully published your podcast Now listeners around the world can check out your podcast and subscribe to it if they wish Tip Make sure that your podcast was properly uploaded and registered by using an aggr...

Page 21: ...on the microphone itself Power Cycle Close Audacity and unplug the USB Cable Then plug in the USB Cable and reopen Audacity Check that the VOL control on the USB microphone is turned up to a suitable level Check the microphone slider in Audacity to make sure that it is at full volume all the way to the right as shown in the figure below POOR SOUND Quality If a recording sounds distorted or garbled...

Page 22: ... WINDOWS VISTA PARA FUNCIONAR CON EL MICRÓFONO USB 25 CÓMO CONFIGURAR WINDOWS XP PARA FUNCIONAR CON EL MICRÓFONO USB 27 CONFIGURACIÓN DE AUDACITY EN PC 29 CONFIGURATIÓN DE AUDACITY PARA MAC OS 10 4 Y SUPERIORES 31 GRABACIÓN EN LA COMPUTADORA 35 AJUSTE DEL NIVEL DE AUDIO OPCIONAL 36 EXPORTACIÓN 37 ESCUCHA Y EXPORTACIÓN A WAV MP3 37 CARGA DEL PODCAST 38 SOLUCIÓN DE PROBLEMAS 41 ...

Page 23: ... que soporte dispositivos de audio USB Hemos incluido a Audacity pero no obstante ello usted puede preferir usar una variedad de paquetes de software de terceros Audacity es distribuido bajo General Public License Licencia pública general GPL Puede encontrar más información así como el código fuente abierto en el CD incluido o en la web en http audacity sourceforge net Audacity funciona tanto en W...

Page 24: ...dora 2 Encienda la computadora y espere que arranque completamente si no estaba encendida de antemano 3 Inserte el CD incluido 4 Abra el icono del CD del escritorio 5 Haga doble clic en la carpeta Audacity Recording Software Software de grabación Audacity 6 Haga doble clic en la carpeta Apple 7 Arrastre la carpeta Audacity que se encuentra dentro de ella a su disco duro Recomendamos que transfiera...

Page 25: ...d Sonido Si no ve una opción llamada Sound seleccione la opción Switch to Classic View Conmutar a vista clásica en el panel de la izquierda de la ventana y el panel de control Sound debe aparecer disponible a la derecha 5 Seleccione la pestaña Recording Grabación de la parte superior de Sound Control Panel 6 Bajo la ficha Recording seleccione Microphone USB Audio Codec Micrófono Códec de audio USB...

Page 26: ...ación de audio que desea y en Set Default para confirmar su selección Nota NO elija Speakers USB Audio Codec Altavoces Dispositivo de audio códec como dispositivo de reproducción USB Audio Codec representa a su micrófono y sólo se puede usar como entrada de grabación no como salida de reproducción 10 Haga clic en Set Default para confirmar su opción 11 Haga clic en Apply Aplicar si es posible y lu...

Page 27: ...spositivos de sonido y audio Si no ve una opción llamada Sounds and Audio Devices seleccione la opción Switch to Classic View Conmutar a vista clásica en el panel de la izquierda de la ventana y Sounds and Audio Devices debe aparecer disponible a la derecha 5 Seleccione la pestaña Voice Voz en la parte superior del panel de control de dispositivos de sonido y audio 6 Bajo Voice Playback Reproducci...

Page 28: ...figurar a USB Audio Codec ni Modem ni Microsoft Sound Mapper 10 Bajo Sound Recording seleccione USB Audio Codec Códec de audio USB como dispositivo predeterminado éste es su micrófono USB 11 Marque la casilla llamada Use only default devices Usar sólo los dispositivos predeterminados 12 Haga clic en Apply si es posible y luego en OK 13 Asegúrese de que los altavoces de la computadora si no están i...

Page 29: ...Dispositivo de reproducción como su tarjeta de sonido interna Puesto que las diferentes computadoras tienen distintas tarjetas de sonido internas su selección puede ser distinta de la imagen de abajo Figura 2 No obstante la selección correcta NO es USB Audio Codec ni Microsoft Sound Mapper ni Modem 5 Configure Recording Device como USB Audio Codec Códec de audio SUB Esto representa a su micrófono ...

Page 30: ...o del medidor de nivel de salida hay un icono que parece un micrófono Junto al micrófono hay una flecha negra que apunta hacia abajo Haga clic en esta flecha y seleccione Monitor Input Entrada al monitor Si no ve los medidores de nivel de entrada y salida abra sus preferencias nuevamente como se explicó arriba seleccione la pestaña Interface Interfaz y asegúrese de que esté marcado Enable Mixer To...

Page 31: ...ure Playback Device Dispositivo de reproducción como Built In Audio Audio incorporado 4 Bajo la ficha Audio I O configure Recording Device Dispositivo de grabación como USB Audio Codec Códec de audio USB 5 Bajo la ficha Audio I O configure Channels Canales como 2 estéreo 6 Marque la casilla llamada Software Playthrough Reproducción pasante por software 7 En la ficha Quality Calidad configure Defau...

Page 32: ...ono Junto al micrófono hay una flecha negra que apunta hacia abajo Haga clic en esta flecha y seleccione Monitor Input Entrada al monitor Si no ve los medidores de nivel de entrada y salida abra sus preferencias nuevamente como se explicó arriba seleccione la pestaña Interface Interfaz y asegúrese de que esté marcado Enable Mixer Toolbar Activar barra de herramientas del mezclador Estos parámetros...

Page 33: ...ompleto Puesto que su micrófono no tiene altavoces no se oye el audio de sus demás programas hasta que le indique a la Mac no usar el micrófono como dispositivo de salida He aquí como cambiar estos parámetros de modo que se use siempre para reproducción la tarjeta de sonido interna ya sea que su micrófono esté conectado o no por USB Utilidad Audio Midi Setup 1 Abra el Finder Buscador 2 Abra la car...

Page 34: ... como USB Audio Codec Default Output Salida predeterminada como Built in Audio Audio incorporado o Built in Output Salida incorporada System Output Salida del sistema como Built in Audio o Built in Output Ahora los programas que no sean Audacity sólo usan su tarjeta de sonido interna para la salida de audio ...

Page 35: ... de la salida de la tarjeta de sonido de la computadora No hay audio vuelva al menú de preferencias y asegúrese de tener seleccionado Software Playthrough Reproducción simultánea por software y que el volumen del altavoz de la computadora esté alto Si necesita más ayuda vea la solución de problemas al final de este manual 5 Pulse el botón de Parar cuando termine de grabar 6 GUARDE SU ARCHIVO AHORA...

Page 36: ...También puede usar Ctrl A en una PC o APPLE A en una Macintosh para seleccionar todo rápidamente 2 Seleccione el menú Effect Efectos y elija el efecto deseado a Hay diversos tipos de efectos que se describen con más detalle en la sección de ayuda del software y en la web b Debe usarse Normalize Normalizar para tener volumen correcto en la grabación ...

Page 37: ... Y EXPORTACIÓN A WAV MP3 Para escuchar su audio digitalizado necesita una aplicación de terceros que puede reproducir archivos WAV Hay una variedad de aplicaciones embutidas en muchos sistemas operativos como también descargas gratuitas de Internet Puede usar también cualquier software de grabación de CD de audio estándar para grabar sus archivos WAV en un CD Hay numerosas aplicaciones gratuitas d...

Page 38: ...nta Finalmente haga clic en Save Next Guardar y Siguiente 4 Se enviará un mensaje de correo electrónico desde service cyberears com a la dirección que usted indicó con la información de registro Deberá abrir su correo electrónico y desbloquear la cuenta Cyber Ears que acaba de crear Simplemente haga clic en el vínculo que se incluye en el mensaje 5 De esta forma está listo para cargar sus podcasts...

Page 39: ... algún gráfico relativo al podcast Esta imagen se incluirá en los registros de búsqueda correspondientes a su podcast Ingrese esta información y luego haga clic en Save Next Guardar y Siguiente 7 En la página siguiente se le dará información que le permitirá promover directamente su podcast Además puede elegir que Cyberears com registre su podcast en numerosos registros de podcasts Elija los regis...

Page 40: ...rde no obstante que algunos agregadores pueden no verificar ciertos registros Por eso es una buena idea familiarizarse con los diferentes registros y agregadores de podcast de Internet a fin de llegar a la mayor audiencia posible Recuerde también que los registros demoran cierto tiempo para actualizar sus listas de nuevos podcasts No es extraño que registros tales como iTunes demoren semanas en ag...

Page 41: ...o o Ciclo de encendido Cierre Audacity y desenchufe el cable USB Luego enchufe el cable USB y reabra Audacity o Verifique que el control VOL del micrófono USB esté ajustado a un nivel adecuado o Verifique el cursor del micrófono en Audacity para asegurarse de que esté a máximo volumen totalmente hacia la derecha como se muestra en la figura de abajo MALA CALIDAD DE SONIDO o Si una grabación suena ...

Page 42: ... DU MICROPHONE USB 45 CONFIGURATION DE WINDOWS XP POUR L UTILISATION DU MICROPHONE USB 47 CONFIGURATION DU LOGICIEL AUDACITY POUR WINDOWS 49 CONFIGURATION DU LOGICIEL AUDACITY POUR MAC OS 10 4 ET VERSIONS SUPÉRIEURES 51 ENREGISTREMENT SUR L ORDINATEUR 55 RÉGLAGE DU NIVEAU DE L AUDIO FACULTATIF 56 EXPORTATION 57 FAIRE L ÉCOUTE ET L EXPORTATION DES FICHIERS WAV ET MP3 57 TÉLÉCHARGEMENT DE VOTRE BALA...

Page 43: ... prend en charge les appareils audio USB Le logiciel Audacity est inclus cependant il est possible d utiliser un logiciel tiers Audacity est distribué sous licence GPL General Public License Vous pouvez trouver plus d information en plus du code source sur le CD inclus ou sur le Web au http audacity sourceforge net Audacity fonctionne sous les systèmes d exploitation Windows 98 et ultérieure et Ma...

Page 44: ...ttez l ordinateur sous tension et attendez que le système d exploitation soit complètement chargé 3 Insérez le CD fourni 4 Cliquez sur l icône CD sur le bureau 5 Double cliquez sur le dossier Audacity Recording Software 6 Double cliquez sur le dossier Apple 7 Faites glisser le dossier Audacity situé à l intérieur à votre disque dur Nous vous recommandons de déplacer le dossier dans le dossier Appl...

Page 45: ...liquez sur Paramètres audio Si vous ne pouvez voir la rubrique Paramètres audio sélectionnez l option mode Classique sur le panneau à gauche de l écran et la rubrique Paramètres audio devrait apparaître à droite 5 Sélectionnez l onglet Enregistrement dans le haut du panneau des Paramètres audio 6 Sous l onglet Enregistrement sélectionnez Microphone USB Audio Codec comme l appareil par défaut L app...

Page 46: ...isir Haut parleurs USB Audio Codec comme appareil de lecture L appareil USB Audio Codec représente le microphone et peut être utilisé seulement comme source d entrée d enregistrement non pas pour la lecture 10 Cliquez sur le bouton Régler par défaut afin de confirmer votre choix 11 Cliquez sur Appliquer si possible puis sur OK pour fermer le Panneau de configuration 12 Cliquez sur Appliquer si pos...

Page 47: ...rique Sons et périphériques audio sélectionnez l option mode Classique sur le panneau à gauche de l écran et la rubrique Sons et périphériques audio devrait apparaître à droite 5 Sélectionnez l onglet Voix dans la partie supérieure du panneau Son et périphériques audio 6 Sous Lecture de voix sélectionnez la carte de son intégrée par défaut Cette option varie en fonction de l ordinateur mais ne doi...

Page 48: ...nregistrement audio sélectionnez USB Audio Codec par défaut ceci représente le microphone USB 11 Cochez l option Utiliser uniquement les appareils par défaut 12 Cliquez sur Appliquer si possible puis sur OK 13 Assurez vous que les haut parleurs externes de l ordinateur soient branchés à la sortie audio de l ordinateur à l aide du câble USB fourni et qu ils soient branchés et sous tension Si votre ...

Page 49: ...tre carte de son intégrée comme Playback Device Comme différents ordinateurs peuvent avoir différentes cartes de son votre sélection peut être différente de celle de l image ci dessous Figure 2 Cependant la sélection ne doit pas être USB Audio Codec Microsoft Sound Mapper ou Modem 5 Réglez l option Recording Device à USB Audio Codec Ceci représente votre microphone Note Il se peut que le microphon...

Page 50: ...semble à un microphone À côté du microphone il y a une flèche noire qui pointe vers le bas Cliquez sur la flèche et sélectionnez Monitor Input Si vous ne voyez pas les vumètres des niveaux d entrée et de sortie ouvrez la fenêtre des préférences à nouveau comme il est indiqué ci dessus sélectionnez l onglet Interface et assurez vous que l option Enable Mixer Toolbar est cochée Vous devriez être prê...

Page 51: ...eure de l écran 2 Sélectionnez Preferences à parti du menu Audacity 3 Sous l onglet Audio I O réglez le Playback Device à Built In Audio 4 Sous l onglet Audio I O réglez l option Recording Device à USB Audio Codec 5 Sous l onglet Audio I O réglez Channels à 2 Stereo 6 Cochez l option Software Playthrough 7 Sous l onglet Quality réglez Default Sample Format à 16 bits ...

Page 52: ...ophone il y a une flèche noire qui pointe vers le bas Cliquez sur la flèche et sélectionnez Monitor Input Si vous ne voyez pas les vumètres des niveaux d entrée et de sortie ouvrez la fenêtre des préférences à nouveau comme il est indiqué ci dessus sélectionnez l onglet Interface et assurez vous que l option Enable Mixer Toolbar est cochée Ces réglages seront sauvegardés lorsque vous quitterez l a...

Page 53: ...oté de haut parleurs l audio ne pourra être entendue lorsque vous utilisez d autres programmes jusqu à ce que vous indiquiez à l ordinateur de ne pas utiliser le microphone comme appareils de sortie audio Voici comment faire pour modifier les réglages afin que la carte de son soit toujours utilisée pour la lecture audio que le microphone soit branché ou non via le port USB Utilitaire des configura...

Page 54: ...ues audio réglez Réglez Entrée par défaut à USB Audio Codec Réglez Sortie par défaut à Audio intégré ou Sortie intégrée Réglez Sortie système à Audio intégré ou Sortie intégrée Maintenant les autres programmes pourront utiliser la carte de son pour leur sortie audio ...

Page 55: ... de son de votre ordinateur Aucun signal audio Si l application logicielle ne reçoit aucun son retournez au menu préférence et assurez vous que vous avez bien sélectionné l option Software Playthrough et que le volume des haut parleurs de votre ordinateur est au maximum Vous trouverez plus d information dans la section dépannage à la fin de ce guide 5 Appuyer sur la touche d arrêt lorsque vous ave...

Page 56: ...iliser Ctrl A sur un PC ou APPLE A sur un Macintoch pour sélectionner tout 2 À partir du menu Effect sélectionnez les effets désirés a Il y a plusieurs types d effet sur lesquels vous trouverez plus d information dans la section d aide du guide d utilisation du logiciel ou encore sur le Web b L effet Normalize devrait être utilisé pour corriger le volume de l enregistrement ...

Page 57: ...couter vos fichiers numérisés vous aurez besoin d un logiciel tiers qui peut faire la lecture de fichiers WAV Il existe plusieurs applications qui sont intégrées aux différents systèmes d exploitation en plus de ceux qui sont offerts gratuitement sur Internet Vous pouvez également utiliser un logiciel de gravure standard pour graver vos fichiers WAV sur un CD audio Il y a beaucoup de logiciels gra...

Page 58: ...s recevrez un courriel de service cyberears com à l adresse que vous avez fournie lors de l inscription Vous devrez ouvrir le courriel et activer votre compte Cyber Ears Pour ce faire cliquez sur le lien qui se trouve dans le courriel 5 Vous pouvez maintenant télécharger vos balados Conseil Une fois que vous aurez ouvert une session vous aurez accès à différents tutoriels sur la baladodiffusion po...

Page 59: ... sur Save Next 7 Sur la page suivante de l information vous sera fournie pour que vous puissiez faire directement la promotion de votre balado Vous pourrez également opter pour que Cyberears com inscrive votre balado sur plusieurs répertoires Sélectionnez les répertoires dans les quels vous désirez inscire automatiquement votre balado une fois la sélection terminée cliquez sur Save Next Remarque L...

Page 60: ...fier tous les répertoires C est pour cette raison qu il est préférable de vous familiariser avec les différents répertoires et agrégateurs de baladodiffusion sur le Web afin que vos balados soient disponibles à un grand nombre d auditeurs Rappelez vous que cela peut prendre quelque temps avant que les répertoires fassent la mise à jour de leur liste de balados Il n est pas rare que les répertoires...

Page 61: ...tation Fermez Audacity et débranchez le câble USB Rebranchez le câble USB et relancez Audacity o Vérifiez que le volume VOL du microphone USB est activé et qu il est réglé à des niveaux adéquats o Vérifiez le potentiomètre du microphone pour vous assurer qu il est au maximum c est à dire complètement à la droite tel qu indiqué à la figure ci dessous MAUVAISE QUALITÉ SONORE o Si l enregistrement se...

Page 62: ... FÜR BETRIEB MIT DEM USB MIKROFON 65 KONFIGURATION VON WINDOWS XP ZUM BETRIEB MIT DEM USB MIKROFON 67 AUDACITY SOFTWARE KONFIGURATION FÜR PC 69 AUDACITY FÜR MAC OS 10 4 UNDER NEUER KONFIGURATION 71 AUFNAHME AUF DEM COMPUTER 75 EINSTELLEN DES AUDIOPEGELS OPTIONAL 76 EXPORTIEREN SIE IHRE AUFNAHME 77 ZÜHOREN UND AUSFÜHRENDEN ZU WAV MP3 77 HOCHLADEN IHRES PODCASTS 78 FEHLERHILFE 81 ...

Page 63: ...t jedoch können auch andere Programme von Drittanbietern verwenden Audacity wird unter der General Public License GPL Zusätzliche Informationen sowie den Open Source Code finden Sie auf der beiliegenden CD oder im Internet unter http audacity sourceforge net Audacity kann sowohl unter Windows 98 und neuer als auch unter Mac OS X und 9 2 eingesetzt werden Auf der Audacity Website ist Software für L...

Page 64: ... USB Port des USB Mikrofons mit dem USB Port Ihres Computers 2 Schalten Sie Ihren Computer ein und fahren Sie ihn vollständig hoch 3 Legen Sie die beiliegende CD ein 4 Öffnen Sie die CD durch einen Doppelklick auf das CD Symbol auf dem Desktop 5 Klicken Sie den Audacity Recording Software Ordner doppelt an 6 Öffnen Sie den Apple Ordner 7 Ziehen Sie den Audacity Ordner auf Ihre festplatte Wir empfe...

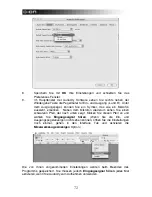
Page 65: ...cheinenden Fenster die Sound Einstellungen Wenn Sie Sound nicht finden aktivieren Sie bitte im linken oberen Bereich des Fensters Bereich die klassische Ansicht Nun sollte Sounds erscheinen 5 Wählen Sie den Aufnahme Tab im oberen Sound Einstellungsfenster aus 6 Wählen Sie im Aufnahme Tab das Mikrofon USB Audio Codec als Standardgerät aus Der USB Audio Codec steht für den Mikrofon 7 Klicken Sie die...

Page 66: ...Ihre Auswahl mit der Als Standard speichern Taste Hinweis Verwenden Sie NICHT Lautsprecher USB Audio Codec als Wiedergabegerät Der USB Audio Codec meint Ihren Mikrofon der zwar als Aufnahme jedoch nicht als Wiedergabegerät funktioniert 10 Klicken Sie auf Als Standard speichern um Ihre Auswahl zu bestätigen 11 Klicken Sie auf Übernehmen falls möglich und danach auf OK um die Systemsteuerung zu schl...

Page 67: ...ogeräte Sollten Sie diese Auswahlmöglichkeit nicht sehen wechseln Sie im linken oberen Menü des Fensters zur klassischen Ansicht Dann wird Ihnen Sounds und Audiogeräte angezeigt 5 Wählen Sie den Stimme Tab im oberen Bereich des Sounds und Audiogeräte Fensters aus 6 Wählen Sie unter Stimmenwiedergabe Ihre interne Soundkarte als Standardgerät aus Je nach Computer variiert die Anzeige Sie sollten jed...

Page 68: ...Codec Modem oder Microsoft Sound Mapper verwenden 10 Unter Soundaufnahme wählen Sie den USB Audio Codec als Standardgerät aus das ist Ihr USB Mikrofon 11 Klicken Sie die Option Nur Standardgerät verwenden an 12 Klicken Sie auf Übernehmen falls möglich und danach auf OK 13 Überprüfen Sie dass die Lautsprecher Ihres Computers wenn nicht eingebaut mit dem Audioausgang Ihres Computers verbunden und ei...

Page 69: ...ieren Sie als Wiedergabegerät die interne Soundkarte Ihres Computers Da in verschiedenen Computern jeweils verschiedene Soundkarten installiert sind kann Ihre Auswahl von der abgebildeten Einstellung Abbildung 2 abweichen Wählen Sie auf KEINEN Fall USB Audio Codec Microsoft Sound Mapper oder Modem aus 5 Definieren Sie als Aufnahmegerät den USB Audio Codec Ihren Mikrofon Hinweis Der USB könnte je n...

Page 70: ...l das wie ein Mikrofon aussieht erkennen Neben dem Mikrofon wiederum sehen Sie einen schwarzen Pfeil der nach unten zeigt Klicken Sie diesen Pfeil an und wählen Sie Eingangssignal hören Wenn Sie die Ein und Ausgangspegelanzeigen nicht sehen können öffnen Sie die Einstellungen noch einmal gehen in den Interface Tab und aktivieren die Mixerwerkzeuge Anzeigen Option Nun sind Sie bereit für die erste ...

Page 71: ...ie im Audacity Menü Preferences aus 3 Stellen Sie im Audio E A Tab das Wiedergabegerät auf Built In Audio ein 4 Als Aufnahmegerät wählen Sie im Audio E A Tab den USB Audio Codec aus 5 Geben Sie an dass Sie 2 Kanäle Stereo aufnehmen möchten 6 Markieren Sie die Software Playthrough Option 7 Stellen Sie im Qualität Tab die Standard Samplefrequenz 16 bit ...

Page 72: ...em Mikrofon wiederum sehen Sie einen schwarzen Pfeil der nach unten zeigt Klicken Sie diesen Pfeil an und wählen Sie Eingangssignal hören Wenn Sie die Ein und Ausgangspegelanzeigen nicht sehen können öffnen Sie die Einstellungen noch einmal gehen in den Interface Tab und aktivieren die Mixerwerkzeuge Anzeigen Option Die von Ihnen vorgenommenen Einstellungen werden beim Beenden des Programms gespei...

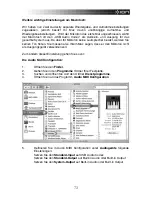
Page 73: ...ie müssen also Ihrem Mac sagen dass er den Mikrofon nicht als Ausgangsgerät verwenden soll Zum ändern dieser Einstellung gehen Sie so vor Die Audio Midi Konfiguration 1 Öffnen Sie den Finder 2 Gehen Sie in den Programme Ordner Ihrer Festplatte 3 Suchen und öffnen Sie dort den Ordner Dienstprogramme 4 Öffnen Sie nun das Programm Audio MIDI Konfiguration 5 Definieren Sie in Audio MIDI Konfiguration ...

Page 74: ...74 Nun verwenden andere Programme die interne Soundkarte zur Wiedergabe von Audiosignalen ...

Page 75: ...signal sollten Sie am Ausgang des Soundkarte Ihres Computers hören Kein Audiosignal gehen Sie zurück in das Preference Menü und achten Sie darauf dass Software Playthrough aktiviert wurde und die Lautsprecher Ihrer Computerlautsprecher aufgedreht sind Beachten Sie dazu den Abschnitt über die Fehlerhilfe am Ende dieser Anleitung 5 Drücken Sie Stop wenn Sie die Aufnahme beenden möchten 6 SPEICHERN S...

Page 76: ...auch die Tastaturkürzel Strg A PC oder APFEL A Mac verwenden 2 Gehen Sie in das Effekt Menü und wählen Sie den gewünschten Effekt a Es gibt verschiedene Effektarten die im Softwareabschnitt oder im Internet erklärt werden b Der Effekt Normalisieren sollte für die richtige Lautstärkeeinstellung der Aufnahme verwendet werden ...

Page 77: ...ie WAV Dateien abspielen kann Es gibt eine Vielzahl von kostenlosen Programmen im Internet die beim Organisieren und Hören von Audiodateien helfen Sie können auch ein normales CD Brennprogramm verwenden um Ihre WAV Dateien auf eine Audio CD zu brennen Viele kostenlose Software Anwendungen die im Internet heruntergeladen werden können spielen brennen und konvertieren WAV Dateien in das MP3 Format E...

Page 78: ... Klicken Sie dann auch Save Next 4 Nun sendet service cyberears com eine Email an die von Ihnen in der Anmeldung spezifizierte Email Adresse Darin finden Sie einen Link zum Freischalten Ihres CyberEars Kontos Klicken Sie dazu einfach auf den Link 5 Nun können Sie Ihre Podcasts hochladen Tipp Wenn Sie sich einmal angemeldet haben können Sie weitere Tutorials zum Podcasting in englischer Sprache les...

Page 79: ... Sie auf Save Next 7 Auf der nächsten Seite können Sie Informationen eingeben die ein direktes Bewerben Ihres Podcasts erleichtert Zudem können Sie definieren ob Ihr Podcast bei Cyberears com registriert wird Wählen Sie die möglichen Registrierungsoptionen aus und klicken Sie dann auf Save Next Hinweis Registrierungen sind Datenbanken die Informationen darüber enthalten wo Ihr Podcast im Web zu fi...

Page 80: ... die größtmögliche Hörerschaft zu erreichen Bedenken Sie auch dass die Datenbanken manchmal etwas Zeit benötigen um ihre Listen mit den neuen Podcasts zu aktualisieren Es ist nichts ungewöhnliches dass Programme wie iTunes manchmal Wochen brauchen um Ihren Podcast in ihre Datenbank aufzunehmen Normalerweise werden Sie per Email aufgefordert Ihren Podcast noch einmal zu überprüfen bevor er bereitge...

Page 81: ...t wurde o Neustart Schließen Sie Audacity und entfernen Sie das USB Kabel Schließen Sie dann das USB Kabel wieder an und öffnen Sie Audacity neu o Überprüfen Sie dass der VOL Regler des USB Mikrofons auf eine ausreichende Lautstärke eingestellt ist o Überprüfen Sie dass der Mikrofon Schieberegler in Audacity auf der Maximallautstärke steht Er sollte auf der äußerst rechten Position sein wie in die...

Page 82: ...INDOWS VISTA PER L USO CON IL MICROFONO USB 85 CONFIGURAZIONE DI WINDOWS XP PER L USO CON IL MICROFONO USB 87 CONFIGURAZIONE SOFTWARE AUDACITY PER PC 89 CONFIGURAZIONE DI AUDACITY IN MAC OS 10 4 E SUCCESSIVI 91 REGISTRAZIONE SU COMPUTER 95 REGOLAZIONE DEL LIVELLO AUDIO OPZIONALE 96 ESPORTARE 97 ASCOLTARE ED ESPORTARE IN WAV MP3 97 CARICARE IL PODCAST 98 RISOLUZIONE DI PROBLEMI 101 ...

Page 83: ...e supporti dispositivi USB Audio Noi abbiamo incluso Audacity al pacchetto ma potreste desiderare di servirvi di una serie di pacchetti software di terzi Audacity è distribuito dietro GPL General Public License ossia licenza pubblica generica Ulteriori informazioni oltre al codice open source si trovano nel CD incluso o in rete all indirizzo http audacity sourceforge net Audacity funziona sia con ...

Page 84: ...rta USB del computer 2 Accendere il computer e lasciare che si avvii completamente nel caso in cui non fosse ancora acceso 3 Inserire il CD allegato 4 Aprire l icona CD sul desktop 5 Fare doppio clic sulla cartella Audacity Recording Software 6 Fare doppio clic sulla cartella Apple 7 Trascinare la cartella Audacity che si trova all interno sul disco rigido Si raccomanda di trasferire la cartella n...

Page 85: ...chiamata Suoni scegliere Passa alla visualizzazione classica nel pannello a sinistra della finestra e il pannello di controllo Suoni dovrebbe apparire sulla destra 5 Scegliere la linguetta Registrazione in cima al pannello di controllo Suoni 6 Sotto alla linguetta Registrazione scegliere Microfono Codec Audio USB come dispositivo predefinito Il Codec Audio USB rappresenta il microfono 7 Cliccare s...

Page 86: ...ere Altoparlanti Codec Audio USB come periferica di riproduzione Codec Audio USB rappresenta il microfono e può essere utilizzato unicamente come periferica di registrazione non come uscita di riproduzione 10 Cliccare su Set Default Imposta predefinito per confermare la scelta 11 Se possibile cliccare su Applica quindi su OK per chiudere il Pannello di Controllo 12 Se possibile cliccare su Applica...

Page 87: ...che audio scegliere Passa alla visualizzazione classica nel pannello a sinistra della finestra e il pannello di controllo Suoni e periferiche audio dovrebbe apparire sulla destra 5 Scegliere la linguetta Voce in cima al pannello di controllo Suoni e periferiche audio 6 Sotto Riproduzione voce scegliere la propria scheda audio interna come dispositivo predefinito Questo varia da computer a computer...

Page 88: ...pper 10 Sotto Registrazione suoni selezionare Codec audio USB per il dispositivo predefinito questo è il microfono USB 11 Selezionare la casella Utilizza solo periferiche predefinite 12 Se possibile cliccare su Applica quindi su OK 13 Assicurarsi che gli altoparlanti del computer se non incorporati siano collegati all uscita audio del computer e accesi in modo da poter ascoltare la registrazione S...

Page 89: ...s 4 Impostare il Playback Device Dispositivo di riproduzione sulla scheda audio interna Poiché computer diversi presentano schede audio diverse la scelta può differire dall immagine seguente Figura 2 La scelta corretta tuttavia NON è Codec Audio USB Microsoft Sound Mapper o Modem 5 Impostare il Dispositivo di registrazione su Codec Audio USB Questo rappresenta il vostro microfono Nota bene il micr...

Page 90: ... presente un icona a forma di microfono Di fianco al microfono è presente una freccia nera che punta verso il basso Cliccare su questa freccia e selezionare Monitor Input Ingresso monitor Se non vengono visualizzati i misuratori di livello d ingresso e di uscita aprire nuovamente Preferences come indicato in precedenza selezionare la linguetta Interface Interfaccia e assicurarsi che sia selezionat...

Page 91: ... Audacity 3 Sotto la linguetta Audio I O impostare la Periferica di riproduzione su Built In Audio 4 Sotto la linguetta Audio I O impostare la Periferica di registrazione su Codec Audio USB 5 Sotto la linguetta Audio I O impostare i Canali Channels su 2 Stereo 6 Selezionare la casella Software Playthrough 7 Sotto Quality Qualità impostare il Default Sample Format Formato campione predefinito su 16...

Page 92: ...ofono è presente una freccia nera che punta verso il basso Cliccare su questa freccia e selezionare Monitor Input Ingresso monitor Se non vengono visualizzati i misuratori di livello d ingresso e di uscita aprire nuovamente Preferences come indicato in precedenza selezionare la linguetta Interface Interfaccia e assicurarsi che sia selezionato Enable Mixer Toolbar Queste impostazioni verranno salva...

Page 93: ... intero sistema Poiché il microfono non è dotato di altoparlanti l audio non verrà sentito dagli altri programmi a meno che non si dica al Mac di non utilizzare il microfono come dispositivo di uscita Ecco come modificare queste impostazioni in modo che la scheda audio interna venga sempre utilizzata per la riproduzione che il microfono sia collegato o meno tramite USB Utility Audio Midi Setup 1 A...

Page 94: ...put Ingresso predefinito su Codec Audio USB Default Output Uscita predefinita su Built in Audio o Built in Output System Output Uscita di sistema su Built in Audio o Built in Output Ora programmi diversi da Audacity si serviranno unicamente della scheda audio interna come uscita audio ...

Page 95: ... audio provenire dall uscita della scheda audio del computer Manca l Audio Tornare al menu preference e assicurarsi che Software Playthrough sia stato selezionato e che il volume degli altoparlanti del computer sia acceso Vedi la risoluzione di problemi alla fine del manuale per ulteriore aiuto 5 Una volta terminata la registrazione premere Stop 6 PROCEDERE ORA AL SALVATAGGIO DEL FILE cliccando su...

Page 96: ...anche utilizzare Ctrl A su un PC o APPLE A su un Macintosh per selezionare tutto rapidamente 2 Selezionare il menu Effect e scegliere l effetto desiderato a Vi sono vari tipi di effetti descritti ulteriormente nella sezione di aiuto del software oltre che in rete b Normalize normalizzare va usato per ottenere il giusto volume della registrazione ...

Page 97: ...rtella di destinazione per il file ASCOLTARE ED ESPORTARE IN WAV MP3 Per ascoltare il proprio audio digitalizzato sarà necessario un dispositivo per la riproduzione di file WAV Vi sono molte applicazioni incluse nei sistemi operativi oltre che in rete da scaricare gratuitamente Si può anche utilizzare un normale software per la masterizzazione di CD audio per masterizzare i file WAV su CD Vi sono ...

Page 98: ...rmazioni di registrazione Dovrete aprire l e mail e sbloccare il conto Cyber Ears appena creato Basta cliccare sul link contenuto nell e mail 5 Ora siete pronti a caricare i vostri podcast Suggerimento una volta collegati navigare nei tutorial disponibili in materia di Podcasting Questi tutorial spiegano come servirsi appieno del sito e come trarre il massimo dalla propria esperienza di podcasting...

Page 99: ... fare in modo che Cyberears com registri il Podcast con numerosi registri di Podcast Scegliere i registri a cui si desidera che il Podcast venga automaticamente sottoposto e una volta fatto cliccare su Save Next Nota i registri sono database che contengono informazioni sull ubicazione del podcast sul web descrizioni e così via I registri lavorano un po come i motori di ricerca di Internet es Googl...

Page 100: ...pubblico più ampio possibile Bisogna inoltre ricordare che i registri impiegano del tempo per aggiornare gli elenchi di nuovi Podcast Registri quali iTunes potrebbero facilmente impiegare settimane prima di aggiungere il vostro Podcast ai loro elenchi Di solito viene inviata un e mail in cui si annuncia che stanno valutando il vostro Podcast per verificare se è accettabile prima di aggiungerlo Ogn...

Page 101: ... Audacity e scollegare il cavo USB Inserire quindi il cavo USB e riaprire Audacity o Verificare che il controllo VOL sul microfono USB sia impostato su un livello accettabile o Verificare lo stato del cursore di Audacity per assicurarsi che si trovi a pieno volume all estrema destra come illustrato nella figura sottostante SCARSA QUALITÀ SONORA o Se un suono registrato risulta distorto o alterato ...

Page 102: ...ONS capsule pattern cardioid sensitivity 65 5dB 1k Hz 3 0V 680 ohm frequency response 50 18K Hz S N ratio more than 59dB USB power 5 0V CONTACT e mail support ion audio com tel U S 401 658 3743 MANUAL VERSION 1 1 ...

Page 103: ......

Page 104: ...www ion audio com ...

Reviews: