background image


5


1.2. Telescope Assembly 

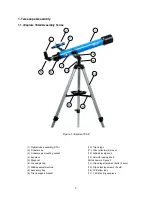
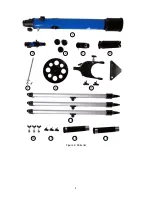
The numbers in brackets refer to the keys shown in Figure 1 & Figure 2. 


1.  Unpack and identify the components of your telescope using the list shown in previous pages. 

2.  Take the Tripod legs (#10) out of the package. Lock each one with supplied Tripod locking screws (#15).


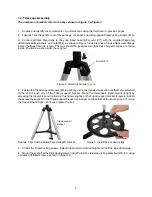
3.  Connect all three tripod legs to the yoke tripod head (AZ mount, #11) with the supplied Tripod leg 
attachment bolts, washers, and nuts (#14), as shown in Figure 3. Each leg has a hinged black metal flange 
located halfway down its length. The legs should be positioned so that these hinged flanges are facing 
inside. Position a washer under the wing nut. 


Figure 3. Attach tripod legs to york


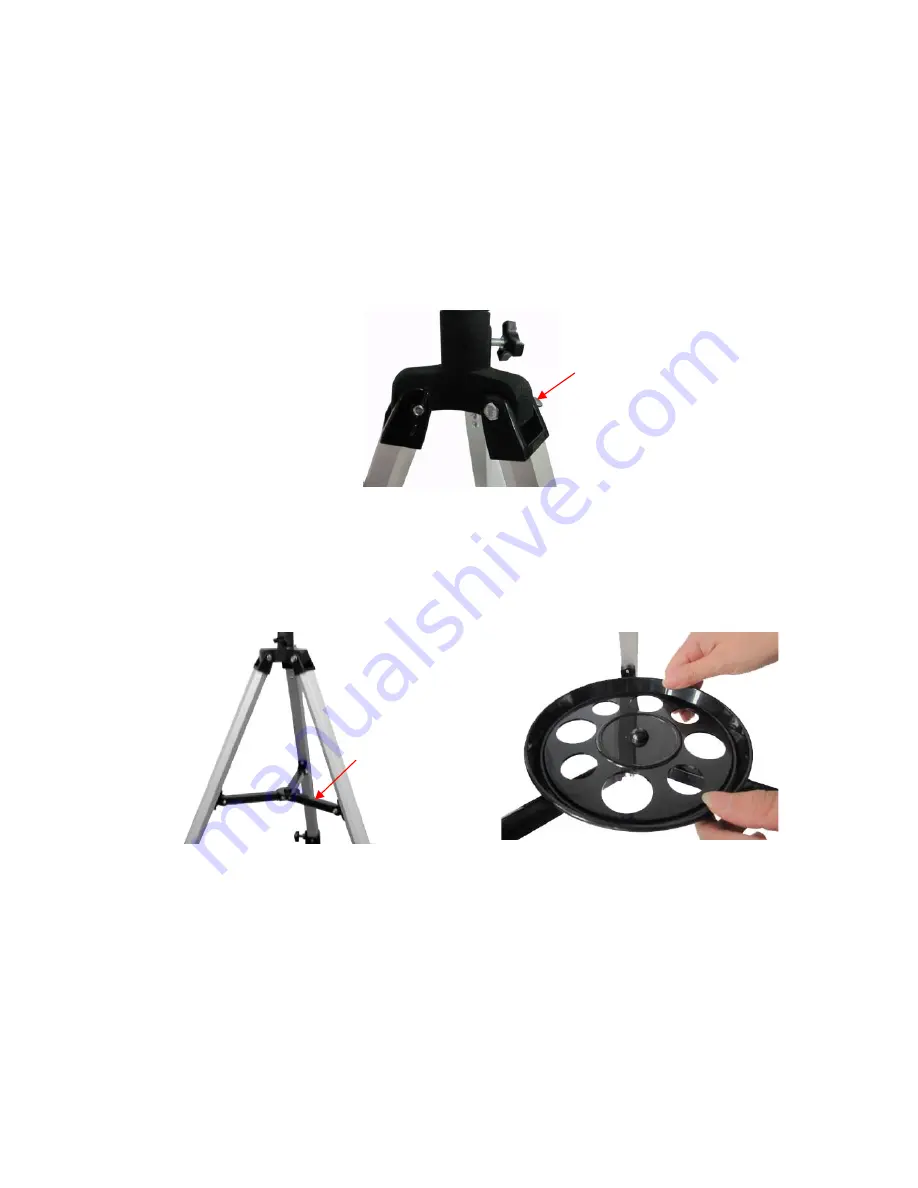
4.  Fasten the Tripod support bracket (#9) to each leg using the included bolts and nuts that come attached 
to the end of each arm of the Tripod support bracket. Stand the telescope's tripod mount upright by 
spreading the tripod's legs out uniformly. Push down slightly on the Tripod support bracket (Figure 4.) Attach 
the accessory tray (#8) to the Tripod support bracket via a screw on the bottom of the tray (Figure 5.) Turning 
the tray until hand tight – don’t over tighten the tray. 


Figure 4. Tripod with installed Tripod support bracket


Figure 5. Install the Accessory tray 

5.  Unlock the Tripod locking screws. Extend tripod legs to desired height and lock the legs afterwards. 

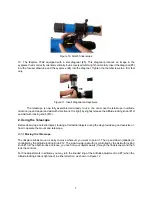
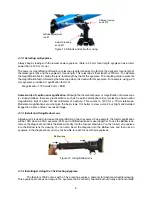
6.  Mount the eyebolt of the Altitude adjustment rod (#7) onto the telescope tube assembly (OTA, #1) using 
a supplied flathead screw, as shown in Figure 6. 

Bolt set #14 

Tripod support 
bracket 

Summary of Contents for iExplore 70AZ

Page 1: ...iExploreTM 70AZ Telescope Instruction Manual For product 6003 www iOptron com ...

Page 2: ... Installing Using the 1 5x Erecting Eyepiece 8 2 1 5 Focusing Telescope 9 2 1 6 Aligning Finderscope 9 2 2 Star Observation 9 2 3 Observation Tips 10 3 Maintenance 10 4 Technical Specifications 11 IOPTRON ONE YEAR LIMITED WARRANTY 12 WARNING NEVER USE A TELESCOPE TO LOOK AT THE SUN WITHOUT A PROPER FILTER Looking at or near the Sun will cause instant and irreversible damage to your eye Children sh...

Page 3: ...nderscope mounting socket 4 Eyepiece 5 Diagonal 6 Focusing knob 7 Altitude adjustment rod 8 Accessory tray 9 Tripod support bracket 10 Tripod legs 11 Yoke altazimuth mount 12 Altitude lockig knob 13 Azimuth locking knob Parts shown in Figure 2 14 Tripod leg attachment bolts 3 sets 15 Tripod locking screws 3 sets 16 3X Barlow lens 17 1 5X Erecting eyepiece ...

Page 4: ...4 1 2 4 5 8 10 9 11 7 14 15 16 17 Figure 2 Parts list ...

Page 5: ...legs to york 4 Fasten the Tripod support bracket 9 to each leg using the included bolts and nuts that come attached to the end of each arm of the Tripod support bracket Stand the telescope s tripod mount upright by spreading the tripod s legs out uniformly Push down slightly on the Tripod support bracket Figure 4 Attach the accessory tray 8 to the Tripod support bracket via a screw on the bottom o...

Page 6: ... knob see Figure 1 Put the Altitude adjustment rod 7 through the eyebolt as shown in Figure 8 Figure 7 Retract the Altitude locking knob Figure 8 Put the rod through the eyebolt on mount 8 Thread the two knobs one on either side of the mount through the top of the mount into the threaded holes on the OTA and tighten see Figure 9 Figure 9 Secure the OTA 9 Slide the finderscope 2 into OTA s findersc...

Page 7: ... Altitude locking knob 12 and Azimuth locking knob 13 2 Using the Telescope Before observing a celestial object looking at terrestrial objects during the day provides a good exercise on how to operate the mount and telescope 2 1 1 Moving the Telescope The iExplore Alt Az mount is easy to move wherever you want to point it The up and down altitude is controlled by the Altitude locking knob 12 The s...

Page 8: ...imit of about 2X per millimeter of aperture This comes to 140X for a 70mm telescope Moderate magnifications are what give the best views It is better to view a small but bright and detailed image than a dim unclear oversized image 2 1 3 Install and Using Barlow Lens A Barlow lens is used to increase the magnification of each eyepiece Foe example the total magnification will be 105X when a 20mm eye...

Page 9: ...Figure 14 Finderscope 3 Now objects centered with the finderscope first will be shown in the FOV of the main telescope They can be focused by turning the finderscope s threaded eyepiece The image in the finderscope will be reversed 2 2 Star Observation First of all you will need to choose an object that is easy to find The Moon or a bright star is a good target to start with 1 Slightly loose the t...

Page 10: ...t when observed at a higher altitude in the sky may benefit from far better definition and a far higher degree of contrast Furthermore air turbulence in the upper layers of the atmosphere may cause trembling to affect the view observed through the eyepiece In this case reduce the magnification factor until the picture stabilizes Keep in mind that even a small sized but bright and well defined imag...

Page 11: ... and accessories Eyepiece 4mm 12 5mm 20mm Diagonal 90º mirror 1 25 Magnification with supplied eyepiece 35X w 20mm 56X w 12 5mm 175X w 4mm Barlow Lens 3X Erecting Eyepiece 1 5X Finding Scope 5X24 Tripod Aluminum Total Weight 6 lbs Warranty One year limited May 2011 V1 0 iOptron reserves the rights to revise this instruction without notice Actual color contents specfication may differ from those de...

Page 12: ...air Further product malfunction or deterioration due to normal wear is not covered by this warranty IOPTRON DISCLAIMS ANY WARRANTIES EXPRESS OR IMPLIED WHETHER OF MERCHANTABILITY OF FITNESS FOR A PARTICULAR USE EXCEPT AS EXPRESSLY SET FORTH HERE THE SOLE OBLIGATION OF IOPTRON UNDER THIS LIMITED WARRANTY SHALL BE TO REPAIR OR REPLACE THE COVERED PRODUCT IN ACCORDANCE WITH THE TERMS SET FORTH HERE I...

Reviews: