
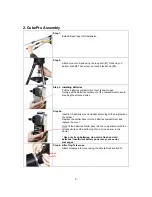


13
Select an object using
▲
or
▼
key. Then
press ENTER. Next use the arrow keys to
slew to the object until it is centered in your
eyepiece. Then press ENTER.
You may need using number keys to
change the slewing speed to make the
centering procedure easier.
4.3. Turn Off the Mount
When you are finished observing it is
recommended to return the mount to Park
Position. If the mount is not moved then no
initial set up is needed when you turn on the
mount next time. To park the telescope
press the MENU button, scroll down to
“Park Telescope” and press ENTER. Once
the telescope returns to Park Position turn
the power off.
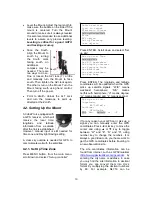
5. Use the CubePro
5.1. Manual Operation of a
Telescope
You may observe land and astronomical
objects using GOTONOVA’s arrow keys.
After the telescope was assembled
(referring to Section 2. Telescope
Assembly), flip the I/O switch on the
telescope mount to turn on the mount. Use
►
,
◄
,
▼
or
▲
buttons to point the telescope
to the desired object. You may need to use
the number keys to change the slewing
speed. Simply press a number while
slewing to change the slew speed.
5.2. Slew to an Object
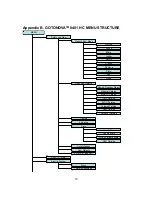
Press the MENU button. From the main
menu select “Select and Slew.” Select an
object that you would like to observe and
press the ENTER key.
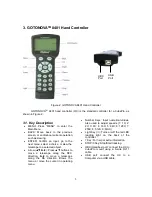
The GOTONOVA
TM
8401 hand controller
has a database of about 130,000 objects.
Use the
►
or
◄
buttons to move the cursor
and the
▼▲
buttons to change the
individual number. The check mark (
√
)
indicates the object is above the horizon,
and a cross mark (X) means it is below the
horizon. In some catalogs those stars below
the horizon will not display on the hand
controller.
5.2.1. Planets, Sun, Moon
There are 10 objects in the Solar system
catalog.
5.2.2. Deep sky objects
This menu includes objects outside our
Solar system such as galaxies, star clusters,
quasars, and nebulae.
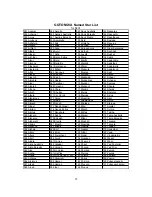
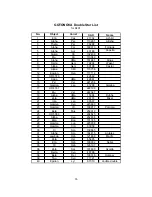
•
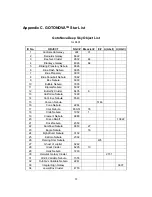
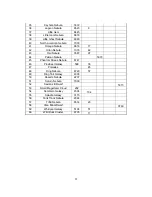
Named Deepsky Objects: consists of 60
deep sky objects with their common
names. A list of named deep sky objects
is attached in Appendix C.
•
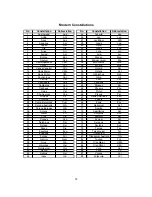
Messier Catalog: consists of all 110
objects.
•
NGC IC Catalog: consists of 7840
objects in NGC catalog and 5386 objects
in IC catalog. To select an object from
NGC or IC catalog, move the cursor to
NGC, using
▲
or
▼
button to toggle
between NGC and IC. Then move the
cursor to numerical position and use the
number button to select the object.
•
UGC Catalog: consists of 12939 objects.
•
MCG Catalog: consists of 29004 objects.
They are listed numerically from
MCG+15 to MCG-05.
•
Caldwell Catalog: consists of 109
objects.
•
Abell Catalog: consists of 2712 objects.
•
Herschel Catalog: consists of 400
objects.
5.2.3. Comets
This catalog contains up to 190 comets.
This database is customer upgradeable.


