background image

6. PRODUCT SUPPORT AND DATA RECOVERY
SERVICE

Congratulations! You are now ready to manage and enjoy all the features of your ioSafe 220+ device. For
more information regarding specific features, please check out DSM Help or refer to our online resources
available at 

iosafe.com

 or 

synology.com

.

6.1. ACTIVATE DATA RECOVERY SERVICE PROTECTION

Register your product to activate your Data Recovery Service protection plan by visiting

iosafe.com/activate

.

6.2. IOSAFE NO-HASSLE WARRANTY

If the ioSafe 220+ breaks during the warranty period, we will repair or replace it.

The standard term for the warranty is two (2) years from the date of purchase. A five (5) year extended term
warranty service is available for purchase upon activation of the Data Recovery Service. See the website
or contact 

customerservice@iosafe.com

 for help. ioSafe reserves the right to have its representative inspect

any product or part to honor any claim, and to receive a purchase receipt or other proof of original purchase
before warranty service is performed.

This warranty is limited to the terms stated herein. All expressed and implied warranties including the
warranties of merchantability and fitness for a particular purpose are excluded, except as stated above.
ioSafe disclaims all liabilities for incidental or consequential damages resulting from the use of this product,
or arising out of any breach of this warranty. Some states do not allow the exclusion or limitation of
incidental or consequential damages, so the above limitation may not apply to you. This warranty gives you
specific legal rights, and you may have other rights as well, which will vary from state to state.

6.3. DATA RECOVERY PROCEDURE

If the ioSafe 220+ faces possible data loss for any reason, you should immediately call the ioSafe Disaster
Response Team at 1-530-820-3090 option 3. You can also send an email to 

disastersupport@iosafe.com

.

ioSafe can determine the best actions to take to protect your valuable information. In some cases a
self-recovery can be performed and provide you with immediate access to your information. In other cases,
ioSafe may request that the product be returned to the factory for data recovery. In any case, contacting us
is the first step.

The general steps for disaster recovery are:

1.

Email 

disastersupport@iosafe.com

 with your serial number, product type and date of purchase. If you

cannot email, call the ioSafe Disaster Support Team at 1-530-820-3090 option 3.

2.

Report the disaster event and obtain return shipping address/instructions.

3.

Follow ioSafe team instructions on proper packaging.

4.

ioSafe will recover all data which is recoverable according to the terms of the Data Recovery Service
Terms and Conditions.

ioSafe 220+ User Manual

19

Summary of Contents for 220+

Page 1: ...ioSafe 220 User Manual ...

Page 2: ...mployee is authorized to make any modification extension or addition to this warranty In no event will CDSG or its suppliers be liable for any costs of procurement of substitute products or services lost profits loss of information or data computer malfunction or any other special indirect consequential or incidental damages arising in any way out of the sale of use of or inability to use any CDSG...

Page 3: ...llation 9 3 1 Tools and Parts for Drive Installation 9 3 2 SATA Drive Installation 9 3 3 Connecting the ioSafe 220 14 4 Install Synology DiskStation Manager 15 5 Connect and Log in to Synology DiskStation Manager 17 6 Product Support and Data Recovery Service 19 6 1 Activate Data Recovery Service Protection 19 6 2 ioSafe No Hassle Warranty 19 6 3 Data Recovery Procedure 19 6 4 Contact ioSafe Suppo...

Page 4: ...ile fully submersed underwater for up to 72 hours and in temperatures up to 1550 F for 30 minutes ensuring that your data stays protected through floods and fires 1 1 ACTIVATE WARRANTY AND DATA RECOVERY SERVICE PROTECTION Make sure to register your product to ensure you receive notices of product updates and are fully protected by our hardware warranty and Data Recovery Service if applicable Regis...

Page 5: ...and all power cords have been disconnected to prevent personal injury and damage to the hardware 2 Do not drop the product submit it to impact or pierce it 3 The circuit boards within this product are susceptible to static electricity Proper grounding is strongly recommended to prevent electrical damage to the product or other connected devices including the computer host 4 Avoid placing this prod...

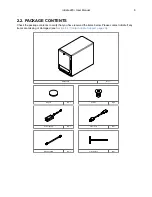
Page 6: ...received the items below Please contact ioSafe if any items are missing or damaged see Section 6 4 Contact ioSafe Support page 20 ioSafe 220 Qty 1 Magnet Qty 1 Screws Qty 9 Power Supply Qty 1 Power Cord Qty 1 Ethernet Cable Qty 1 Allen Wrench Qty 1 ioSafe 220 User Manual 6 ...

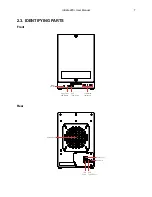
Page 7: ...2 3 IDENTIFYING PARTS Front Power Switch Copy From USB Button USB Type A Port LED Status Indicators Rear System Fan Power In USB Type A Port LAN Port 2 LAN Port 1 ioSafe 220 User Manual 7 ...

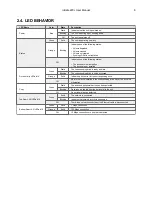
Page 8: ... ready and idle Blinking The corresponding drive is being accessed Orange Solid Indicates a drive error for the corresponding drive Off No internal drive installed in the corresponding drive bay or the drive is in hibernation Copy Green Static The attached peripheral device has been detected Blinking Data is being copied from the peripheral to the unit Off No peripheral device detected Top Rear LA...

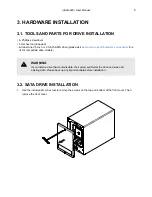
Page 9: ...are compatibility for a list of compatible drive models WARNING If you install a drive that contains data the system will format the drive and erase all existing data Please back up any important data before installation 3 2 SATA DRIVE INSTALLATION 1 Use the included 3mm hex tool to remove the screws on the top and bottom of the front cover Then remove the front cover ioSafe 220 User Manual 9 ...

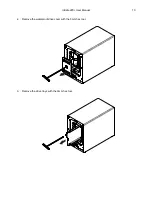
Page 10: ...2 Remove the waterproof drive cover with the 3mm hex tool 3 Remove the drive trays with the 3mm hex tool ioSafe 220 User Manual 10 ...

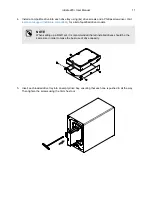
Page 11: ...list of qualified drive models NOTE When setting up a RAID set it is recommended that all installed drives should be the same size in order to make the best use of drive capacity 5 Insert each loaded drive tray into an empty drive bay ensuring that each one is pushed in all the way Then tighten the screws using the 3mm hex tool ioSafe 220 User Manual 11 ...

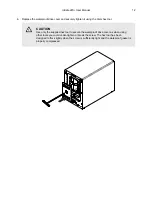
Page 12: ...se only the supplied hex tool to secure the waterproof drive cover as when using other tools you could under tighten or break the screw The hex tool has been designed to flex slightly when the screw is sufficiently tight and the wateproof gasket is properly compressed ioSafe 220 User Manual 12 ...

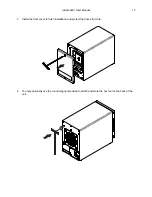
Page 13: ...ll the front cover to finish installation and protect the drives from fire 8 You may optionally use the round magnet provided to attach and store the hex tool on the back of the unit ioSafe 220 User Manual 13 ...

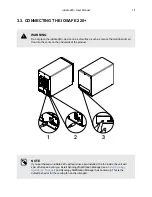
Page 14: ...ide of the product 1 2 3 NOTE If you purchased an ioSafe 220 without drives pre installed the fan inside the unit will spin at full speed until you install Synology DiskStation Manager see Install Synology DiskStation Manager and Synology DiskStation Manager has booted up This is the default behavior for the cooling fan and is intended ioSafe 220 User Manual 14 ...

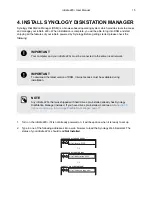
Page 15: ...ss must be available during installation NOTE Any ioSafe 220 that was shipped with hard drives pre installed already has Synology DiskStation Manager installed If you have drives pre installed continue on to Section 5 Connect and Log in to Synology DiskStation Manager page 17 1 Turn on the ioSafe 220 if it is not already powered on It will beep once when it is ready to set up 2 Type in one of the ...

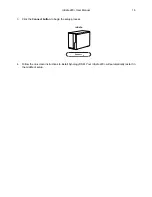
Page 16: ...he Connect button to begin the setup process ioSafe Connect 4 Follow the on screen instructions to install Synology DSM Your ioSafe 220 will automatically restart in the middle of setup ioSafe 220 User Manual 16 ...

Page 17: ...000 http server_name 5000 PURCHASED WITH HARD DRIVES PURCHASED WITHOUT DRIVES http find synology com CONNECT VIA SYNOLOGY COM OR OR IMPORTANT If you do not have an Internet connection and you purchased the ioSafe 220 without drives pre installed you will need to connect using the second method Use the server name you gave your ioSafe 220 while installing Synology DiskStation Manager see Section 4 ...

Page 18: ...hased the ioSafe 220 without drives the username and password are the ones you created while installing Synology DSM see Section 4 Install Synology DiskStation Manager page 15 ioSafe Sign In Stay signed in username password TIP You can change the username and password with the User Control Panel applet in the Synology DiskStation Manager user interface ioSafe 220 User Manual 18 ...

Page 19: ...lities for incidental or consequential damages resulting from the use of this product or arising out of any breach of this warranty Some states do not allow the exclusion or limitation of incidental or consequential damages so the above limitation may not apply to you This warranty gives you specific legal rights and you may have other rights as well which will vary from state to state 6 3 DATA RE...

Page 20: ...data with the ioSafe backup data 6 4 CONTACT IOSAFE SUPPORT Your investment in ioSafe products is backed up by our free technical support for the lifetime of the product Use the support resources on our website iosafe com support email us or give us a call Customer and Technical Support Phone 1 530 820 3090 Option 2 Email customersupport iosafe com Data Recovery Services Phone 1 530 820 3090 Optio...

Reviews: