English
- 14 -
- Apply a thin film of Magic Lube to the inside diameter of both
ends of the new filter.
- Install filter onto Tube Adaptor inside appliance.
- Make sure Plug Adaptor is inserted into Plug.
- Apply a thin film of Magic Lube on to the large Plug o-ring.
- Insert Plug o-ring into place in the appliance housing.
- Install Plug. Make sure it is fully seated down over the O-ring.
- Install snap Ring tail end first. It is very important to ensure the
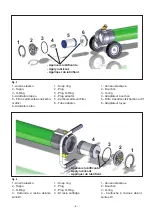
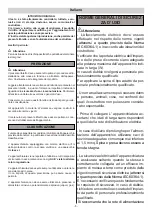
snap ring is seated all the way into its groove. (Fig. 3)
DI Resin Cartridge replacement:
- Stand the appliance up vertically or lay down on a hard surface.
- Remove Snap Ring on the Pure Water outlet end by the handle.
If snap ring is tight, push Plug down to release pressure on snap
ring. It should come out easily.
- Remove Plug. Rock plug back and forth if needed to unseat
from o-ring.
- Remove used cartridge and discard into the trash.
- Remove foil tape from the ends of the new cartridge.
- Apply a thin film of Magic Lube to the outside diameter of the
male end of the new cartridge.
- Install cartridge, female end down onto the membrane perme-
ate tube inside the appliance.
- Apply a thin film of Magic Lube on to the large Plug o-ring.
- Insert Plug o-ring into place in the appliance housing.
- Install Plug. Make sure it is fully seated down over the O-ring.
- Install snap Ring tail end first. It is very important to ensure the
snap ring is seated all the way into its groove. (Fig. 4).
Reverse Osmosis Membrane.
- Remove the worn RO membrane from the appliance, exerting
pressure on it from the wheels side and remove it from the
opposite side (handle). Discard into the trash.
- Remove the protective cover from the new RO membrane.
- Install the new RO membrane in the appliance from the wheel
side, with the pin facing pure water outlet (handle side).
STORAGE
Short term:
If unit is not to be used for 2 to 4 weeks:
- Allow unit to drain for 1 hour.
- Connect waste water hose to INLET port.
- Cover PURE WATER outlet port with a garden hose cap or
with plastic and wire tie.
- Protect from freezing and high temperatures.
Long term:
If unit is not to be use for more than 4 weeks:
- Allow unit to drain for 1 hour.
- Connect waste water hose to INLET port.
- Remove Snap Ring and Plug on the Pure Water end.
- Mix MEMstore powder in 6 quarts of cold water to create
storage solution.
- Pour solution into top of HydroTube. Allow to settle and refill
until completely full.
- Replace Plug and Snap Ring.
- Cover PURE WATER outlet port with a garden hose cap or
with plastic and a wire tie.
- Protect from freezing and high temperatures. Indoor storage
is recommended.
SCRAPPING
If you decide to stop using the equipment, you should render it
inoperative. Parts which might constitute a danger, especially to
Stopping the Equipment:
- Open PURE WATER valve at pole if installed.
- Turn water supply valve to its fully closed position.
Equipment with Pump Unit.
- Turn motor switch OFF by pressing the push button
- Disconnect water supply hose from Equipment.
- Disconnect PURE WATER hose from Equipment.
- Disconnect additional hose that may have been attached to
the WASTEWATER hose. Do not disconnect the WASTEWA-
TER hose.
- Stand HydroTube up vertically on a flat, hard surface.
- Allow water to drain from appliance for 3-5 minutes. This will
allow the high TDS concentrate water to drain out of the unit,
extending the overall life of the RO membrane.
- Connect the male end of the waste water hose to the INLET port
on the Equipment. This will keep the unit sealed up so residual
water will not drain out during transportation.
IMPORTANT.
As with all technical appliances, your equipment should always
be used according to the instructions.
MAINTENANCE
Warning
Only maintenance authorised in this booklet may be carried out
by the user. All other operations are prohibited.
Cleaning the appliance.
Do not use direct jets of water to clean the appliance. Use a
damp cloth only.
Clean all accessories thoroughly each time they are used.
Replace the Filters:
Tracking the usage of the appliance is critical as it provide the
information for replacement of the sediment/carbon block filter
and the deionizing resin cartridge DI. To ensure protection of the
reverse osmosis membrane RO and at the same time maintain
an optimal level of performance, is recommended to replace
both the sediment/carbon block filter and the DI cartridge at the
same time when one of the following condition occurs:
1)
After the appliance has processed 10000 litres of water.
Measure the water using a flow meter installed on the supply
water inlet.
2)
Every 30 hours of operation.
3)
When the total dissolved solids level (TDS) in the pure water
produced exceeds 1% of the total dissolved solids level (TDS)
in the feed water. Measure using the TDS meter provided as
standard.
Carbon/Sediment pre-filter replacement:
- Lay the appliance down horizontally on a hard surface.
- Remove Snap Ring on the inlet end by the wheels. If snap ring
is tight, push plug down (in) to release pressure on snap ring.
It should come out easily.
- Remove Plug. Rock plug back and forth if needed to unseat
from o-ring.
- Remove used filter and discard into the trash.
- Open new filter package.
- Remove the 2 rubber gaskets from the ends of the new filter
and discard.
!
Summary of Contents for APTA40008
Page 22: ......


