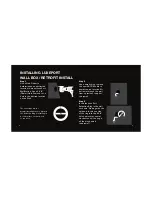
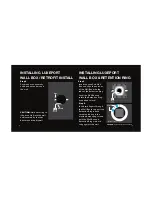
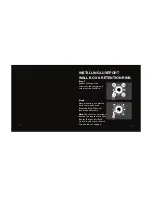
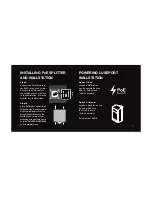
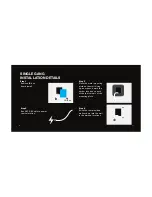
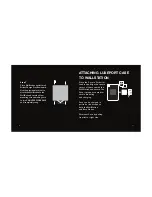
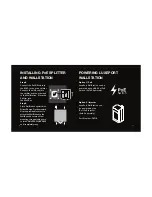
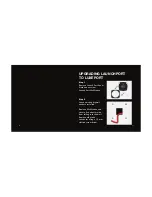
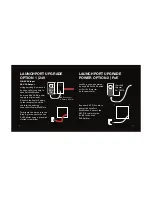
background image

32

33

UPGRADING LAUNCHPORT  

TO LUXEPORT

Step 3

Step 4

Step 5

Attach black metal 
mounting plate to the 
installed anchors.

Insert the LuxePort Wall Box 
into the Cover Plate.

Place both the Wall Box 
and Cover Plate onto the  
Mounting Plate and secure 
using provided four M4 x 
5.5 mm machine screws.

Summary of Contents for 71003

Page 1: ...WallStation Manual iportproducts com luxeport support ...

Page 2: ...re Tools Required 2 3 4 70mm Hole Saw Electric Drill Phillips Screw Driver Turn off power to eliminate risk of shock during installation 5 INSTALLATION OVERVIEW Provided in this manual are details on the 4 most common install scenarios in North America For a more detailed install matrix including Europe and the United Kingdom please visit www iportproducts com luxeport support ...

Page 3: ...d Components LuxePort WallStation 71003 Black 71004 Silver 71005 White Wire Requirements Cat5 6 Power Requirements POE Splitter Included POE Switch 802 3af or POE Injector if not using a POE Switch 70719 Sold Separately WHAT YOU NEED Stud Bay CAT5 6 Details Page 12 ...

Page 4: ...ng Wall 2 3 4 70mm Hole Saw Required Components LuxePort WallStation 71003 Black 71004 Silver 71005 White Wire Requirements Cat5 6 Power Requirements POE Splitter Included POE Switch 802 3af or POE Injector if not using a POE Switch 70719 Sold Separately Details Page 14 ...

Page 5: ... 71004 Silver 71005 White Wire Requirements 1 Cat5 6 Power Requirements POE Splitter Included POE Switch 802 3af or POE Injector if not using a POE Switch 70719 Sold Separately WHAT YOU NEED LuxePort Wall Adapter Kit Sold Separately 71006 Black 71007 Silver 71008 White 1G Wall Box CAT5 6 Details Page 22 ...

Page 6: ...e Wire Requirements Existing 2 Conductor wire OR CAT5 6 if using PoE Power Requirements POE Splitter Included 24V 1A Power Supply with 5 5 mm x 2 5mm barrel connector Sold Separately OR 802 3af PoE Switch or iPort Injector 70719 WHAT YOU NEED LuxePort Wall Adapter Kit Sold Separately 71006 Black 71007 Silver 71008 White Details Page 29 ...

Page 7: ...y secure the Cat5 6 wire to the stud for easy retrieval Prior to drywall make sure to leave enough wire to work with when the wall is complete Step 1 Measure and note the location of the stud bay the cat5 6 wire is secured to for easy retrieval after drywall is installed Step 2 Continue to the next page for installation of the LuxePort Wall Box CAT5 6 ...

Page 8: ...only Discard the Retention Ring if installing in a solid surface such as wood or concrete Step 1 Insert the LuxePort Retention Ring in the wall as shown Starting with the split end insert one side of the ring into the 2 3 4 hole and rotate counter clockwise until the ring is all the way behind the drywall Step 3 Use a wire fishing tool and run new CAT5 6 cable to power source location Or pull wire...

Page 9: ...to level Step 5 Insert two fingers through the Wall Box to support the Retention Ring in each corner and drive in the provided mounting screws until the Wall Box and Retention Ring are both snug against the wall Step 6 Position fins horizontally and bend out and around the wall Step 4 CAUTION Hold onto ring so it does not fall into the wall until secured by the tabs bent around the drywall Hold Fi...

Page 10: ...e remaining 3 corners of the Wall Box Step 7 Once mounting is complete bend the two exposed Retention Ring Tabs until they brake off cleanly Note Tabs must not protrude beyond the legnth of the Wall Box for the LuxePort Wall Station to sit flush on the wall Trim the tabs as needed Step 8 ...

Page 11: ...UNTER CLOCKWISE until completely snug Connect the Cat5 6 cable to the RJ45 jack on the splitter Connect the USB cable to the splitter and the other end to the WallStation Place the Splitter into the Wall Box POWERING LUXEPORT WALLSTATION Option 1 PoE Switch LuxePort WallStation can be powered by any 802 3af PoE Switch Sold Separately LuxePort WallStation can be powered by the iPort PoE Injector So...

Page 12: ...AT5 6 Cable to power source location Step 2 Place the metal mounting plate on the wall Using a pen or pencil mark the anchor location on each of the four corners of the mounting plate Step 3 Drive the four provided wall anchors into the wall in the marked locations Step 4 1 G Box ...

Page 13: ...d anchors using the provided mounting screws Step 5 Insert the LuxePort Wall Box into the Cover Plate Step 6 Place both the Wall Box and Cover Plate onto the Mounting Plate and secure using the provided four M4 x 5 5 mm machine screws Step 7 Continue to the next page for power information ...

Page 14: ...NTER CLOCKWISE until completely snug Connect the Cat5 6 cable to the RJ45 jack on the splitter Connect the USB cable to the splitter and the other end to the WallStation Place the Splitter into the Wall Box POWERING LUXEPORT WALLSTATION Option 1 PoE Switch LuxePort WallStation can be powered by any 802 3af PoE Switch Sold Separately LuxePort WallStation can be powered by the iPort PoE Injector Sol...

Page 15: ...aunchPort Cover Plate and unscrew LaunchPort WallStation Leave existing drywall anchors installed Remove WallStation and secure 2 conductor wire from falling into the wall Remove old green connector using a 1 5 mm slotted screw driver Step 1 Step 2 ...

Page 16: ...Plate 110 220V Input 24V 1A Output Terminate the 2 wire into the Blue 2 pin connector on the PoE Splitter using a precision slotted screwdriver LuxePort can be powered by any 802 3af PoE Switch or iPort PoE injector sold separately LAUNCHPORT UPGRADE POWER OPTION 2 PoE Run new CAT 5 6 cable to power the LuxePort WallStation Connect the CAT 5 6 cable into the RJ 45 Jack on the PoE Splitter 24V 1A i...

Page 17: ...3 Step 4 Step 5 Attach black metal mounting plate to the installed anchors Insert the LuxePort Wall Box into the Cover Plate Place both the Wall Box and Cover Plate onto the Mounting Plate and secure using provided four M4 x 5 5 mm machine screws ...

Page 18: ...nductor wire to the blue 2 pin connector fig 1 or connect the CAT5 6 cable to the RJ45 Jack fig 2 on the splitter Connect the USB cable to the Splitter and the other end to the WallStation Place the Splitter into the Wall Box Figure 1 Figure 2 24V Power Option PoE Option ...

Page 19: ...ure mounting and charging Case can be charged in portrait or landscape on both the WallStation and BaseStation Dismount Case by pulling from left or right side Step 7 Place WallStation against wall Orient Charge Pins downward Use the provided lock tool to attach the WallStation to the Wall Box and secure all four mounting screws making sure to turn COUNTER CLOCKWISE until completely snug ...

Page 20: ...2 CAUTION Use products as directed Unspecified use could result in injury CAUTION This product contains magnets Do not place in direct proximity with magnetically sensitive objects such as credit cards or exposed hard drives Persons with pace makers are not recommended to use this product Warranty can be found at iportproducts com warranty 33 7885 ...

Reviews: