background image

CM-IW100T

Instruction Manual

2

Introduction

The iPort

®

 Control Mount is an in-wall 

system that allows an iPod touch

®

 (2

nd


generation and 3

rd

 generation) to become a 

semi-permanent fixture in your home control 
system through wireless applications. Before 
installing and using the CM-IW100T, please 
read and follow all of the instructions in this 
manual carefully.

System Capabilities

:

• Delivers local-zone unbalanced audio up 

to 30 feet (9m) from the mount. Note: 

The audio system must supply volume control.

• Charges the iPod touch while it is mounted.

iPort Control Mount Box Contents:

  (1) iPort in-wall mounting system (faceplate and mounting cradle) 
   (1) Audio wall plate
  (1) Regulated power supply
  (1) Installation cut-out template
  (1) Instruction manual

Required Tools

The following tools are required to install the iPort:

• #2 Phillips screwdriver
•  Wire cutters and wire strippers
•  RJ-45 cable crimp tool and modular connectors
•  Sheet rock saw (for retrofitting into an existing wall)

Selecting an Installation Location

The  iPort  Control  Mount  is  designed  for  use  in  normal  interior  environments.  When 
selecting an installation location for the Control Mount, please consider the following:

•  Do not use the Control Mount outside or in a humid or wet environment. It is not 

waterproof or water-resistant. 

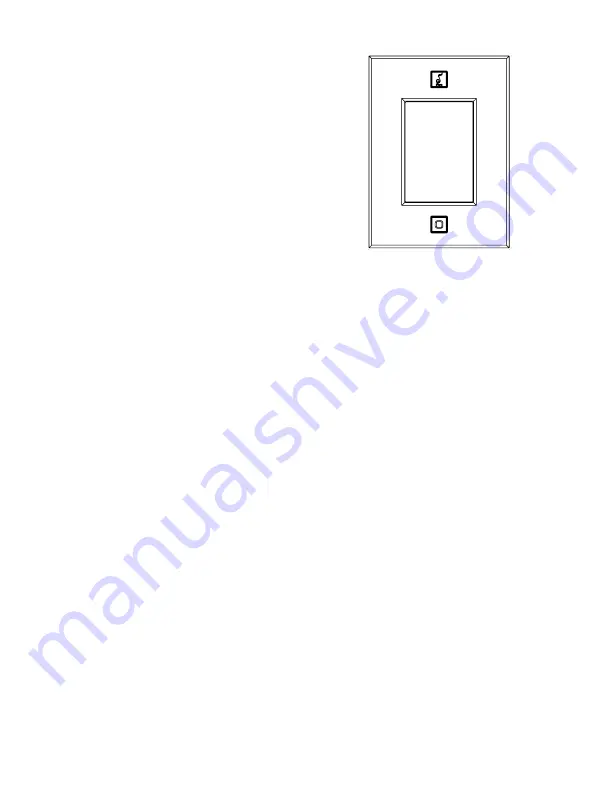
•  The  Control  Mount  cut-out  must  have  enough  depth  within  the  wall  cavity  for  the 

Control Mount and its connections.

•  The Control Mount has angled screw mounting holes on both sides that allow it to 

be installed up against a stud.

• Check for a strong Wi-Fi signal at the mounting location using the iPod touch that is 

to be installed in the Control Mount.

5.

76

0i

n

14

6.

3m

m

4.210in

106.9mm

2.

16

5i

n

55

m

m

2.

37

5i

n

60

.3

m

m

Summary of Contents for CM-IW100T

Page 1: ...Control Mount Instruction Manual CM IW100T ...

Page 2: ...d Tools The following tools are required to install the iPort 2 Phillips screwdriver Wire cutters and wire strippers RJ 45 cable crimp tool and modular connectors Sheet rock saw for retrofitting into an existing wall Selecting an Installation Location The iPort Control Mount is designed for use in normal interior environments When selecting an installation location for the Control Mount please con...

Page 3: ...through the wall between the desired locations 2 Use a stripper or knife to strip about 1 of the cable jacket off each end of the wire Be careful not to nick any of the indi vidual wires 3 Untwist the wire pairs and spread them flat Arrange them as shown in Figure 2 4 Trim the ends of the individual wires to in length making sure that they are even with each other Flatten the wires against each ot...

Page 4: ...the cut out template provided in the CM IW100T packaging Position the template where the Control Mount is to be located and pencil an outline on the wall Note Be sure to confirm the installation of the iPort at this time for either vertical portrait or horizontal landscape orientation Certain applications of the mounted iPod touch work only in one orientation so be sure to confirm the client s req...

Page 5: ...l plates or with controls such as A B speaker switches infrared receivers and volume controls if these other devices are rated as Class 2 devices according to the National Electrical Code 5 Use a stereo RCA audio cable to connect the wall plate s Audio connectors to a source input on the local zone audio system as shown in Figure 3 6 Prior to placing the mounting cradle into the wall pull a suffic...

Page 6: ...k screws 10 If there is a wall stud up against one side of the utility box that prevents one Roto Lock clamp from operating secure the box by hand driving a 1 6 drywall screw not provided through the angled hole on that side of the chassis and into the wall stud Important Do not over tighten the drywall screw 11 Connect the Cat5 cable from the wall to the RJ 45 jack on the connector board and then...

Page 7: ...y box as shown in Figure 8 15 Plug the included DC power supply into the Power connector on the wall plate and into a wall outlet as shown in Figure 3 Note To sync your iPod touch with your computer please follow the steps above in reverse order to remove the iPod touch and sync Once your synchronization is complete reinstall the iPod touch and fol low the steps to reassemble Note If landscape ori...

Page 8: ...et remains the same Note For questions regarding the touch screen functions of your iPod touch please visit www apple com To reorient the logo Remove the retaining screws and bracket from the back of the magnetic face plate rotate iPort logo to desired position and reinstall retaining bracket and screws See Figure 10 Note Do not overtighten the retaining screws Overtightening may cause face plate ...

Page 9: ...CM IW100T Instruction Manual 9 5 760in 146 3mm 4 210in 106 9mm 2 165in 55mm 2 375in 60 3mm ...

Page 10: ...th respect to the Product IN ANY EVENT IPORT SHALL NOT BE LIABLE FOR CONSEQUENTIAL INCIDENTAL ECONOMIC PROPERTY BODILY INJURY OR PERSONAL INJURY DAMAGES ARISING FROM THE PRODUCT ANY BREACH OF THIS WARRANTY OR OTHERWISE This warranty statement gives you specific legal rights and you may have other rights which vary from state to state Some states do not allow the exclusion of implied warranties or ...

Page 11: ...warranty period 2 must obtain a return merchandise number RMA and 3 deliver the Product to iPort shipping prepaid during the warranty period together with the original sales receipt invoice or other satisfactory proof of purchase from your iPort Dealer If you did not purchase from an iPort dealer you must contact your authorized seller within the warranty period and obtain instructions for obtaini...

Page 12: ...san clemente ca 888 45 iPort www iportmusic com 33 5443 ...

Reviews: