


HIL
1
–
USER
MANUAL
16
Chapter
3
Getting
Started
This
chapter
provides
a
general
overview
of
your
HIL1
and
some
basicsbefore
using
your
HIL1.
Some
of
the
features
described
in
this
manual
may
not
function
properly
if
you
use
an
operating
system
that
was
not
pre
‐
installed
by
Ipteq.
Check
the
components
Check
to
make
sure
you
have
all
of
the
following
items:
Hardware
Ipteq
HIL
1
AC
adaptor
(2
‐
pin
or
3
‐
pin)
Power
cable
Documentation
Quickstart
Guide
User
Manual
Warranty
information
If
any
of
the
items
is
missing
or
damaged,
contact
your
dealer
immediately.
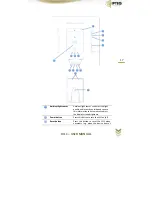
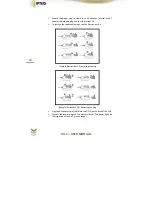
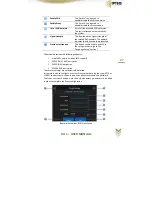
Grand
tour
Please
handle
your
product
carefully
to
avoid
scratching
or
damaging
thesurface.
The
following
figure
shows
each
important
part
of
your
HIL
1.
Summary of Contents for HIL1
Page 1: ......


