background image

Product Description of BRT-311

Page 4 of 7

Shenzhen Asia Bright Industry co., Ltd., Building 10, Asia Industrial Park, Gangtou, Bantian, Shenzhen, China.

www.a-brt.com

sales@a-brt.com.

© 2015 All rights reserved. Subject to change without notices.

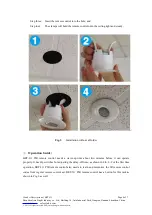
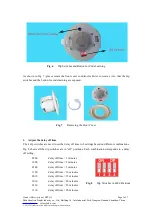
Step three: Insert the remote control into the hole; and

Step four:

The clamps will hold the remote control onto the ceiling tight and steady.

Fig. 5

Installation without a Holder

Operation Guide:

BRT-311 PIR remote control needs a warm-up time about two minutes before it can operate

properly. It has dip switches for adjusting the delay-off time, as shown in Fib. 6. For the first time

operation, BRT-311 PIR remote control also needs to learn and memorize the IR remote control

codes from regular remote control set. BRT-311 PIR remote control has a button for this task as

shown in Fig. 6 as well.

Summary of Contents for BRT-311

Page 1: ...e It can determine when a space is unoccupied and turns off the large loads such as air conditioners etc automatically by sending out IR control signals Capable of learning and memorizing infrared control codes of all kinds of appliances Adjustable delay off time from 1 minutes to 30 minutes Good for all kinds of appliances that have infrared control such as air conditioners TVs fans audios etc Ea...

Page 2: ...105mm Circular faceplate 77mm Weight 110g Wiring Diagram BRT 311 PIR remote control uses 24V DC power supply Fig 3 shows the wiring diagram Wiring must be done according to the diagram and the labeled ports of the control Fig 3 BRT 311 Wiring Diagram Installation Guide There are two ways to install BRT 311 PIR remote control to the ceiling Fig 4 and Fig 5 show the step by step installation instruc...

Page 3: ...R remote control can be easily snapped into the holder The holder is specially designed for BRT 311 PIR remote control Please talk to our sales representative when placing orders Fig 4 Installation with a Holder 2 Installation without a holder As shown in Fig 5 without a holder an opening in the ceiling needs to be made first There are four steps Step one Open a hole of 68mm in diameter in the cei...

Page 4: ...will hold the remote control onto the ceiling tight and steady Fig 5 Installation without a Holder Operation Guide BRT 311 PIR remote control needs a warm up time about two minutes before it can operate properly It has dip switches for adjusting the delay off time as shown in Fib 6 For the first time operation BRT 311 PIR remote control also needs to learn and memorize the IR remote control codes ...

Page 5: ...d the button for code learning are exposed Fig 7 Removing the Front Cover 1 Adjust the delay off time The 4 dip switches are used to set the delay off time to 8 settings based on different combinations Fig 8 shows all the dip switches are in off positions Each combination corresponds to a delay off setting 0000 delay off time 1 minutes 1000 delay off time 2 minutes 0100 delay off time 5 minutes 11...

Page 6: ...orize the IR control codes from IR remote controls sets of appliances Fig 9 Learn IR Remote Codes a Turn on power to BRT 311 PIR remote control and set dip switch 4 to ON position There is an LED flashing behind the PIR lens b Press and hold the button for code learning until the LED is constantly on c Point the regular IR remote control of appliance to the PIR lens and start to send OFF control s...

Page 7: ...tomatically turning off various loads which use IR remote controls such as lights fans appliances or other kinds of electrical equipment They are perfect for saving energy and bringing convenience and safety to our daily life and work They have wide applications at various locations such as stairwells corridors washrooms offices conference rooms in homes schools laboratories hospitals offices etc ...

Reviews: