22
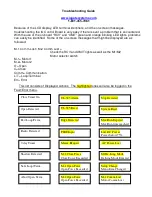
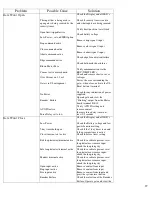
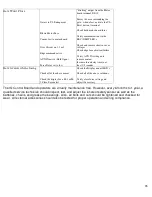
Error and Fault Log – Press Enter to View
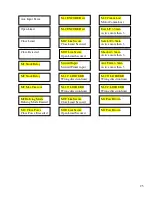
This menu will display the recent faults, errors, or important notifications as well as the time and date that
they occurred and what the recorded temperature was at that time. You may scroll left or right and view the
events as they occurred with the date and time displayed. To
exit the sub-menu
, just press the programming
knob.
Quick Start Guide: Example of an IQ-5000-S installation
The following are instructions on how to simply and quickly program an IQ controlled gate operator after it has
been mounted to concrete pad and attached to the gate.
Be sure to disconnect any magnetic or other gate locks before learning an operator
.
1. With the power and battery disconnected, attach the IQ-5000-S wires to the “Motor Control” board
according to the direction that the gate opens:
The following example is for Right Hand operation
•
The RED wire inserted in the MOTOR B terminal
•
The BLACK wire inserted in the MOTOR A terminal
•
The WHITE wire tightened into a GND terminal on the motor board
•
The GREEN / BLUE wire tightened into the ENCDR / A.C.L. terminal
•
Open and Closed limit switch wires are terminated accordingly with their commons inserted in the
GND terminals of the motor board
2. Reconnect the power and / or batteries and turn on the On/Off switch on the side of the control box
3. Disconnect the RJ45 Ethernet cable from the Display board
4. Push and hold the “OPEN” manual override button on the motor control board and manually adjust the
open limit
5. Push and hold the “CLOSE” manual override button on the motor control board and manually adjust the
close limit
6. Reconnect the RJ45 Ethernet cable to the Display board
7. Set the appropriate date and time
8. Scroll to the “Motor Drive Menu” and select “Number of Operators” = 1, and then select “IQ Gate” as the
Operator “IQ”. Scroll all the way clockwise and “Exit the sub-menu”
9. Scroll to “IQ Gate Learning” and press the programming knob.
10. Scroll to and select “Enter for Motor 1”
11. The display will read “Use ‘Radio’ to learn Close Count”, press the programming knob and the
programming
*
will be displayed at the right. At this point, press the RADIO button on the display board.
If the gate is not opened, it will begin to. Once the gate is fully opened, it will stop, a series of relays will
click, and then the gate will start to close. The gate speed might slow down at some point during closing.
This is normal and will assist in accurate placement of the gate in the closed position. When the gate
reaches your desired closed position, press the RADIO button again. At this point the gate will stop and
reopen. When the gate is fully opened and the relays quit activating, press the RADIO button once
more. When the RADIO button is pressed this final time, the programming
*
will disappear and the gate
will close to your selected position and stop.
Error and Fault Log
Press Enter to view


