background image

3) The New Pi- 

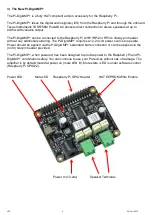
The Pi- is a fully HAT compliant add-on accessory for the Raspberry Pi.  

The Pi- takes the digital audio signals (I2S) from the Raspberry Pi and through the onboard 
Texas Instruments TAS5756M PowerDAC delivers direct connection to stereo speakers at up to 
2x35w with variable output. 

The Pi- can be connected to the Raspberry Pi A+/B+/RPi2 or RPi3’s 40way pin header 
without any additional soldering. The Pi- requires a 12-24 volt power source to operate. 
Power should be applied via the Pi-’s standard barrel connector or can be applied via the 
(no fit) two pin header provided. 

The Pi-, when powered, has been designed to provide power to the Raspberry Pi and Pi-
 combination safely. You can continue to use your Pi devices without risk of damage. The 
amplifier is by default muted at power on (mute LED lit). Mute state / LED is under software control 
(Raspberry Pi GPIO22). 

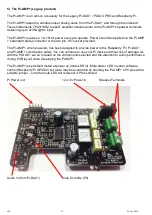
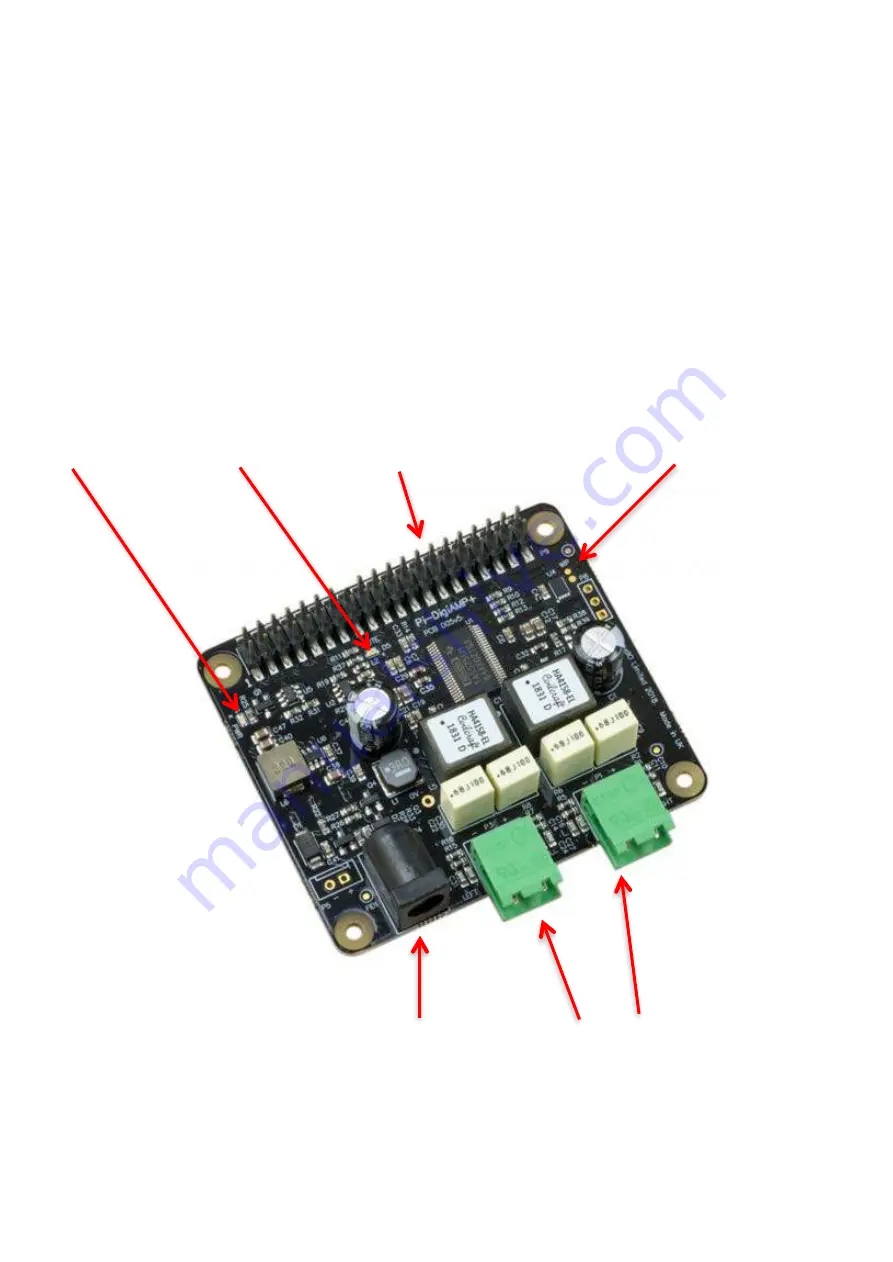
Power LED   

Mute LED 

Raspberry Pi GPIO Header   

HAT EEPROM Write Enable 


Power In (12-24v)   

Speaker Terminals


v28 

=  


24-Oct–2018 

9

Summary of Contents for PI-AMP+

Page 1: ...n and usage of IQaudIO audio cards for the Raspberry Pi If you would like to see additional information within this document please email us at info iqaudio com v28 IQaudIO Limited Company No 09461908...

Page 2: ...12 Configuring Linux Raspbian to include sound card support 13 Checking audio is working through the IQaudIO sound card 14 Advanced troubleshooting 15 Controlling the Pi AMP or Pi DigiAMP s Mute Un mu...

Page 3: ...and others are more suited to the Pi Zero form factor We also have accessory boards that either act as accessories to our sound cards or can be used standalone such as the CosmicController Pi DAC Pi...

Page 4: ...erry Pi Each IQaudIO sound cards has a specific purpose is designed for specific use cases Select the board that best integrates with your existing HiFi equipment If you don t have any existing equipm...

Page 5: ...enting out the dtparam audio on device tree parameter in your boot config txt file by placing a at the start of the line saving the file and rebooting dtparam audio on What s Headless Many of the soft...

Page 6: ...iTunes Below LivingRoom and Snug are both RaspberryPi running Shairport sync Other headless applications install a web server onto the Pi so to control it you simply open a browser window on your PC...

Page 7: ...g file over to the Pi Err no Doing this will just store the img file on the SD card The Pi needs the SD card to be formatted in a particular way to allow it to boot start up and run Don t worry there...

Page 8: ...nnectors The PI DAC also via the Texas Instruments TPA6133A headphone amp supports the direct use of headphones via the Pi DAC s 3 5mm audio jack The Pi DAC can be connected to the Raspberry Pi s 40wa...

Page 9: ...al soldering The Pi DigiAMP requires a 12 24 volt power source to operate Power should be applied via the Pi DigiAMP s standard barrel connector or can be applied via the no fit two pin header provide...

Page 10: ...ed Differential out in parallel to Phono RCA line level output It also includes the IQaudIO Headphone amp The Pi DAC PRO can be connected to the Raspberry Pi A B RPi2 or RPi3 s 40way pin header withou...

Page 11: ...ided The Pi AMP when powered has been designed to provide power to the Raspberry Pi Pi DAC and Pi AMP combination safely You can continue to use your Pi devices without risk of damage As with the Pi D...

Page 12: ...h the onboard Wolfson Cirus Logic WM8804 delivers Optical TOSLINK and isolated electrical SPDIF connection to an external DAC The Pi Digi can be connected to the Raspberry Pi A B RPi2 or RPi3 s 40way...

Page 13: ...Headphone daughter card for the Pi DACZero which can be mounted above the DACZero to give an amplified headphone output in parallel The Pi DACZero and Pi DACZeroHeadphone boards are powered from the...

Page 14: ...cted to the Raspberry Pi s 40way pin header without any additional soldering The Pi DAC is normally supplied along with 4x 12mm PCB spacers and 8x M2 5 screws You may want to use a 30way right angled...

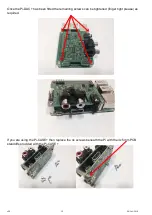
Page 15: ...fitted the remaining screws can be tightened finger tight please as required If you are using the Pi CASE then replace the 4x screws beneath the Pi with the 4x 5mm PCB standoffs provided with the Pi...

Page 16: ...ormal way You should see that the Raspberry Pi and the Pi DAC both have power LEDs this indicates that the power is successfully being applied to the Pi DAC You can now remove power and reconnect any...

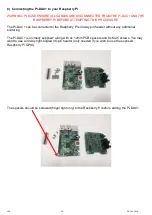
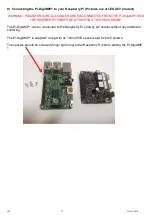
Page 17: ...AND THE RASPBERRY PI BEFORE ATTEMPTING THIS PROCEDURE The Pi DigiAMP can be connected to the Raspberry Pi s 40way pin header without any additional soldering The Pi DigiAMP is supplied along with 4x 1...

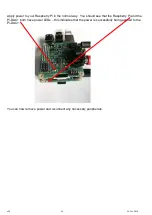
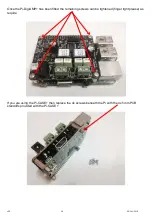
Page 18: ...een fitted the remaining screws can be tightened finger tight please as require If you are using the Pi CASE then replace the 4x screws beneath the Pi with the 4x 5mm PCB standoffs provided with the P...

Page 19: ...C supply The Power supply s output connector should be inserted into the Pi AMP s DC input terminal marked P4 Only then should the Power supply s AC input be plugged into the mains When power has been...

Reviews: