background image

1

IQeye Alliance-pro Series

Vandal-resistant IP Camera

Installation and Operating Instructions

Summary of Contents for IQeye Alliance

Page 1: ...1 IQeye Alliance pro Series Vandal resistant IP Camera Installation and Operating Instructions...

Page 2: ...s 6 7 Removal of Dome Cover and Camera Assembly 7 8 Install Interior Mounting Plate 8 9 Connect Camera 8 10 Camera Positioning Field of View Set up and Focus 10 11 Reboot and Factory Restore 12 12 Clo...

Page 3: ...E IQA3xNX and IQA3xWX Series Alliance Dome Alliance Dome Camera Assembly and Back Box NPT Plug Torx T 20 Security Wrench Weather Gasket Dome Camera Tether Assembly Mounting Hardware Mounting Template...

Page 4: ...camera Analog output to assist with setting the field of view The auto tracking shroud automatically aligns during setup and installation of the camera The integrated 3 axis gimbal allows for mountin...

Page 5: ...3xWI Series a Alliance Mounting Plate b Alliance Camera Lens c Alliance Shroud d Alliance Dome Cover Assembly IQA3xNE IQA3xWE IQA3xNX and IQA3xWX Series a Alliance Exterior Back Box b Alliance Camera...

Page 6: ...talling the Alliance pro dome camera outdoors the camera should not be installed directly to a wall surface and should avoid exposure to direct sunlight When mounting outdoors to a wall surface the IQ...

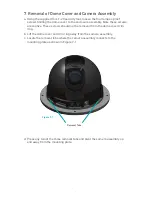
Page 7: ...screws are captive These screws should not be removed from the dome cover trim ring b Lift the dome cover and trim ring away from the camera assembly c Locate the removal tabs where the camera assembl...

Page 8: ...tile use hardware designed to secure the camera assembly to such a surface and ensure the ceiling tile being mounted is secure In addition follow local regulations and laws which may have specific re...

Page 9: ...ns can be connected to either terminal as shown in Figure 9 2 NOTE Using a power source with specifications other than those defined will damage the camera and will void the product warranty 2 Power o...

Page 10: ...at a time back through the pass through hole f Snap the camera assembly into the mounting ring by sliding one of the removal tabs under the lip of the mounting ring and firmly pivoting the other two...

Page 11: ...ld of view and focused To change the zoom and focus settings browse to the camera s home page and go to the Setup Zoom Lens tab See Figure 10 2 For more information see section 14 e The Alliance pro i...

Page 12: ...ied make sure all adjustment screws and locks are firmly tightened b Remove the analog test monitor RCA connection if used c Close the shroud by pivoting it back against the camera while being careful...

Page 13: ...a IP address will need to be configured using either IQfinder or IQmanager depending on the number of cameras being installed a Insert the IQtools CD in the CD drive of the PC The IQfinder installatio...

Page 14: ...and DHCP will cause the camera to reboot d To view a camera double click a camera entry or highlight a camera in the list and click the Web Page button Figure 13 3 The Live page will be displayed thr...

Page 15: ...nd the default password is system f To prepare the camera to serve the H 264 stream select H 264 from the video drop down Figure 13 5 To view the H 264 stream full screen without Live page controls do...

Page 16: ...nd is automatically focused The zoom controls are as follows Sets the lens to the full wide field of view Moves the zoom position toward the wide field of view Moves the zoom position toward the telep...

Page 17: ...Zoom Focus Position Information The zoom focus position information window provides the following status to the user See Image 14 2 a Focus Status Indicates if the lens is currently in focus or out o...

Page 18: ...18 NOTES...

Page 19: ...19 NOTES...

Page 20: ...20 33122 Valle Road San Juan Capistrano CA 92675 4853 USA phone 1 949 369 8100 fax 1 949 369 8105 www iqeye com 901 0278 Rev E...

Reviews: